This is a "found" opportunity and is much more difficult than it seems. It exposes the limitations of shooting from the hip, automated features. It demands that one investigate new parts of the craft. This is not a matter of "tips and tricks." It is a matter of skills; it has all been done before.
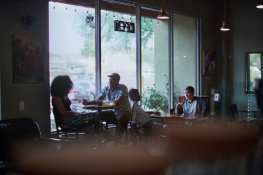
There are at least 2, maybe 3, kinds of tungsten light (orange), with sky light (blue) from the left window. The light from the door (yellow) is bounced off of the warm-colored building across the street coming through a yellow plastic lamination. It is just inside the dynamic range of the sensor. The light is much cooler from the transom. The shaded windows in the back do little to illuminate the room but will have a color. In any case you will have myriad color crossovers no matter what you do.
If you add a flash to will add yet another color, blue. Further, the light direction will change and fall-off will cause the scene to be lit unevenly. A simple "filter" will not even everything out. 81A will only make things even warmer. That could be okay, as Matt has demonstrated, as a matter of style.
I suggest that you filter for the dominant light, tungsten, and let the other light fall where it may. All of the tungsten-lit surfaces and lamps will appear more neutral. However, the bar, being lit by the window, will go blue. The door will settle some but will still be very bright. It also might help to come on a clear sunny noon day; that would bring ambient external light into a more neutral color range, eliminate hard direction from the windows and close the ratios overall.
I hear that you want to avoid developing (post processing) the image but I do not understand why. In this capture I would use Lightroom to bring down the highlights, adjust the general brightness, and work with the color temperature. Even better, shooting in RAW, place a gray card in the scene and shoot with and with out the card. and key on that to set your neutral color balance in Lightroom. Apply that key to your overall shot. You can do something similar in Photoshop: Command M, pick the middle dropper on the bottom of the wind, then click on "neutral color "surfaces to see what you might get.
All that said, you might not light-color neutrality but it is a great place to start.


