• Welcome to Photrio!
    Registration is fast and free. Join today to unlock search, see fewer ads, and access all forum features.
    Click here to sign up

Change M601 bulb socket - problem??

Tree Farm

H
Tree Farm

  • 0
  • 0
  • 31
A long time ago...

A
A long time ago...

  • 0
  • 0
  • 76

Forum statistics

Threads
201,211
Messages
2,820,494
Members
100,589
Latest member
rando
Recent bookmarks
1

aca

Member
Allowing Ads
Joined
Jul 13, 2016
Messages
72
Location
Amsterdam
Format
35mm
Hello all,

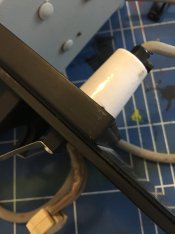
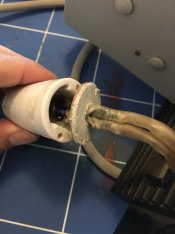
One of the enlargers got a piece of the bulb stuck into the socket. The holder itself also got a nasty crack, my questions
- can I replace the white bulb "holder / socket"? I don't see any screws and I am not familiar with this socket
- any tips how to get the little piece of bulb out of the socket?

IMG_6697.JPG IMG_6699.JPG

ps; I am not the person replacing the bulbs, are there any do an don'ts while replacing the bulb? As I don't want this to happen when I must replace the bulbs / lamps
 
Last edited:

Ian C

Member
Allowing Ads
Joined
Feb 8, 2009
Messages
1,293
Format
Large Format
The socket & lead set shown in the photo should be replaced. The socket and the two insulated leads are permanently assembled in manufacture.

If you have the Durst M601 dichroic color head, it takes the 12-volt 100-Watt 2-pin GZ6.35 base, MR-16 reflector EFP lamp.

Thus, you need a GZ6.35 2-pin ceramic base socket & lead set. Here is an example. The shape of the ceramic block varies among the various makers, but should not be a problem.

https://www.distrelec.biz/en/bulb-socket-g6-35-gx6-35-gz6-35-bender-wirth-881-12301/p/13380037

Many different suppliers can be found via Internet search. Some of these are priced exorbitantly. Others are reasonably priced.

Shop for a reasonable price before ordering. It might be useful to search the Internet for suppliers in your area. Use the search string “GZ6.35 socket” in Google or whatever search engine you prefer. If you have more than one of these machines to maintain, it is a good idea to purchase several replacement sockets for future use when needed.
 
Last edited:

AgX

Member
Allowing Ads
Joined
Apr 5, 2007
Messages
29,972
Location
Germany
Format
Multi Format
Mill-out, then grind-out (to save the milling tool) the two rivets, disassemble the socket and remount it with two machine-screws and nuts and wavy locking washers.

HOWEVER your socket is cracked. Exchange it completely.
 

AgX

Member
Allowing Ads
Joined
Apr 5, 2007
Messages
29,972
Location
Germany
Format
Multi Format
Furthermore, the fact that the lamp pin got stuck makes the respective connector springs already questionable. This already should make you consider exchanging the socket. At low voltages connector resistance is critical and may lead to voltage decline.
 
OP
OP

aca

Member
Allowing Ads
Joined
Jul 13, 2016
Messages
72
Location
Amsterdam
Format
35mm
The socket & lead set shown in the photo should be replaced. The socket and the two insulated leads are permanently assembled in manufacture.

If you have the Durst M601 dichroic color head, it takes the 12-volt 100-Watt 2-pin GZ6.35 base, MR-16 reflector EFP lamp.

Thus, you need a GZ6.35 2-pin ceramic base socket & lead set. ........

Shop for a reasonable price before ordering. It might be useful to search the Internet for suppliers in your area. Use the search string “GZ6.35 socket” in Google or whatever search engine you prefer. If you have more than one of these machines to maintain, it is a good idea to purchase several replacement sockets for future use when needed.

Thanks Ian for the great explanation + information, I will search for a supplier in my area.

Do yo have any manual / description how to remove / replace the socket as a whole?
 

Attachments

  • IMG_6700.JPG
    IMG_6700.JPG
    780.9 KB · Views: 83
OP
OP

aca

Member
Allowing Ads
Joined
Jul 13, 2016
Messages
72
Location
Amsterdam
Format
35mm
Furthermore, the fact that the lamp pin got stuck makes the respective connector springs already questionable. This already should make you consider exchanging the socket. At low voltages connector resistance is critical and may lead to voltage decline.

Exchanging the socket is the next thing for me to do, thanks.
I am now in search for the right socket and how to get the socket out..

Regards,
 

AgX

Member
Allowing Ads
Joined
Apr 5, 2007
Messages
29,972
Location
Germany
Format
Multi Format
Yes, see my dismantling proposal as ad-hoc solution just to keep the enlarger running until you got spares.
 

Ian C

Member
Allowing Ads
Joined
Feb 8, 2009
Messages
1,293
Format
Large Format
The socket replacement procedure varies from model to model. Some socket leads terminate in loop-type terminals that attach to a screw post. Others have a solder-joint. You have to do some disassembly to see what must be done to replace the socket & lead set on your Durst M601 dichroic head.
 
OP
OP

aca

Member
Allowing Ads
Joined
Jul 13, 2016
Messages
72
Location
Amsterdam
Format
35mm
Yes, see my dismantling proposal as ad-hoc solution just to keep the enlarger running until you got spares.
hmm, i am not quit getting your dismantling proposal, drilling will make the socket crack even more. (fortunatly I got another enlarger working ok)

At the moment I have dissamble until the following photo, but i expected some kind of easier "plug + play" when I have found a new socket with the 2 threads. Somehow the 2 threads are not "loose", wondering if I can just replace the socket

ps: meanwhile I am also putting a local ad for an incomplete burst m601, who knows I might get a good head +bulb, as this seems to be more then just "changing a light bulb" :wink:
 

Attachments

  • IMG_6702.JPG
    IMG_6702.JPG
    753.9 KB · Views: 130

Arvee

Member
Allowing Ads
Joined
Aug 23, 2006
Messages
976
Location
Great Basin
Format
Multi Format
It is highly probable that you will not find a new replacement socket. It is possible that you could find another unit to salvage the socket as a replacement.
If it were my problem, I would drill out the rivets, separate the cracked half and clean the inner surfaces, epoxy (clear Gorilla glue or equivalent) and clamp the two pieces tightly together until completely cured. While the two halves are apart, you should be able to remove the broken pin and clean/re-tension the connector receptacles. As mentioned above, reassemble using the appropriate machine screw with nut.
 
Photrio.com contains affiliate links to products. We may receive a commission for purchases made through these links.
To read our full affiliate disclosure statement please click Here.

PHOTRIO PARTNERS EQUALLY FUNDING OUR COMMUNITY:


Ilford ADOX Freestyle Photographic Stearman Press Weldon Color Lab Blue Moon Camera & Machine
Top Bottom