R Shaffer
Member
Hi All,
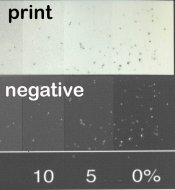
Got a problem I can't figure out. Prior to printing there are no spots on the negative. After printing there are spots on the negative & print. See attached.
I'm spirit sensitizing with acetone and allowing the tissue to dry for 4 hours, no fan.
Any ideas? Are the tissues just not dry?
I don't see this in the body of the print, but it is quite evident in the step wedge at the bottom. I am getting a bit of blistering, but I think I just need to use dead water. These are digital negs.