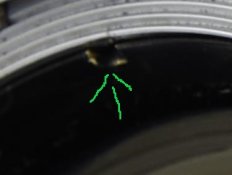
Can anyone tell me what this mottled coating in taking lens on my Rollei 2.8e Planar lens is?

$12.66

A
$12.66

  • 3
  • 2
  • 51
A street portrait

A
A street portrait

  • 0
  • 0
  • 98
A street portrait

A
A street portrait

  • 1
  • 1
  • 84
img746.jpg

img746.jpg

  • 5
  • 0
  • 85
No Hall

No Hall

  • 1
  • 3
  • 82

Recent Classifieds

Forum statistics

Threads
198,794
Messages
2,780,974
Members
99,706
Latest member
Ron Harvey
Recent bookmarks
0

Golden1245

Member
Joined
Jun 27, 2020
Messages
2
Location
san francisco
Format
Medium Format
Hello everyone, new to the forum. Excited to learn more! Recently acquired a Rolleiflex 2.8E Planar. Can anyone tell me what this mottled pattern on the inside of the front element is? I took the lens apart discovered that it's not on the rear element, which is pristine, but actually on the inside of the front element, I can't seem to get to it.

It doesn't look like seperation or fungus to me, but more like coating degradation or oxidation. Or is it just oil? The lens looks crystal clear except from an extreme angle and thats when you can notice it. I actually didn't notice it until I had the camera for a few weeks. I lit this photograph in a way that shows the mottled look in a pronounced way, otherwise you wouldn't even realize it's there.

It doesn't affect my photographs even in bright sun (i rarely shoot into the sun though so I don't know if it will hurt flare resistance) though but was wondering if it will start to if it gets worst and affect image quality in a few more years.

Thank you for your help!


_J5A2067.jpg
 

shutterfinger

Member
Joined
Feb 25, 2013
Messages
5,020
Location
San Jose, Ca.
Format
4x5 Format
Being its on the inside of the lens front cell I suspect its haze/gassing out of lubricants in the shutter.
Did you notice the notches in the trim ring?
ScreenShot_20200627173801.jpeg
There will be a second one 180° from this one. Put a lens spanner in the slots and unscrew the trim ring to remove the front element.
In the event the trim ring contacts the housing then the front trim plate of the camera will need to be removed.

Fungus looks different.
 
OP
OP

Golden1245

Member
Joined
Jun 27, 2020
Messages
2
Location
san francisco
Format
Medium Format
Being its on the inside of the lens front cell I suspect its haze/gassing out of lubricants in the shutter.
Did you notice the notches in the trim ring?
View attachment 249269
There will be a second one 180° from this one. Put a lens spanner in the slots and unscrew the trim ring to remove the front element.
In the event the trim ring contacts the housing then the front trim plate of the camera will need to be removed.

Hey Shutterfinger, thanks for the reply. I actually did take out the entire front element group, I meant that it's not on the rear glass of the front element, but rather in the middle of the front lens of the front element. Like it's not on the surface of the 1st element, not on the rear glass of the front element, but in the middle of the 1st element. It also doesn't look like fungus damage as the camera is in absolutely top mint condition except for this wierd area of the lens.
 

shutterfinger

Member
Joined
Feb 25, 2013
Messages
5,020
Location
San Jose, Ca.
Format
4x5 Format
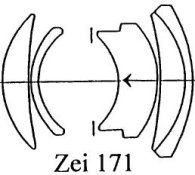
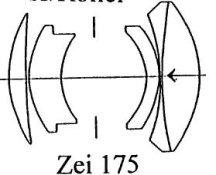
Ok, your lens is one of these
ZEI 171.jpeg ZEI 175.jpeg
Light travels the direction of the arrow, the | is the position of the shutter and aperture blades.
Download https://drive.google.com/file/d/1yavVANy-hVm4V6Ug5RuqjR2rTf4-xL-l/view?usp=sharing
Read the introduction as it contains the information needed to use the manual.
Use a chisel tip hobby knife and peel up the leather from the front of the camera face plate. Remove the six screws holding the face on. Disconnect flash socket, cable release socket according to the manual instructions. The levers for flash sync, shutter speed, aperture dials do not come off from the front but they have to be set to B and 2.8 if I remember correctly. There may be brass shims that look like washers between the front plate and its mount points so exercise care during removal. Once the front plate is off the front cell unscrews from the shutter and the rear element of the front cell retainer ring will be accessible. Assembly is reverse of removal. reattach the leather covering with Pliobond contact cement https://www.ebay.com/itm/PLIOBOND-P...467978&hash=item365b793cce:g:1SIAAOSwLABeGhJh which dries flexible. Apply to one surface only and attach while wet.
OR
send it to me for lens cleaning.
 

JPD

Member
Joined
Mar 24, 2007
Messages
2,155
Location
Sweden
Format
Medium Format
Hey Shutterfinger, thanks for the reply. I actually did take out the entire front element group, I meant that it's not on the rear glass of the front element, but rather in the middle of the front lens of the front element. Like it's not on the surface of the 1st element, not on the rear glass of the front element, but in the middle of the 1st element. It also doesn't look like fungus damage as the camera is in absolutely top mint condition except for this wierd area of the lens.

When you unscrewed the front components you probably took out both the first and second groups and not just the front element. Yoy could see the shutter blades when you removed the lens components, right?

It looks like coating damage. The matte grey is where that lens surface has lost its coating. The shapes of those areas make me guess that the lens once had fungus, and those marks were left after the fungus had been removed. You can see the brass of the front element retaining ring notches from when someone used a lens spanner to unscrew it.
 

AgX

Member
Joined
Apr 5, 2007
Messages
29,973
Location
Germany
Format
Multi Format
Looks like corrosion of the anti/reflection coating. Not necessarily of effect.
 

JPD

Member
Joined
Mar 24, 2007
Messages
2,155
Location
Sweden
Format
Medium Format
Ok, your lens is one of these
View attachment 249270 View attachment 249271
Light travels the direction of the arrow, the | is the position of the shutter and aperture blades.
Download https://drive.google.com/file/d/1yavVANy-hVm4V6Ug5RuqjR2rTf4-xL-l/view?usp=sharing
Read the introduction as it contains the information needed to use the manual.
Use a chisel tip hobby knife and peel up the leather from the front of the camera face plate. Remove the six screws holding the face on. Disconnect flash socket, cable release socket according to the manual instructions. The levers for flash sync, shutter speed, aperture dials do not come off from the front but they have to be set to B and 2.8 if I remember correctly. There may be brass shims that look like washers between the front plate and its mount points so exercise care during removal. Once the front plate is off the front cell unscrews from the shutter and the rear element of the front cell retainer ring will be accessible. Assembly is reverse of removal. reattach the leather covering with Pliobond contact cement https://www.ebay.com/itm/PLIOBOND-P...467978&hash=item365b793cce:g:1SIAAOSwLABeGhJh which dries flexible. Apply to one surface only and attach while wet.
OR
send it to me for lens cleaning.

If he can remove the front lens groups, like he did before, there is no need for him to remove the front of the camera.
 

NB23

Member
Joined
Jul 26, 2009
Messages
4,307
Format
35mm
Looks like the coating... but you’ll know best.

I have noticed that, while all the 3.5 rolleiflexes have very stable lenses that age well, a lot of 2.8 rolleiflexes have problematic taking lenses. Delamination is quite comon amongst the 2.8 series.
 
Photrio.com contains affiliate links to products. We may receive a commission for purchases made through these links.
To read our full affiliate disclosure statement please click Here.

PHOTRIO PARTNERS EQUALLY FUNDING OUR COMMUNITY:


Ilford ADOX Freestyle Photographic Stearman Press Weldon Color Lab Blue Moon Camera & Machine
Top Bottom