I haven't prepared a tutorial but here goes.
First of all you'll likely want a panchromatic b&w film for best results; I use tmax. Acros would be fine, but compare spectral sensitivity charts and see what that tells you. I suppose you could decide whether you want a low or high contrast developer but truth be told I use tmax developer with tmax and I use ID11 1+1 on just about everything else, and xtol now and then.
You can simply sandwich the slide to the b&w neg and contact print, but I prefer to enlarge the slide to the b&w film so that I can contact print a larger b&w neg. Any way you slice it, you'll be enlarging at one step anyway. I personally prefer the final print to come from a contact print, whenever possible, because I like matte fiber which has issues with flatness.
Bear in mind that if you do decide that you want to contact print the b&w neg, you'll want to do so emulsion side down. That means that you need to flip your slide in the enlarger so that when you flip your b&w neg...
Exposure is easy, I treat the film just like paper... only with the safelight off

Just expose in test strips, toss the film in the developer and off you go. If you want to get fancy you can make yourself an exposure versus development matrix by first exposing strips and then cutting the sheet into perpendicular strips and then developing those for different times. Thus you can pinpoint the best exposure/development combo. But why not "K.I.S.S." the first time.
The exposure through the slide will be pretty quick... maybe seconds. Until you get the hang of it, why not stop down the enlarger to f/16 or so and test a wide range of exposures.
Small tips... it's pretty hard to focus the slide, for reasons I mentioned above. But be patient and don't resort to stopping down the enlarger lens excessively or else you'll soften the dupe neg.
The dupe neg can be retouched, what fun. The neg can of course also be Se toned if you feel you need a bit more contrast. Or you can deliberately overexpose your b&w neg and reduce it back with farmer's reducer. Just have fun. Time spent doing this is time not spent at a computer
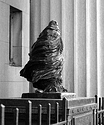
Here is one of my results, to give you an idea. I started with a poorly exposed 35mm astia slide. The slide was overexposed:
(there was a url link here which no longer exists)
Please notice three things: the overexposure on his back, the tad of motion blur (also evident along his back). It was shot quickly with an om-1 that I hadn't used in a while, what can I say, I screwed up a bit. Anyway please also notice that the focal plane is perpendicular to the lens-subject axis.... just as it is for pretty much any 35mm shot. This process I am describing is akin to re-photographing a photograph... so you can go to town and apply tilts, if you fancy.
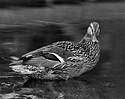
Now the analogue b&w conversion. Not my best result to date, but here it is:
(there was a url link here which no longer exists)
The tonality is quite strong, yes? Doesn't have to be but in this case it was what I was after. The highlight and the unintentional blur sort of evokes halation, maybe. I applied a wee bit of lens tilt in the enlarger, to make the focus a little bit more selective... look at the foreground rock at right and at left.
Just experiment and have some good, clean, analogue fun
P.S. Consider also contact printing your 4x5 velvia slide to fuji fp100c and doing an emulsion lift.... fun for the whole family...