Allen Friday
Member
- Joined
- Mar 30, 2005
- Messages
- 882
- Format
- ULarge Format
Buulf Cameras: Thinking outside the box.
An earlier post requested photographs of homemade cameras. Here are photographs of my homemade or home modified ultra-large format cameras. I call them Buulf Cameras: Butt Ugly Ultra-large Format. If you are into fine wood working, lots of brass and traditional design, I suggest you close this thread now.
My design for the Buulf cameras came out of my frustration with my traditional field cameras in 11x14 and 7x17. My 11x14 Wisner is a very well made camera, which I like in most respects. But, it is not stable and free from vibration with long lenses, e.g. 890mm, and it has limited movements. My 7x17 Korona was old, the focus rails had given out and it was a PITA to use in a vertical orientation. I set out to design a camera that would be easy to use, easy to build--I.e. very little wood working and using off-the shelf parts, and one that I could use by myself in the field. The Buulf camera is what I came up with.
The photos below and in the gallery show the Buulf Cameras in 7x17, 12x20 and 16x20.
Photo 1 shows the component pieces: tripod, front standard, rear standard, 7x17 camera (modified Korona), 12x 20 camera (modified Korona) and 16x20 camera (completely homemade). I also have a 20x24, which is very similar to the 16x20, so it is not pictured.
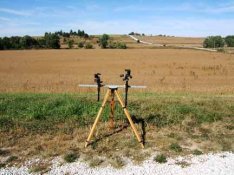
Photo 2 show the hardware assembled. I set up the tripod, attach the monorail, and slide on the front and back standards. Note that I have three rails which I carry in my car, 24, 48 and 60. I choose the shortest rail which I think I will need. If I have to carry the camera a long distance, I strap the rail to the tripod with bungee cords and pack the standard and camera body in a back pack or wheeled cart.
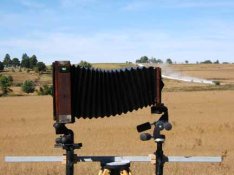
Photo 3 shows the 7x17 body attached to the standards in horizontal orientation. The camera body attaches by tripod head quick release plates. To change to a vertical orientation, I release the plates, flip the camera 90 degrees and reattach.
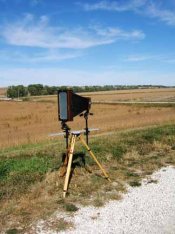
Photo 4 shows the 7x17 body in vertical orientation.
Photo 5 shows the 7x17 with some movements. I have found that the practical limits on movements are from the lens and bellows, not from the hardware.
Photos 6-8 will be put in the technical gallery. I am learning new technology here, so be patient with me if it takes a little while.
Photo 6 shows the 12x 20 in horizontal set. Note that the same rail, front and back standard are used for all the cameras.
Photo 7 shows the 12x20 in vertical set.
Photo 8 shows the 16x20. My brother in law John Pottebaum is included to provide scale. He is 6 tall in case you were wondering.
With this design, I can focus from the back of the camera--a major problem with really big cameras.
We just started harvest this week, so my responses to comments may be sporadic. But I look forward to your comments.
Allen
An earlier post requested photographs of homemade cameras. Here are photographs of my homemade or home modified ultra-large format cameras. I call them Buulf Cameras: Butt Ugly Ultra-large Format. If you are into fine wood working, lots of brass and traditional design, I suggest you close this thread now.
My design for the Buulf cameras came out of my frustration with my traditional field cameras in 11x14 and 7x17. My 11x14 Wisner is a very well made camera, which I like in most respects. But, it is not stable and free from vibration with long lenses, e.g. 890mm, and it has limited movements. My 7x17 Korona was old, the focus rails had given out and it was a PITA to use in a vertical orientation. I set out to design a camera that would be easy to use, easy to build--I.e. very little wood working and using off-the shelf parts, and one that I could use by myself in the field. The Buulf camera is what I came up with.
The photos below and in the gallery show the Buulf Cameras in 7x17, 12x20 and 16x20.
Photo 1 shows the component pieces: tripod, front standard, rear standard, 7x17 camera (modified Korona), 12x 20 camera (modified Korona) and 16x20 camera (completely homemade). I also have a 20x24, which is very similar to the 16x20, so it is not pictured.
Photo 2 show the hardware assembled. I set up the tripod, attach the monorail, and slide on the front and back standards. Note that I have three rails which I carry in my car, 24, 48 and 60. I choose the shortest rail which I think I will need. If I have to carry the camera a long distance, I strap the rail to the tripod with bungee cords and pack the standard and camera body in a back pack or wheeled cart.
Photo 3 shows the 7x17 body attached to the standards in horizontal orientation. The camera body attaches by tripod head quick release plates. To change to a vertical orientation, I release the plates, flip the camera 90 degrees and reattach.
Photo 4 shows the 7x17 body in vertical orientation.
Photo 5 shows the 7x17 with some movements. I have found that the practical limits on movements are from the lens and bellows, not from the hardware.
Photos 6-8 will be put in the technical gallery. I am learning new technology here, so be patient with me if it takes a little while.
Photo 6 shows the 12x 20 in horizontal set. Note that the same rail, front and back standard are used for all the cameras.
Photo 7 shows the 12x20 in vertical set.
Photo 8 shows the 16x20. My brother in law John Pottebaum is included to provide scale. He is 6 tall in case you were wondering.
With this design, I can focus from the back of the camera--a major problem with really big cameras.
We just started harvest this week, so my responses to comments may be sporadic. But I look forward to your comments.
Allen