Burning with a cut-out mask

Brentwood Kebab!

A
Brentwood Kebab!

  • 1
  • 1
  • 55
Summer Lady

A
Summer Lady

  • 2
  • 1
  • 66
DINO Acting Up !

A
DINO Acting Up !

  • 2
  • 0
  • 42
What Have They Seen?

A
What Have They Seen?

  • 0
  • 0
  • 57
Lady With Attitude !

A
Lady With Attitude !

  • 0
  • 0
  • 50

Forum statistics

Threads
198,771
Messages
2,780,643
Members
99,701
Latest member
XyDark
Recent bookmarks
1

albada

Subscriber
Joined
Apr 10, 2008
Messages
2,172
Location
Escondido, C
Format
35mm RF
Today, using thick paper, I cut out the shape of an area to be burned -- the bright sun-lit concrete floor of an outdoor pavilion. I burned the floor while holding this mask close to the paper. It worked well because it avoided burning objects on the pavilion. But how many of you go to all this trouble just for a burn? I sometimes wonder if I'm unable to do things the easy way, such as masking a burn with my hands like everybody else.

Mark Overton
 

Sirius Glass

Subscriber
Joined
Jan 18, 2007
Messages
50,359
Location
Southern California
Format
Multi Format
I have done that in the past and it can cause halos. If you cut the mask a little smaller, that helps. I have learned that using hand shaded masks, film masks or digital masks [using PhotoShop for example] will work better but to be done right the masks you need a way to align the masks with location pins in a negative carrier. After having this knowledge for over two year I ordered a 4"x5" carrier from Lynn Radeka which is on back order. I would rather have a 6x6 carrier but I have not found a vendor for one. Suggestions for locating a 6x6 carrier are welcome.
 

MattKing

Moderator
Moderator
Joined
Apr 24, 2005
Messages
52,889
Location
Delta, BC Canada
Format
Medium Format
Never hesitate to consider using a combination of burning and dodging to replace just burning (or just dodging).
And a slightly smaller print cut appropriately makes a great burning or dodging mask.
 

mshchem

Subscriber
Joined
Nov 26, 2007
Messages
14,633
Location
Iowa City, Iowa USA
Format
Medium Format
I've done it and it works great. I made a portrait over 20 years ago of my dear departed mother. Sunlight was streaming in a bay window and illuminated her white hair. I bet I burned that spot 3 or 4 stops more than the rest. The portrait is hanging on my wall. Polywarmtone, selenium toning. Beautiful picture. No substitute for hands on printing.
 

Hilo

Subscriber
Joined
Apr 19, 2011
Messages
918
Format
35mm
But how many of you go to all this trouble just for a burn? I sometimes wonder if I'm unable to do things the easy way, such as masking a burn with my hands like everybody else.

Mark Overton

It is very good you think about, and create, your own solutions. There is no one way. Analog printing is often a struggle or a fight. It is typical of today's world to see that as negative. I have always seen that as a positive. Because in the end, when you've been at it long enough, it will become part of your photographic identity.
 
  • AgX
  • Deleted

AgX

Member
Joined
Apr 5, 2007
Messages
29,973
Location
Germany
Format
Multi Format
I have done that in the past and it can cause halos. If you cut the mask a little smaller, that helps. I have learned that using hand shaded masks, film masks or digital masks [using PhotoShop for example] will work better but to be done right the masks you need a way to align the masks with location pins in a negative carrier. After having this knowledge for over two year I ordered a 4"x5" carrier from Lynn Radeka which is on back order. I would rather have a 6x6 carrier but I have not found a vendor for one. Suggestions for locating a 6x6 carrier are welcome.

I thought the classic way is not masking at or near the film stage, but near the paper. Either in the unsharp zone above the paper. (Jobo made an easel attachment for this.) Or by cutting a mask at the easel plane and moving it during exposure.
 

Helge

Member
Joined
Jun 27, 2018
Messages
3,938
Location
Denmark
Format
Medium Format
My guess is that underexposed lith or tech film would make a perfect mask for highlights.
Problem is of course as always, alignment. And how to extract partway through the exposure without disturbing the film.
 

Nicholas Lindan

Advertiser
Advertiser
Joined
Sep 2, 2006
Messages
4,243
Location
Cleveland, Ohio
Format
Multi Format
Over the years I have accumulated a lot of bits and bobs of cardboard in various shapes that I use for burning/dodging. I often put several of them together with paper clips to make a mask.

I also use a cut-out smaller print as mask. Lower the head 2", make the mask print and then hold it 2" above the easel when printing. Great use for old fogged paper.

"We never do anything nice and easy" - T. Turner
 

Sirius Glass

Subscriber
Joined
Jan 18, 2007
Messages
50,359
Location
Southern California
Format
Multi Format
I thought the classic way is not masking at or near the film stage, but near the paper. Either in the unsharp zone above the paper. (Jobo made an easel attachment for this.) Or by cutting a mask at the easel plane and moving it during exposure.

Both are viable. The first, the Classic, is what I have used. Making masks is newer, at least to me, and can allow fine tuned dodge and burn that is repeatable for making many copies consistently the same as an added feature.
 
OP
OP

albada

Subscriber
Joined
Apr 10, 2008
Messages
2,172
Location
Escondido, C
Format
35mm RF
Over the years I have accumulated a lot of bits and bobs of cardboard in various shapes that I use for burning/dodging. I often put several of them together with paper clips to make a mask.
I also use a cut-out smaller print as mask. Lower the head 2", make the mask print and then hold it 2" above the easel when printing. Great use for old fogged paper.
Both of these are good ideas! I hadn't thought of either. Time to keep some paper-clips in the darkroom.
You could also put a wood block under the easel to raise it about 2", but then you'd need to recompose the photo after removing the block. Anyway, making masks is also a great use of Foma paper. :surprised:
"We never do anything nice and easy" - T. Turner
"We always do it nice and rough" -- I remember that song!

Mark Overton
 

Pieter12

Member
Joined
Aug 20, 2017
Messages
7,594
Location
Magrathean's computer
Format
Super8
I use cut-out masks all the time for both dodging and burning. I don't hold them too close to the paper, and keep them in constant motion to avoid obvious masking halos or lines. Also, I find that by gluing a sheet of white and a sheet of black pastel paper back-to-back, it is stiff enough to hold its shape and easy enough to draw on the white side in order to cut out your shape. You can see your negative projected on the white side and the black side will not reflect back extraneous light to the print.
 

MattKing

Moderator
Moderator
Joined
Apr 24, 2005
Messages
52,889
Location
Delta, BC Canada
Format
Medium Format
Over the years I have accumulated a lot of bits and bobs of cardboard in various shapes that I use for burning/dodging.
For decades I had in my darkroom a cut out of my grade 10 math teacher's head taped on the end of a thin wooden skewer.
I used it originally to dodge a print I made of a school scene she was in where her face required a bit of lightening, and it turned out to be a good dodging tool for similar purposes for a really, really long time!
 

Bill Burk

Subscriber
Joined
Feb 9, 2010
Messages
9,299
Format
4x5 Format
I always keep a sheet of black and white paper in the work area.

I glue good quality art paper to black construction paper.

When doing a complicated burn/dodge I cut out a rough, but smaller, shape of what I am going for. Then I clip it into one of my dodgers which is a piece of wood with piano wire sticking out. The very end is a small spring-like coil the paper fits into. Most of the time the dodger is a half-inch by one inch oval. But special shapes are easy to dream up.

I had bad luck with a ‘mosquito’ but thought it was very clever. The lapel of my best friend’s tux wasn’t white enough so I cut a piece of paper the shape of the lapel. Dropped it on the paper. Let it dodge the allotted time, then swatted it off. It worked but left too crisp an outline.
 

Sirius Glass

Subscriber
Joined
Jan 18, 2007
Messages
50,359
Location
Southern California
Format
Multi Format
Dodging with small or larger cutouts on a wand are easy and I have those tools, but I have to cut holes in cardboard for burning. I do not have a set of commercially burning holes.
 

Craig75

Member
Joined
May 9, 2016
Messages
1,234
Location
Uk
Format
35mm
Always admire the people who can do complicated burns and dodges with their hands. That's proper skills.

I can do a series of basic ones but some people are like shadow puppeteers under the enlarger
 
OP
OP

albada

Subscriber
Joined
Apr 10, 2008
Messages
2,172
Location
Escondido, C
Format
35mm RF
Has anyone tried putting one or more masks on a sheet of glass, and holding it above the paper being exposed? That would let you dodge multiple areas. If the glass sat on a frame above the easel, you could align the masks accurately, and the distance above the paper would blur mask-edges a little, feathering them into the base image. Would this work?
 

Pieter12

Member
Joined
Aug 20, 2017
Messages
7,594
Location
Magrathean's computer
Format
Super8
Has anyone tried putting one or more masks on a sheet of glass, and holding it above the paper being exposed? That would let you dodge multiple areas. If the glass sat on a frame above the easel, you could align the masks accurately, and the distance above the paper would blur mask-edges a little, feathering them into the base image. Would this work?
I should work, but it will still leave obvious dodging/burning shapes on the print just blurry ones. Not the same a moving the masks. I do wonder sometimes when I want to burn a sky if I used a bit of frosted material attached to a black board if I could darken the sky without bringing out as much grain. I guess I'll have to try it out.
 
OP
OP

albada

Subscriber
Joined
Apr 10, 2008
Messages
2,172
Location
Escondido, C
Format
35mm RF
I should work, but it will still leave obvious dodging/burning shapes on the print just blurry ones. Not the same a moving the masks.
I think I see what you mean: If the area being dodged has no sharp edges, such as the shadow-side of a face, then moving the mask creates a large blur and hides the mask. But if an area has sharp edges, then a large blurred dodge will look poor because the interior of the area will be lighter than on/near the edges. I guess a sheet of glass would work for both if one moves the glass when there are no sharp edges. Or maybe not. As Pieter12 wrote, "I guess I'll have to try it out."

Also, I think glass shifts the image slightly, so the base exposure would need to be done through the glass to avoid double-lines everywhere.
 

Craig75

Member
Joined
May 9, 2016
Messages
1,234
Location
Uk
Format
35mm
I would have thought that if you have multiple complicated dodges it would be better to sort out initial exposure time to replace them with burns
 

Sirius Glass

Subscriber
Joined
Jan 18, 2007
Messages
50,359
Location
Southern California
Format
Multi Format
I would have thought that if you have multiple complicated dodges it would be better to sort out initial exposure time to replace them with burns

Any way it is done, it is a learned art. One cannot take one class or read one book and master it.
 

M Carter

Member
Joined
Jan 23, 2013
Messages
2,147
Location
Dallas, TX
Format
Medium Format
My biggest tip for burning with cards? Use duplex paper (black one side, white on the other). It's expensive but you can make it with a can of spray mount, black poster board and white printer paper. You can see the negative image - even if it's blurred by height - and align things much more easily. If you find a specific height works well, stack some books on the easel to that height, project the neg on the white side, and draw the main shapes if the image with a sharpie. Makes it even easier to align the thing (you do have to remove the books, they're just to hold the card steady while you draw on it).

Tip #2 - keep a scrap of red lighting gel handy. If you're doing a 10 second burn, set your timer for 14 seconds, and hold the card with the gel over the hole. Hit the timer and you have 4 seconds to align things, then just slide the gel away with your thumb. You can make very precise burns this way. (An audible enlarger with a foot switch is, of course, a monster upgrade for this kind of work).

I have a pin registered masking setup and I can create soft masks with it, but I still use cards for many things.
 
OP
OP

albada

Subscriber
Joined
Apr 10, 2008
Messages
2,172
Location
Escondido, C
Format
35mm RF
Below is a photo of the Nubble Lighthouse submitted to Photrio a while ago by ColColt (David Fincher). ColColt has not posted to Photrio in five years, so I can't ask him the following question, so I'll ask you:
How did he create a high-contrast foreground and low contrast background? If he used a mask, he did a great job because the detail of the bush and the outline of the woman are contrasty with sharp edges, so alignment must have been perfect. Although the power-pole on the left is half low-contrast and half high-contrast. I could not have come close to this print using burn/dodge cut-out cards.
ColColt-DavidFincher.jpg


Or was this a hazy day?

Mark Overton
 

MattKing

Moderator
Moderator
Joined
Apr 24, 2005
Messages
52,889
Location
Delta, BC Canada
Format
Medium Format
Don't discount the possibility of this photo being shot with a long lens on a hazy day.
 

Vaughn

Subscriber
Joined
Dec 13, 2006
Messages
10,079
Location
Humboldt Co.
Format
Large Format
I'll second atmospheric distance of a sunny coastal day...perhaps wise non-use of a yellow (etc) filter.

I had my own way of printing my 16x20 prints from 4x5 negatives. More for the enjoyment as a way of creating than anything else. Test strips and a full-size work print got me to the base exposure and contrast (graded paper), and importantly, a good look at the image itself and where I wanted to take it. I rarely dodged, but my base exposure would be on the light side with the idea to eventually bring the whole print up through burning. I had to be careful at this stage and not abandon an image because it has not rung true yet...most did but some needed to be coaxed out.

I saw the white paper below the lens of the enlarger as a slab of marble that became darker as I chisled deep into it with light...I used boards with a hole to chisel (burn) small areas at a time. My base exposures were often around 20 seconds and I had that on the timer. I would then perhaps do edge/corner burning, then spend the next 5 to 15 minutes hitting the timer button and continously burn in 20 second intervals. I would process the print thru the fixer, take it out of the darkroom and study it for several minutes, plan my next changes, then go back in the dark and print it again...and repeat as needed over a period of ten hours, give or take a couple hours. What a joy! I don't think I'd actually recommend it to anyone.

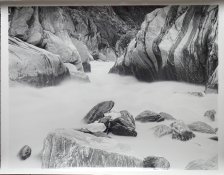
This print took a light touch. The negative was exposed with a red filter to lengthen the exposure (very little color in the scene) and I thought of trying to bring the water and the rocks close together in feeling when I made the exposure. The speed of the water shooting out from the base of the glacier behind me said otherwise once I got into the darkroom, and I enjoyed working with the negative and image to make the print.
 

Attachments

  • NZRiver.jpg
    NZRiver.jpg
    305.9 KB · Views: 91

NB23

Member
Joined
Jul 26, 2009
Messages
4,307
Format
35mm
Basically, I only burn. Dodging is always too iffy to me.
I use 2 same cardboards: one with a small hole, another with a big hole. And my hands.
 
Photrio.com contains affiliate links to products. We may receive a commission for purchases made through these links.
To read our full affiliate disclosure statement please click Here.

PHOTRIO PARTNERS EQUALLY FUNDING OUR COMMUNITY:


Ilford ADOX Freestyle Photographic Stearman Press Weldon Color Lab Blue Moon Camera & Machine
Top Bottom