• Welcome to Photrio!
    Registration is fast and free. Join today to unlock search, see fewer ads, and access all forum features.
    Click here to sign up

Burning in skies with complicated horizons

Cigar again

H
Cigar again

  • 1
  • 0
  • 23
Rainy Day Trees

A
Rainy Day Trees

  • 8
  • 1
  • 116

Recent Classifieds

Forum statistics

Threads
203,166
Messages
2,850,766
Members
101,705
Latest member
kyuut
Recent bookmarks
0

El Gringo

Subscriber
Allowing Ads
Joined
Oct 20, 2006
Messages
147
Location
Wales
Format
Medium Format
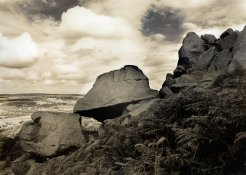
I'm not that experienced with darkroom intricacies but I thought I was getting better as far as dodging and burning go, until I came to the attached image. I can't for the life of me burn in the sky (which needs an extra 10 secs on top of the base exposure) without leaving the bright halos around the edge of the two main rock formations.

In my latest attempts I have cut a bit of card in the same shape as the line between the sky and the rest of the scene and have got slightly better results than before, but I;m still not happy. Is there something I am doing wrong or do I just need more practice with this kind of thing?
 

Attachments

  • balancedrock8x10small.jpg
    balancedrock8x10small.jpg
    231.9 KB · Views: 413
You might try flashing the paper which affects the highlights with little impact on mid-tones and shadows.
 
perhaps try cutting out the shape of the foreground, but slightly smaller.... I would imagine, and from my experience, that when you mask an area thats exactly the same size it will create the halos. Try out cutting a shape maybe 1-2cm smaller than the area to be masked and then slightly move it around while the 10sec burning is going on.

that may help limit the haloing.
 
Are you moving the card during the exposure? It looks like you just placed it over the paper and left it during the exposure.
 
burning a complicated area

I don't know if there is any scientific validity but I usually burn the backgrounds first and depending on effect often with a lower contrast filter, and then the main exposure. It seems to over print any of my errors in the edges of the back ground burn
 
I think you'll get the best result with the pre-flashing technique. There are a number of threads here on APUG that discuss it, and other web resources as well as books that go into that technique. Another thing you can try is to divide up the area that needs burning in into segments, and do your burn in multiple steps. Something else some people try is to fully develop the print (ie give the print even a bit longer than you're used to - 3 mins instead of 2, etc), then before fixing, have a tray of full-strength developer sitting by, and swabbing full-strength (non-diluted) developer onto the areas you need to bring out. Let that sit for another two to three minutes, then rinse, stop, and fix as normal. You can also warm up the second developer tray so the chemistry is even more active. Don't run it too hot or it will exhaust itself in the tray.
 
One option is to make a contrast mask in register with the negative. Donald Miller has done quite a bit of this and discusses it in some threads (search on "contrast mask"). Ctein offers a good discussion of the procedure in his book _Post-Exposure_.

One of the reasons I like albumen printing, is that it is self-masking and handles just this sort of situation easily. Albumen is a bit labor intensive, but any printing-out process, like Centennial POP or Ziatype has this property. You don't mention what format the original negative is, but it wouldn't be too difficult to get a packet of Centennial POP and try it out. If the original is too small, you can make an enlarged negative on ortho film by first making an enlarged interpositive as you would make a print (maybe a little darker than you would print), and then contact print the interpositive to another sheet to make the enlarged negative. It could take a couple of tries to get the contrast right in the enlarged negative for POP, but the results should prove worth the effort.
 
Try stopping down the lens to increase overall exposure time then b&d. This will give you a smoother transition.

Doyle
 
Rest the card on a thick book (or even two) when you draw the outline before cutting around it. That will compensate for the cone of light that centres on your enlarging lens. If you draw it on the baseboard, it won't natch when you hold it above the paper at the right height for dodging.
 
I also find that split-filter techniques with multigrade paper cut down a bit on the amount of b and d that must be done. There are several threads discussing this technique.
 
All of the suggestions mentioned thus far will help with your problem. If you decide to do masking (which I believe to be the most precise) you will need some way of registering the mask that you make with either the camera negative or the projected image.

If your enlarger does not registration capabilities you can still arrange to mask the projected image. I would make the mask to be a burn mask and followed with an exposure through an unsharp mask.

The burn mask can be made from ortho lith film (such as Freestyle's APHS film) by doing a mask of the projected image.

The first generation mask from the projected image will be an interpositive of your camera negative and by contact printing this mask with the enlarging paper while you are projecting the image onto the enlarging paper, it will serve to block the foreground exposure allowing you to burn the sky down very precisely.

This burn mask would be remove following the burning of the sky and then the unsharp mask would be placed in registration with the enlarging paper and
the unsharp mask would then be printed through while you finish the exposure. This unsharp mask will serve to defocus the boundaries of the burn mask.

The registration of the baseboard materials can be accomplished by using registration pins such as those mfg by Milton Bergman company (if they are still in business...if not a graphics supply house should be able to help you).

The developer for this film can be Dektol. I use 1-10 for the high contrast and high density masks such as burn masks. For unsharp masks you can use Dektol 1-30 for the low density and unsharp masks. You will want a peak density of about .15 to .35 for the unsharp mask. For the burn mask you will want as much density and contrast as the material will provide. In the burn mask you should have no density in the sky and peak density in the foreground.

This will give you perfect results...a bit of work but for a great image where only the best will suffice, it is well worth the effort.
 
There are always a number of different methods to deal with the complicated issues involved in making a finished print and there are a number of good suggestions here for you to try before you find the way that best suits you.

When I'm faced with such a problem I generally employ several different procedures. I always break the area being burned in into small sections and use a very pliable piece of card held as near as I can get it to the enlarger lens. This provides a softened edge of light down at baseboard level. This softened edge reduces the amount of light hitting the paper in the area were the sky meets the rocks in the image you posted. This is also the area where the unwanted halo occurs. The trick is to use that softened edge to straddle the area where the two elements meet, and not to be afraid to allow some light to fall on to the part of the image you are holding back. I also use quite a lot of random movement of the card during the burning in process so that there is no chance of an obvious line occuring.

To see the effect that I describe, without a piece of photo paper on the baseboard switch on the enlarger with the negative in the carrier and project the image on to the baseboard. Hold the card near to the baseboard partially covering the image and note how sharp the edge is. Move the card to near the enlarging lens, again covering part of the projected image, and note the softened edge that I describe.

When faced with burning in skies I sometimes use a small dodger and during the main exposure hold back along the horizon where it meets the sky to allow for overspill when burning in the sky. In effect, taking out exposure to allow for putting it back during the burn. Clearly, you need to practise this but I find if you run the dodger contiunously along the horizon during most of the exposure it helps solve the problem. I should explain that the dodger I refer to is a small piece of card on the end of some flower arranging wire about 1 inch long and 1/2 an inch wide.

It has also been suggested that if using VC paper burning in with a softer grade helps which is quite correct because soft grades produce a more even exposure than do harder grades.
 
Dear Rhys,

To deal with your situation, the first thing I try to do is scan a print and print it out half size (or so) on heavy paper. I cut the profile out with a ragged edge and then hold the mask by hand during exposure. Obviously, this method has its limitations and difficulties.

Neal Wydra
 
Without wishing to appear flippant about it, maybe no-one had given enough weight to one very important item - a large waste bin for the rejects.

Even with the tips mentioned good B&D is an art that needs a lot of practice but it seems to me from the photo that you are already getting there. Tim Rudman in fact mentions the waste bin in his book " The Photographer's Master Print Course where he gives an illustrated example of how its done using most of the tips already given plus some - with the exception of Donald Miller's contrast/unsharp masking.

It's a simple, bland picture of some rocks on a moor which he amazingly transforms into something quite dramatic.

Worth getting the book for this alone. Best of luck

pentaxuser
 
Thank you all for the suggestions and in-depth explanations of certain techniques, it is very much appreciated. I'll give them a try and see which works best for me.

I do need a bigger bin in the darkroom though, its already full.
 
actually.. you are almost there... just need to work with your technique a bit... it takes a bit of practice.. and can be pretty frustrating. I always have just used a sheet of cardboard roughly shaped to the area needed. The halo thing will go away with some practice. The key is to keep things moving and use the image on the cardboard as a guide as mentioned earlier as well as breaking it up into sections also mentioned earlier.. btw... I am new as you can probly tell.. so if I am repeating things I apologize..
 
I know this doesn't help with the image you're working on now, but my solution was to avoid the sky-burning issue altogether by shooting with yellow/orange/red filters so that the sky is already dark when I print. In the vast majority of cases I don't have to burn the sky at all.
 
I know this doesn't help with the image you're working on now, but my solution was to avoid the sky-burning issue altogether by shooting with yellow/orange/red filters so that the sky is already dark when I print. In the vast majority of cases I don't have to burn the sky at all.

Wouldn't those filters only work if the sky was blue? I have a recent landscape of a field on a cloudy day. The base exposure for the paper was 8 seconds, and then I burned in the sky for another 30 or so (about 4 stop difference). It was very dramatic and beautiful (if only I had remembered to check the focus in the field on the left side) I don't think a filter does anything for all clouds, but I have been wrong before.

- Justin
 
I would use a very long exposure to be confortable with burning. Begin with the rocks with some card then use the hands to burn the sky. Always in motion, hands give me a lot more flexibility than card. At the end only the overall exposure. This tends to avoid any zone which are more susceptible to come if you burn at the end of the exposure.
Anyway, each one has his own trick and habits.
Regards,
G.
 
About the bin in the darkroom...
Some day everything is great and every print comes out good. Some day every print goes to the trash. In that case... I stop and forget about darkroom ! It all depends on the vibes of the day.
Better to enjoy than just feed the trash bin.
 
Tim Rudman describes a technique vor this exact application in his book "Master printing course". Without rereading it: It employs a transparent sheet which you put over your workprint and where you cover the rocks with an opaque red laquer which was avaliable from Tetenal... back then. I don't remember exactly what follows. Maybe you put that sheet some centimeters above the paper maybe directly on it.

I recommend Tim's book.

best

Stefan
 
I wonder no one has mentioned the SLIMT.
Has no one made use of the technique? I've
not yet but am impressed with it's potential.
More on it at www.unblinkingeye.com BTW
a chemical way to burn. Dan
 
What's SLIMT and how is it listed? Is it an acronym? I couldn't see anything under the web site which had these letters.

Thanks

pentaxuser
 
What's SLIMT and how is it listed? Is it an acronym?
I couldn't see anything under the web site which had
these letters.Thanks pentaxuser

An acronym; Selective Latent Image Manipulation Technique.
Search this NG for SLIMT; at least a few informative threads.
I've just now brought forward one of those threads to B&W
Film Paper and Chemistry. The OP's problem solved?
For ever no more dodging and burning? Dan
 
An acronym; Selective Latent Image Manipulation Technique.

That's SLIMT all right, but it's for minus development of negatives. SLIMT is David Kachel's adaptation of the Sterry Method; a development method using a mild bleach solution prior to development of a print for reducing excessive contrast.

Murray
 
Last edited by a moderator:
Photrio.com contains affiliate links to products. We may receive a commission for purchases made through these links.
To read our full affiliate disclosure statement please click Here.

PHOTRIO PARTNERS EQUALLY FUNDING OUR COMMUNITY:


Ilford ADOX Freestyle Photographic Stearman Press Weldon Color Lab Blue Moon Camera & Machine
Top Bottom