Two thoughts on this -
The "you need a second light source" to fog or flash - I don't believe this is the case. I made a flashing-thing… a 2" - to 1.5" PVC adapter, with a circle of matte plastic, and a 1" piece of 1.5" PVC pushed in to hold the diffusion in place. I stick the fat side right over the lens and flash.
With diffusion, you don't need to pull the negative or anything - you just get even, white light. It's not a ton of light, and you have to do a flash test strip for the f-stop, height, and paper type - my times are running 10-20 seconds… but that's kinda cool if you want to mask or dodge the flashing. There is absolutely no sense of the negative on the paper plane - just even light.
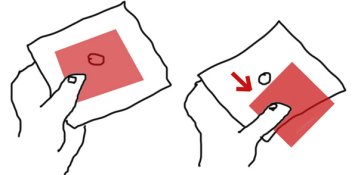
Precision burning: we all have our white-top, black-bottom cards with little holes. I had a shot where I needed to burn in just the wedding ring on a hand shot. I took a scrap of red gel and rested it on top of the burn card. That way, I could get the card perfectly aligned on the spot with no exposure due to the red, and then with a slide of my thumb move the red gel away without moving the card. I set the timer longer than the burn, and once the gel is slid away, I count to the beeps.
In the past I've used a desktop microphone boom stand to position precise dodging and burning cards, since it's heigh adjustable and can swing away. This works pretty well, you just have to jiggle the card - but the red gel for very specific burns - man, it's pretty kickass.
I drew this with my stylus pad and it's horrible but shows the idea:


 burn it with a flashlight.