I've done it twice.
The first time was designed as a wall mount for my enlarger (then a Durst F60) that had a short column height. I wanted to separate the column and head from the baseboard, and provide a means of lowering the baseboard in order to be able to do larger enlargements. When I framed the wall behind the enlarger, I made sure that there were studs in the right locations behind where I wanted the enlarging station to be. Then, after installing the drywall, I cut two brackets from a scrap of 2"x6" construction-grade lumber, and attached them to the studs using carriage bolts. Then, I cut a shelf from 3/4" plywood and attached it across the top of the brackets. The enlarger column bolted to this shelf. I built cabinets on either side of the space, and put some cleats on the sides of the cabinets to hold a section of countertop under the enlarger - this section was removable and could be lowered by slipping it onto a lower set of cleats. Obviously, I had to take great pains to assure that the enlarger column was plumb and that the baseboard would be absolutely horizontal in each of its three adjustable positions.
Leter, I cobbled a retrofit to replace the F60 with an Omega DII. Same basic principle - the only difference was that because the DII has a much longer column, and the darkroom had a low ceiling, I had to make the shelf that the enlarge mounts on lower.
Two years ago, the spousal unit and I built a new home (our retirement home), and I had to build a new darkroom. Yeah, its a dirty job - - -
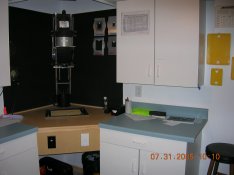
This time, I was working in a space where the logical place for the darkroom was in the basement directly underneath the master bath, and it made sense to put the enlarger in a corner, with the enlarge bolted directly to the countertop. While the overall basement ceiling was much higher, there was a support beam across the darkroom space that forced me to lower the ceiling in that area. I built a fixed corner shelf that is supported by cleats attached to the wall studs and to the cabinets on either side of the enlarging station. To allow maximum extension of the enlarging head, I recessed the ceiling above the enlarger.
The counter top is made of varnished particleboard. I like the feel of varnished wood, and particle board is strong, inexpensive and very smooth. I also put a front on the cabinet and mounted two switches - the black switch on the left controls the safelights, while the white switch on the right controls the white lights.
My darkroom has positive pressure ventillation, and the duct that brings air in terminates in a louver that is mounted on the side of the ceiling recess above the enlarger. That keeps the enlarging area cool and with an ample supply of fresh air. I have two safelights in the darkroom - one is over the wet side sink, and the other is mounted immediately above the enlarger and aimed up to the recessed ceiling - note that the ceiling over the enlarger is painted white while the surround is a flat black to control light reflections.
Unfortunately, I don't have a picture of the first installation, but here's a shot I did just a few days ago of the new darkroom.