Has anyone here built a dispenser for RA-4 paper? In principle I would be looking at the Fuji Supreme (gloss) in 10" or 12" size, so not a huge width. However I've never used RA4 paper rolls before and can't visualise how the paper would sit inside a light-tight box etc. I have a completely light-proof darkroom and a good Rotatrim cutter so should be able to handle that aspect of the process.
-
Welcome to Photrio!Registration is fast and free. Join today to unlock search, see fewer ads, and access all forum features.Click here to sign up
- Home
- Forums
- Analog Workflow Forums (100% Analog/Traditional)
- Darkroom
- Color: Film, Paper, and Chemistry
You are using an out of date browser. It may not display this or other websites correctly.
You should upgrade or use an alternative browser.
You should upgrade or use an alternative browser.
Building a paper dispenser for RA4?
-
A
- Thread starter Tom Kershaw
- Start date


Recent Classifieds
-
For Sale Schneider Kreuznach Super Angulon MC 120mm f8
- Started by RoboRepublic
-
Sold JOBO MultiTank 2 2521 4 X 5
- Started by Inayat Noor
-
For Sale Ilford 5X7 Paper Lot
- Started by davela
-
For Sale Omega Audible Repeating Timer II
- Started by davela
Forum statistics
Ebay has used cassettes for Fuji and Noritsu machines. These things are expensive new (500-600 bucks) . I'm not sure if the cassette would help??. I picked up a set of rollers from an old Nord roll easel, it's just a piece of steel with two rubber rollers.
I've never gone to the trouble of cutting paper. One thing, I have Thomas safelights with color filters. After about 10 minutes your eyes get adjusted and you can see just enough that it makes a huge difference.
I still use the old school Kodak Rapid Color Processors model 11 and 16k. These machines you work in the dark. Super fast but I'm probably the only person left in North America using these beasties.
I've seen references to "DIY" roll dispensers but no actual plans or photos of the units.
It looks like the Kodak Alaris paper is wound emulsion in . Skate board wheels might work.
- Joined
- Aug 22, 2006
- Messages
- 1,532
- Format
- Multi Format
Why not just keep the paper in the original dark-bag until ready to use? Then all you need to hold the roll is a stand to hold a horizontal bar (through the paper roll's core). The stand could be a wood base plate with an upright arm at each end. If you cut a "V" notch at the top of each upright this will keep the horizontal bar in place. (If the bar is relatively short you might want a collar of sorts so it can't fall out of the v-notch.)
You'd wanna cut what you need for a printing session, then PUT YOUR LONG ROLL BACK IN THE DARK-BAG. Otherwise it's way too easy to forget about it and turn on the room lights (this will put edge fog on the entire roll). I've seen probably hundreds of rolls like this over the years; the fog typically only goes in about 1/16 inch or so, but that's enough that you can't print to the spec size anymore. (In photofinishing, such rolls would be relegated to color tests, so no real loss, but if it's your only roll...)
Don't let the emulsion side touch your bench, and when you cut the paper you might want to hold it down with either a gloved hand, or perhaps lay a piece of scrap paper on top so that your finger don't touch the emulsion.
As a note, something we did long ago in our processor darkrooms, back when a long-roll paper processor was built half-in and half-out of a darkroom, was to replace the light switches with those key-operated switches (they have a little bar inset, and a little forked "key" was used like a lever to operate the switch). Just the slight delay of having to reach in your pocket was typically long enough for your brain to register, oh, did I leave the paper roll out?
pentaxuser
Member
Tom,A member on FADU called John King built himself a very usable dispenser and there is a thread on this on FADU. Just search for paper dispenser
pentaxuser
pentaxuser
Tom,A member on FADU called John King built himself a very usable dispenser and there is a thread on this on FADU. Just search for paper dispenser
pentaxuser
Thanks. I hadn't thought to look on FADU.
Why not just keep the paper in the original dark-bag until ready to use? Then all you need to hold the roll is a stand to hold a horizontal bar (through the paper roll's core). The stand could be a wood base plate with an upright arm at each end. If you cut a "V" notch at the top of each upright this will keep the horizontal bar in place. (If the bar is relatively short you might want a collar of sorts so it can't fall out of the v-notch.)
You'd wanna cut what you need for a printing session, then PUT YOUR LONG ROLL BACK IN THE DARK-BAG. Otherwise it's way too easy to forget about it and turn on the room lights (this will put edge fog on the entire roll). I've seen probably hundreds of rolls like this over the years; the fog typically only goes in about 1/16 inch or so, but that's enough that you can't print to the spec size anymore. (In photofinishing, such rolls would be relegated to color tests, so no real loss, but if it's your only roll...)
Don't let the emulsion side touch your bench, and when you cut the paper you might want to hold it down with either a gloved hand, or perhaps lay a piece of scrap paper on top so that your finger don't touch the emulsion.
As a note, something we did long ago in our processor darkrooms, back when a long-roll paper processor was built half-in and half-out of a darkroom, was to replace the light switches with those key-operated switches (they have a little bar inset, and a little forked "key" was used like a lever to operate the switch). Just the slight delay of having to reach in your pocket was typically long enough for your brain to register, oh, did I leave the paper roll out?
Thanks. You've given me a good number of points to think about.
I do exactly what Mr. Bill says. Works quite alright. You may want to spend some time thinking of a somewhat decent beating for the axle on which the roll rests. The weight of such a roll translates into a bit of pressure, but you want your roll to run quite smoothly for convenience's sake.
I just put my haphazard roll suspension rig in line with a rotary cutter and next to the rotary cutter I tape a piece of wood to the table as a stop, so that I can pull paper from the roll, through the cutter, until it touches the stop. The paper runs between a pair of guides to keep the paper perpendicular to the travel of the rotary blade.
You'll get the hang of it after having cut a number of interesting parallelograms
I usually cut something like 50 sheets and store them in a lightproof bag inside a box; the roll goes back into its original box for the next cutting session. Cutting 50 sheets costs me something like 30-40 minutes. Needs to be done in the dark of course.
I
I build myself such a holder from plywood, which I use in the dark. I have a film safe into which the cut sheets go. And for longer storage they go into the box in which I got my first and only pre cut sheets.
Next to the holder I have a board of plywood with a coated smooth surface, on which the paper lands. It happens to be exactly the thickness necessary to align with my circular blade cutter. I use a designated (fixed out) sheet of paper as a template, and push the roll paper through the cutter until it has the length of the template sheet. The latter is pushed against a stop, which my cutter (Kaiser Easy Cut) has under the blade. So it really serves as the length required. Primitive but good enough to quickly cut enough sheets for a few print sessions.
I'm looking forward to switching over to color again, towards the end of the year, for my second term of color printing.
Thanks Bill for your many great posts on colour lab practice!
Why not just keep the paper in the original dark-bag until ready to use? Then all you need to hold the roll is a stand to hold a horizontal bar (through the paper roll's core). The stand could be a wood base plate with an upright arm at each end. If you cut a "V" notch at the top of each upright this will keep the horizontal bar in place. (If the bar is relatively short you might want a collar of sorts so it can't fall out of the v-notch.)
You'd wanna cut what you need for a printing session, then PUT YOUR LONG ROLL BACK IN THE DARK-BAG. Otherwise it's way too easy to forget about it and turn on the room lights (this will put edge fog on the entire roll). I've seen probably hundreds of rolls like this over the years; the fog typically only goes in about 1/16 inch or so, but that's enough that you can't print to the spec size anymore. (In photofinishing, such rolls would be relegated to color tests, so no real loss, but if it's your only roll...)
Don't let the emulsion side touch your bench, and when you cut the paper you might want to hold it down with either a gloved hand, or perhaps lay a piece of scrap paper on top so that your finger don't touch the emulsion.
As a note, something we did long ago in our processor darkrooms, back when a long-roll paper processor was built half-in and half-out of a darkroom, was to replace the light switches with those key-operated switches (they have a little bar inset, and a little forked "key" was used like a lever to operate the switch). Just the slight delay of having to reach in your pocket was typically long enough for your brain to register, oh, did I leave the paper roll out?
I build myself such a holder from plywood, which I use in the dark. I have a film safe into which the cut sheets go. And for longer storage they go into the box in which I got my first and only pre cut sheets.
Next to the holder I have a board of plywood with a coated smooth surface, on which the paper lands. It happens to be exactly the thickness necessary to align with my circular blade cutter. I use a designated (fixed out) sheet of paper as a template, and push the roll paper through the cutter until it has the length of the template sheet. The latter is pushed against a stop, which my cutter (Kaiser Easy Cut) has under the blade. So it really serves as the length required. Primitive but good enough to quickly cut enough sheets for a few print sessions.
I'm looking forward to switching over to color again, towards the end of the year, for my second term of color printing.
Thanks Bill for your many great posts on colour lab practice!
Tom,A member on FADU called John King built himself a very usable dispenser and there is a thread on this on FADU. Just search for paper dispenser pentaxuser
I have just seen this. It was me in another life. I have made 2, one out of plywood but this resulted in a mottling along the edges of the paper almost certainly due to odours from the resin in the plywood glue. I more recently made another out of aluminium sheet and aluminium angle strips 'pop' rivetted together and to ensure it was completely light tight the insides of the angle strip was sealed with a black low odour sealant and so far it has proved successful The biggest problem is keeping the slot at the bottom of the front light tight but with a close fitting metal flap I seem to have managed it so far. It will take a 12" x 88m roll of Kodak Endura paper which will give me well over 200 sheets of 12x16 paper and a lot more smaller sizes.
- Joined
- Oct 7, 2015
- Messages
- 63
- Format
- 35mm
I read through the thread on FADU but was unable to view your images of the box since I'm not a member. I'm curious if you still have images of either of your boxes that you could share here.I have just seen this. It was me in another life. I have made 2, one out of plywood but this resulted in a mottling along the edges of the paper almost certainly due to odours from the resin in the plywood glue. I more recently made another out of aluminium sheet and aluminium angle strips 'pop' rivetted together and to ensure it was completely light tight the insides of the angle strip was sealed with a black low odour sealant and so far it has proved successful The biggest problem is keeping the slot at the bottom of the front light tight but with a close fitting metal flap I seem to have managed it so far. It will take a 12" x 88m roll of Kodak Endura paper which will give me well over 200 sheets of 12x16 paper and a lot more smaller sizes.
pentaxuser
Member
I am not quite sure how the rules apply to new members. There may be some restrictions until a new member has made a certain number of posts but it's a free site and very helpful with a great set of members. Just a small word of warning. It is strictly an analogue photography site which concentrates on analogue picture and print making to the exclusion of matters that are non photographic . There are no "lounges" or "soapboxes" For that reason it remains a "good friends" siteI read through the thread on FADU but was unable to view your images of the box since I'm not a member. I'm curious if you still have images of either of your boxes that you could share here.
pentaxuser
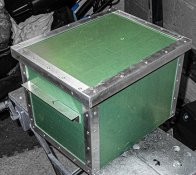
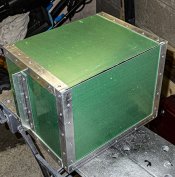
Attached are two images of the aluminium dispencer The basic measurements are 12" tall x12"wide x13"long inches with a lid about 1/2" wider and longer
The basic construction is 1.5mm alloy sheet with 25mm x 25mm angle strip all pop riveted together with black mastic sealing applied on the inside of each angle strip to assist in excluding the light. The top edge has 10mm wide self adhesive foam strip applied along each inside edge to make the lid and the box light tight. Image 2 shows the slot which the paper is pulled with the emulsion face down (It is rolled by Kodak with the emulsion facing outwards). The slot is lined inside with 1 strip of black felt glued to the front plate. The roll is suspended on a 2" diameter wooden dowel resting in wooded 'U' shaped bearers. and lubricated with candle wax.
The front slot when not in use is covered with a VERY close fitting piece of the same angle strip that formed the edges, again lined on the inside with black velvet. I did have a problem with some light getting in at first but this was found to be coming in via the pop rivets so they were also treated individually with the same black mastic.
The green colour was the protective plastic attached to the alloy sheet.
Attachments
- Joined
- Oct 7, 2015
- Messages
- 63
- Format
- 35mm
Thanks for sharing this. It's interesting to see how you did it.Attached are two images of the aluminium dispencer The basic measurements are 12" tall x12"wide x13"long inches with a lid about 1/2" wider and longer
The basic construction is 1.5mm alloy sheet with 25mm x 25mm angle strip all pop riveted together with black mastic sealing applied on the inside of each angle strip to assist in excluding the light. The top edge has 10mm wide self adhesive foam strip applied along each inside edge to make the lid and the box light tight. Image 2 shows the slot which the paper is pulled with the emulsion face down (It is rolled by Kodak with the emulsion facing outwards). The slot is lined inside with 1 strip of black felt glued to the front plate. The roll is suspended on a 2" diameter wooden dowel resting in wooded 'U' shaped bearers. and lubricated with candle wax.
The front slot when not in use is covered with a VERY close fitting piece of the same angle strip that formed the edges, again lined on the inside with black velvet. I did have a problem with some light getting in at first but this was found to be coming in via the pop rivets so they were also treated individually with the same black mastic.
The green colour was the protective plastic attached to the alloy sheet.
As I'm very pushed for space, I go completely low-tech and set up an ironing board in the darkroom  Paper roll on the left (ironing board pushed up against the wall so the paper can't fall on the floor), rotary cutter next in line and a 16" inch stick taped to the ironing board to measure the length. I cut the paper a bit longer than required so I can trim it straight after the print has dried. Works fine for 20 or so sheets, but I wouldn't want to do much more than that. The paper I have is emulsion side out, but I've never had any issues with it marking. I do wear cotton gloves while I'm cutting the paper which probably helps.
Paper roll on the left (ironing board pushed up against the wall so the paper can't fall on the floor), rotary cutter next in line and a 16" inch stick taped to the ironing board to measure the length. I cut the paper a bit longer than required so I can trim it straight after the print has dried. Works fine for 20 or so sheets, but I wouldn't want to do much more than that. The paper I have is emulsion side out, but I've never had any issues with it marking. I do wear cotton gloves while I'm cutting the paper which probably helps.| Photrio.com contains affiliate links to products. We may receive a commission for purchases made through these links. To read our full affiliate disclosure statement please click Here. |
PHOTRIO PARTNERS EQUALLY FUNDING OUR COMMUNITY:  |