Building a Drying Cabinet for Negatives...Ideas?

Rose still life

D
Rose still life

  • 0
  • 0
  • 0
Sombra

A
Sombra

  • 3
  • 0
  • 78
The Gap

H
The Gap

  • 5
  • 2
  • 95

Forum statistics

Threads
199,012
Messages
2,784,590
Members
99,770
Latest member
Stolk
Recent bookmarks
0

hspluta

Member
Joined
Feb 28, 2010
Messages
73
Location
Chicago Area
Format
Medium Format
For the filter you might want to look at the units made for a shop vacuum. They are available at Sears or any of the home improvement stores.

Best, Harry
 

Shadowtracker

Member
Joined
Apr 4, 2010
Messages
265
Location
St. Louis
Format
Multi Format
Something you might want to consider Colin, is an inexpensive ionizer. It doesn't get rid of dust, but it does make the dust fall to the floor or other flat surfaces - gets the dust out of the air. I use one and it seems to have made a big improvement in the general environment of the darkroom. It also makes it easier to clean up what does fall from the air onto the floor because it's all on the floor. Just an idea, I doubt you would want to put something like that within a dryer though - wouldn't be needed there really.
 

Hexavalent

Member
Joined
Nov 19, 2009
Messages
592
Location
Ottawa, Onta
Format
Multi Format
I cobbled up a couple surplus computer fans (120 mm) and a cheap hepa filter. This rig blows air into what used to be a gun-cupboard - I chose to blow clean air in as the cupboard is fairly leaky, and dust etc., will not be drawn inside when the door is opened. Is use a similar rig, but with a clear plastic 'tent' (clothes storage bag thing) when I'm coating.
 
OP
OP
photobizzz

photobizzz

Member
Joined
Jan 3, 2008
Messages
565
Location
El Paso, Tex
Format
35mm
I actually picked up 10 small HEPA filters made for a hand held vacuum called a "dirttamer", they are 3X3.5X.5" and have a rubber seal all the way around. They were only $1.99 each and the eBay seller cut me a deal on shipping so I spent $30 on enough filters to last me for a long time. I will just cut a hole with an xacto knife to fit the rubber seal snugly and put the 120mm, 3 speed PC fan I bought at the opposite corner to get a cross draw of air. I will have the fan drawing the air rather than blowing in the container. The filters look like this: Amazon.com link

I think it will work for what I need until I can finally build my "dream" darkroom, and I know by the time I actually get to do it, it's gonna be sweet! (hopefully I can still get film in 10 years) :sad:
 

Dave Ludwig

Member
Joined
Apr 13, 2010
Messages
105
Location
Wisconsin
Format
Multi Format
I agree with natural drying unless time is critical and then I would also agree with others that you do not want blow air in, rather suck air through it. Am currently using a simple garment storage bag from wally world. It is made out of an open filter like material and hang it from hooks in
the ceiling. To keep the shape square I place an 11x14 tray in the bottom where I throw the clips when removing the film. It also can
be taken down and stores easily. I also run a dehumidfier as I am in my basement. My drying cabinet cost me like $12 bucks.
 

Gadfly_71

Member
Joined
May 5, 2006
Messages
224
Location
Phoenix, AZ
Format
Multi Format
I built mine from an Ikea wardrobe that cost less than $100. Drilled holes in the top for two 12v biscuit fans (the same kind used for cooling desktop PCs, wired up to a 12v wall wart) and holes at the bottom on either side for air intake. The intakes have computer vent filters installed to keep the dust down and the fans move air just fast enough to aid drying. The cabinet is tall enough to dry 35mm film and I can use spring loaded curtain rods to add drying space for several rows of 4x5. Works great, looks great and it was pretty cheap and easy to do.
 
OP
OP
photobizzz

photobizzz

Member
Joined
Jan 3, 2008
Messages
565
Location
El Paso, Tex
Format
35mm
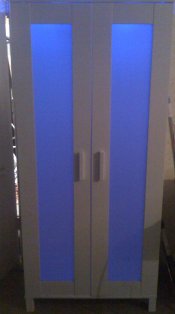
Well I finished my drying cabinet today, the HEPA filters arrived and I had the cabined partially constructed. The drying "tote" is made from a Rubbermaid tote, the first attempt failed due to trying to use a tote that was too hard of plastic. I would have preferred the harder one as it was clear and I would have been able to see the negatives without removing the top but it was not meant to be.

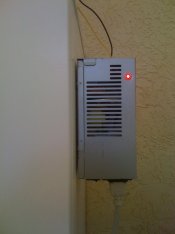
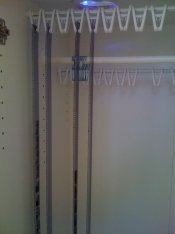
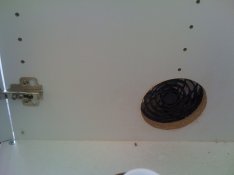
I first installed the 120mm - 3 speed fan, it was attached with small nuts and bolts with a washer on the inside. I used black silicone and let it partially cure around the hole before securing the fan. I am powering the fan with an AC to DC adapter you can buy at the department store for $15, I had it laying around and it has a switch to choose different voltages from 3 to 12V; so if I wanted I could slow the fan down even more than the low setting by lowering the voltage. I installed the 3.5X3X.5" HEPA filter that was originally meant for use with a "Dirttamer" hand held vacuum, cut the hole with an Xacto knife and used gaffers tape on the inside to insure a tight seal and that it wouldn't pop out. The holes for the galvanized wire were made with my Xacto knife by twisting rather than pull out the drill and a small washer was used to secure one end of the wire by twisting it through the hole in the washer and then inserting the wire into the hole. I then slid on a 1/2 binder clip, running the wire through both handles and then securing it in place by running the wire through one handle again, this insure it does not slide down the wire. Repeated this three more times and then secured the wire in the opposite hole with a washer as well. The same was done for the other row of clips as I have two rows in the drying tote. The top of the tote was sealed with one layer of gaffers tape (love this stuff) and that is all it took.

Works like a charm, I haven't actually dried any negatives in it yet but don't see any design flaws other than I can only dry 8 X 4X5 or 4 5X7 at any one time but I rarely shoot more than that anyway so I will just have to live with it and develop my negatives in batches for the time being. Once I do buy the home I will plan on staying in for a good long while once I retire from the military I will no doubt build a real darkroom instead of using my downstairs bathroom and will have a suitable drying cabinet to fit the size of my darkroom, but for now we are keeping it all mobile.

Oh and I installed the HEPA filter at the top and the fan at the bottom creating a cross wind and the fan sucks the air through the filter, not blowing on the negatives to prevent dust getting sucked in for one reason (kinda defeats the purpose huh) and to avoid drying too fast and getting water spots.

If anyone likes this idea and decides to build one identical or similar remember I own the copyright to this, just kidding...please feel free to PM or email me if you run into a snag and I will be happy to help. I actually do have 9 more HEPA filters, an extra identical fan, and the wire and binder clips so if someone wants one or two filters and the fan for a few bucks and shipping costs I will be happy to help them out. I bought two fans thinking of installing two but one is more than enough and I bought 10 filters as they were only $1.99 each so why not for the same shipping?

Cool as snot!

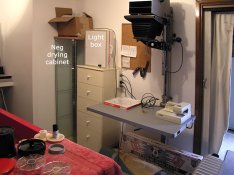
Some photos for the masses:

4569174093_89d712abbd_b.jpg


4569812152_098461592e_b.jpg


4569812300_0f9922c1ac_b.jpg


4569174427_3249708145_b.jpg


4569812426_0a25a7daa6_b.jpg
 

Gadfly_71

Member
Joined
May 5, 2006
Messages
224
Location
Phoenix, AZ
Format
Multi Format
Just put the finishing touches on a small modification to my drying cabinet. Replaced the 12vdc wall-wart with a PC power supply (slightly modified) that I've managed to re-purpose. (The lighted fans are silly, but these fans were cheaper than the ones without lights.)
 

Attachments

  • IMG_0466.jpg
    IMG_0466.jpg
    117.1 KB · Views: 125
  • IMG_0727.jpg
    IMG_0727.jpg
    143.4 KB · Views: 117
  • IMG_0728.jpg
    IMG_0728.jpg
    141.3 KB · Views: 128
  • IMG_0729.jpg
    IMG_0729.jpg
    89.3 KB · Views: 116

Neil Poulsen

Member
Joined
May 28, 2005
Messages
520
Format
4x5 Format
Negative Drying Cabinet

Please excuse me if I go into a bit of detail.

I couldn't find an existing cabinet that fit my needs, so I built one from scratch. The design worked out really well for my purposes. Please see the attached word document for a diagram that's drawn to scale.

I used poplar, because it was inexpensive, it's not warped at all, and the dimensions are very consistent and accurate. I purchased five standard sized boards that were 48"x7.25"x0.75" and two that were 48"x1.5"x0.75". I had to do very little cutting. I also purchased a sheet of eighth inch "something" board for the back.

My cabinet is 8" deep, 48" tall, and 17.5" wide. Because I bought 48" boards, it's 48" tall. It's 8 inches deep, because I used one each of the 48"x7.25"x0.75" for the two sides, and at right angles, I glued and screwed one of the 48"x1.5"x0.75" boards onto the edge of each side. The cabinet is 17.5" wide, because I used two of the 48"x7.25"x0.75" boards between the two 48"x1.5"x0.75" boards. The only boards I had to cut were two that were 16"x7.25"x0.75" for the top and bottom. I added a 48"x17.5"x0.125" back that I nailed onto the top, bottom, and sides, so that I could attach the cabinet to the wall. The hinges in the diagram help to define the doors and how they open out. Magnets keep the doors from opening unintentionally.

As to the inside, I extended five 5"x6.5"x0.25" horizontal shelves from the left at equal distances from each other. Under each shelf, I can vertically hang four 4x5 sheets of film. I put six hooks at the top on the right side from which to hang up to six lengths of 120 roll film. (The 48" length of the cabinet does not allow me to hand 36 exposure 35mm film strips.)

I painted the whole thing to protect the wood and to match my darkroom's colors.

The dimensions of this cabinet may not work for your needs. But, maybe you can get some ideas of construction from the approach that was used. Again, all boards were used as purchased, except the top, bottom, and back. It was very easy to construct.
 

Attachments

  • NegativeCabinet.doc
    15.5 KB · Views: 84
Last edited by a moderator:
Joined
Jan 19, 2008
Messages
280
Location
Upper Hunter
Format
8x10 Format
I've been using the metal clips without any issues. Check with your local air conditioner outlet. They have sheets of filter material.
Pat
 
OP
OP
photobizzz

photobizzz

Member
Joined
Jan 3, 2008
Messages
565
Location
El Paso, Tex
Format
35mm
I have some extra HEPA filters and one extra fan identical to the ones I used in my drying 'tote' above, PM me if you need one.
 
Joined
Jan 17, 2005
Messages
1,355
Location
Downers Grov
Start with a dehumidifier or air conditioner.

All that humidity will breed fungus in camera and enlarging lenses.

I just have a HEPA air filter in the wet room, no cabinet, and hang the negs to dry, Never a problem.
 

ic-racer

Member
Joined
Feb 25, 2007
Messages
16,552
Location
USA
Format
Multi Format
DryingCabinet.jpg


This is my cabinet.
A few comments:
1) My darkroom started negative processing operations the day the cabinet was built. Which is to say, I would not even think of processing negatives without a place like this in which to hang them.
2) As you may notice from my other darkroom pictures, I could have made this cabinet as complex and expensive as I wanted. But it is only as complex and expensive as needed to do its job.
 
Photrio.com contains affiliate links to products. We may receive a commission for purchases made through these links.
To read our full affiliate disclosure statement please click Here.

PHOTRIO PARTNERS EQUALLY FUNDING OUR COMMUNITY:


Ilford ADOX Freestyle Photographic Stearman Press Weldon Color Lab Blue Moon Camera & Machine
Top Bottom