Brush Development—Recommended Brush Types
I am working with a really great "brush-development" process with pyro chemistry and tray development of sheet film negatives. It offers all of the benefits of reduced agitation development with none of the unwanted problems of risking uneven development or streaking under the extreme exhaustion with tanning/staining developing agents like pyro—encouraging maximum gradation and even development. (see picture attachment)
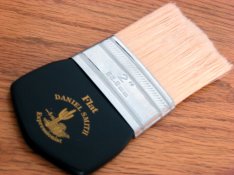
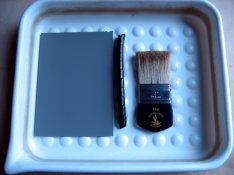
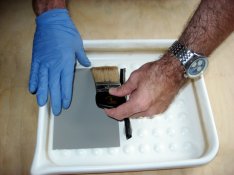
This special non-handled brush retails for about $32.00 but I purchased it for half-price. The brush uses natural boar's hair that has just enough body and tooth, but not overly grab the negative or scratching delicate film surfaces. I find it to provide even coverage, dislodging of trapped bubbles, and to fluidly glide across the surface of sheet film with gentle tension. For very large negatives one would need a wider brush, but 5x7 negatives work well with 2" brushes and with a little practice even 8x10. Although a 3" - 4" coverage would work more easily with 8x10 format film. Having no handle (as shown) is perfect for holding near the film and tray, so that one can sense more acutely its responsiveness against the film's surface in relationship to the tray and to keep a low angle along the entire film surface. I use very thin nitrile examination gloves for protection against the chemistry and then eagerly "drink" the exhausted developer for added energy! haha!
Another great brush type is the Hake brush, pronounced "Hay-Kay"—goat hair being most common. Hake brushes are available in wider sizes as a rule and spread alternative process chemistry very well also. Like all things, it takes practice in how to gently hold the negative or optimize brush strokes during darkroom use by tray. My first thought when I started using a brush was "panic" at first, for it felt odd and my coordination was barely adequate as I tried to feel my way on the negative. Bottom-line, take your time and do several test first. I am planning to create a YouTube video of my process within the next few weeks. I'll keep you posted!
I am working with a really great "brush-development" process with pyro chemistry and tray development of sheet film negatives. It offers all of the benefits of reduced agitation development with none of the unwanted problems of risking uneven development or streaking under the extreme exhaustion with tanning/staining developing agents like pyro—encouraging maximum gradation and even development. (see picture attachment)
This special non-handled brush retails for about $32.00 but I purchased it for half-price. The brush uses natural boar's hair that has just enough body and tooth, but not overly grab the negative or scratching delicate film surfaces. I find it to provide even coverage, dislodging of trapped bubbles, and to fluidly glide across the surface of sheet film with gentle tension. For very large negatives one would need a wider brush, but 5x7 negatives work well with 2" brushes and with a little practice even 8x10. Although a 3" - 4" coverage would work more easily with 8x10 format film. Having no handle (as shown) is perfect for holding near the film and tray, so that one can sense more acutely its responsiveness against the film's surface in relationship to the tray and to keep a low angle along the entire film surface. I use very thin nitrile examination gloves for protection against the chemistry and then eagerly "drink" the exhausted developer for added energy! haha!
Another great brush type is the Hake brush, pronounced "Hay-Kay"—goat hair being most common. Hake brushes are available in wider sizes as a rule and spread alternative process chemistry very well also. Like all things, it takes practice in how to gently hold the negative or optimize brush strokes during darkroom use by tray. My first thought when I started using a brush was "panic" at first, for it felt odd and my coordination was barely adequate as I tried to feel my way on the negative. Bottom-line, take your time and do several test first. I am planning to create a YouTube video of my process within the next few weeks. I'll keep you posted!