Bronica ETRS film advance issues

Do-Over Decor

A
Do-Over Decor

  • 1
  • 0
  • 9
Oak

A
Oak

  • 1
  • 0
  • 16
High st

A
High st

  • 6
  • 0
  • 56
Flap

D
Flap

  • 0
  • 0
  • 22

Recent Classifieds

Forum statistics

Threads
199,216
Messages
2,788,006
Members
99,838
Latest member
HakuZLQ
Recent bookmarks
2

Orange555

Member
Joined
Oct 13, 2017
Messages
16
Location
Denmark
Format
DSLR
Issue: Film can't be advanced in normal operation.
  1. Load film
  2. Close film back, attach to the camera.
  3. Counter starts at S.
  4. Single exposure mode, lever up.
  5. Keep winding the winder on the camera until the film reaches "1".
  6. Remove dark slide.
  7. Fire the shutter.
  8. Attempt to wind to next frame. Film counter does not advance and the film does not advance.
Attached diagram:
  • A "counter release lever", spring loaded.
  • B "Film advance lever", spring loaded.

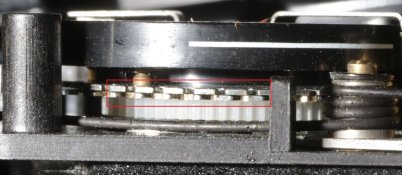
On the Bronica ETRS, the camera body engages a pin, which tells the film back to advance to the next frame. See pictures. This pin will engage B as seen in the attached diagram. It seems like the pin is not pushed far enough to engage the gears. If I remove the film back and press the pin in, it will engage. I can then reattach to the camera and successfully advance to the next frame.

Here's a video demonstrating the issue:
Demonstration of the intended function first. Lever disengages the frame counter ( top half, big wheel with the slots) and the frame counter advances ever so slightly so it can not fall back into the same slot. Shutter is now wound and it advances the film and frame counter perfectly. The camera shutter is now fired. The lever should jump and let the frame counter advance, but notice how the lever never quite clears the frame counter wheel, jumping right back into the same spot. Shutter is cocked and fired again. Same issue. Thus the film advance "clutch" is never engaged and the film can't be wound.​


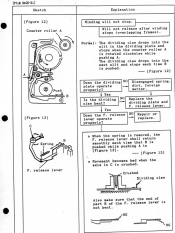
From the repair manual:
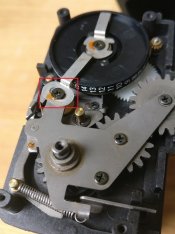
"The dividing claw drops into the slit in the dividing plate and stops when the counter roller A is rotated clockwise pushing A. The dividing claw drops into the next slit and stops each time B is pushed."

I've noticed pushing A as seen in Figure 12, has seemingly no effect. It seems restricted by a stopper preventing it from actually doing anything other than lightly touching the film advance lever.

The repair manual is of no help troubleshooting this specific problem and I have no clue what might be causing this, so I don't know how to fix it.

Thank you for reading this wall of text, your help is appreciated.
 

Attachments

  • u3o3WTe.jpg
    u3o3WTe.jpg
    553 KB · Views: 729
  • diagram.PNG
    diagram.PNG
    496.4 KB · Views: 1,085

DWThomas

Subscriber
Joined
Jun 13, 2006
Messages
4,606
Location
SE Pennsylvania
Format
Multi Format
Perhaps the matching interlock pin in the camera body is bent or misbehaving? I have SQ-A gear and am amazed at how complex those things can get with the various interlocks and such -- all without software! :blink: If you have, or could borrow, another (ideally known working) back, that should help localize the problem. (That's how I wound up with three bodies and four backs for my kit!)
 

moto-uno

Member
Joined
Sep 28, 2009
Messages
585
Location
Burnaby, B.C
Format
Medium Format
^ ^ If you don't mind paying postage (both ways) I have an etr back you could use .PM
me if this could help. I'll also check my etr operation and pin position to see if I notice something
different from yours. Regards Peter
 

wiltw

Subscriber
Joined
Oct 4, 2008
Messages
6,455
Location
SF Bay area
Format
Multi Format
I would suggest that finding another member in EU would be better, from a Customs perspective, than shipping between Canada and Denmark!
 

paul ron

Member
Joined
Jan 22, 2004
Messages
2,709
Location
NYC
Format
Medium Format
555, if you look under the counter wheel... you will see a wafered gear with slots the arm is suposed to drop in and stop at each frame. You can rotate the counter wheel to see the slots. That wheel has to run dry.. most times the cause of counter trouble is that the wafer is stuck together by oil or dirt.

check if the teeth are deformed... if so, run a thin blade between the wafers to straighten them.

Also check the arm blade is 90 deg to the wheel and not bent in any way.

wick in some naphtha (coleman liquid fuel AKA lighter fluid) it will wash out all the old oil n crud. The wafers should free up, the top one is on a spring and should snap back.

EDIT ... I just watched your video... if the wafer is free adn moving as it should... the signal arm may need to be adjusted. If it doesnt pick up far enough for the wafers to go out of sync, it will fall in the same slot and not advance. the signal arm has a turnbuckle like adjustment at the pin that releases it.

hopefully your counter issues will be cured.
 
Last edited:
OP
OP
Orange555

Orange555

Member
Joined
Oct 13, 2017
Messages
16
Location
Denmark
Format
DSLR
Perhaps the matching interlock pin in the camera body is bent or misbehaving? I have SQ-A gear and am amazed at how complex those things can get with the various interlocks and such -- all without software! :blink: If you have, or could borrow, another (ideally known working) back, that should help localize the problem. (That's how I wound up with three bodies and four backs for my kit!)
Ill try opening up the camera to inspect for it for the pin. Unfortunately I don't have a spare back.

^ ^ If you don't mind paying postage (both ways) I have an etr back you could use .PM
me if this could help. I'll also check my etr operation and pin position to see if I notice something
different from yours. Regards Peter
I'm hoping the ebay seller will fix this before I have to ship it across the Atlantic, but thank you for your offer.

555, if you look under the counter wheel... you will see a wafered gear with slots the arm is suposed to drop in and stop at each frame. That wheel has to run dry.. most times the cause of counter trouble is that the wafer is stuck together by oil or dirt.

If you can wick in some naptha (coleman liquid fuel AKA lighter fluid) it will wash out all the old oil n crud. The wafers should free up and your counter issues will be cured hopefully.

I took a picture of what I'm assuming you're refering to. The two wafered wheels seem to run smoothly, the top one being springloaded, returning to the position seen in the picture when moved.
 

Attachments

  • wheels.jpg
    wheels.jpg
    546.2 KB · Views: 443

paul ron

Member
Joined
Jan 22, 2004
Messages
2,709
Location
NYC
Format
Medium Format
Yes sir thats the wafer. Does it slip one over the other easily?

dont open the camera.. its teh insert problem not the camera body.

the signal arm may not be raising far enough... make the adjustment there. I also see the arm at the wheel has been adjusted by someone... that orange dot of lock tite has been broken. can you see where it was orginally? If it hasnt been moved, leave it be.
 
Last edited:

paul ron

Member
Joined
Jan 22, 2004
Messages
2,709
Location
NYC
Format
Medium Format
its funny i saw this thread this morning... I just repaired a back last night with exactly the same problems.

that blade has to clear the wafer just enough to let it snap out of sync when the camera fires.
 
OP
OP
Orange555

Orange555

Member
Joined
Oct 13, 2017
Messages
16
Location
Denmark
Format
DSLR
Yes sir thats the wafer. Does it slip one over the other easily?

dont open the camera.. its teh insert problem not the camera body.

the signal arm may not be raising far enough... make the adjustment there. I also see the arm at the wheel has been adjusted by someone... that orange dot of lock tite has been broken. can you see where it was orginally?

its funny i saw this thread this morning... I just repaired a back last night with exactly the same problems.

that blade has to clear the wafer just enough to let it snap out of sync when the camera fires.

Took a video. Seems to slip smoothly


What's the signal arm? If its the arm that slots into the wafer, then yes, it does not raise far enough, only raises far enough when i manually push it.

The arm at the wheel? See my attached picture, not sure which arm you're refering to.
 

Attachments

  • IMG_20171015_160407.jpg
    IMG_20171015_160407.jpg
    454.9 KB · Views: 717

paul ron

Member
Joined
Jan 22, 2004
Messages
2,709
Location
NYC
Format
Medium Format
I see you have one of the newer inserts that wont let you adjust the length of the part the pin in the body hits. Mine has a turnbuckle brass rod there.... investigate what can raise the arm a bit more?

The arm is not raising high enough to clear trhe wafers.... it is definitely your problem.

bronica back.jpg
bronica back.jpg
 
Last edited:
OP
OP
Orange555

Orange555

Member
Joined
Oct 13, 2017
Messages
16
Location
Denmark
Format
DSLR
I see you have one of the newer inserts that wont let you adjust the length of the part the pin in the body hits. Mine has a turnbuckle brass rod there.... investigate what can raise the arm a bit more?
I guess the only way to let the arm raise more is to add to the length of the rod that meets the camera body. But it doesn't make sense, the ebay seller claims he shot two rolls of film on it with no issues and now it does not work. I guess I'm confused by how and what has gone wrong. The issue is clearly the arm, but how can it suddenly no longer raise enough to clear the wafer?

EDIT: I guess this is why it could be plausible the rod in the camera body is slightly bent, making it ever so slightly shorter.

EDIT2: Also just saw your picture now. Wow if only my back had such an adjustable rod, would've been a super easy fix.
 

paul ron

Member
Joined
Jan 22, 2004
Messages
2,709
Location
NYC
Format
Medium Format
Can it be you are not engaging the back to the body properly?

Move the arm and see what linkage is moving to lengthen the arm? It only has to move a very tiny bit more...

Can you see how far the rod in the body is moving? It seems to be activating the arm... that isnt usually what goes out on these cameras.... the insert is always the problem unless that pin is stuck.

check the pin in the body with the back removed? When you fire the camera, hold the fire button down and see if that pin is just below the surface less than 1/2mm, not quite flush.
 
Last edited:

paul ron

Member
Joined
Jan 22, 2004
Messages
2,709
Location
NYC
Format
Medium Format
That pin is clearly your problem. If you can get that extra bit by bending or adjustment, the back will be 100% again.

But dont mess inside the body unless you see the pin is being restricted.

BTW when the camera is idle n ready to shoot, that pin sits flush at the bottom inside the hole of the body. It extends just shy of the top of the body when you hold the fire button in.

Ive got to go for now.. be back tonight in about 8 hours from now.. not sure of the time differences.

get that arm to raise higher in the mean time?

BTW my blade at the wafers has 2 screws holding it to the plate, do you have such a setup too? that may be how to move the blade a bit?
 
OP
OP
Orange555

Orange555

Member
Joined
Oct 13, 2017
Messages
16
Location
Denmark
Format
DSLR
With the back off, the pin sits flush with the body. Dry firing the body in single shot mode, it stays flush, but does never raise above the body
 

DWThomas

Subscriber
Joined
Jun 13, 2006
Messages
4,606
Location
SE Pennsylvania
Format
Multi Format
With the back off, the pin sits flush with the body. Dry firing the body in single shot mode, it stays flush, but does never raise above the body
My question there would be is there a slight outward bias on that pin from a small spring. If so, the pin from the back may push it in when the back is installed and the shutter firing does actually move the body pin outward. I have no hints -- experience or otherwise -- as to what "correct operation" of those interlocks actually looks like in terms of dimensions and locations. I might try firing just the body while gently pressing inward on that pin with a small widget and see if it tries to move outward.

(When I need an afternoon of frustration, I have an SQ-A body that won't fire, and it's definitely the body.)
 

paul ron

Member
Joined
Jan 22, 2004
Messages
2,709
Location
NYC
Format
Medium Format
hahaha I just opened a back with your configuration.... that one screw on teh blade at the wafer is the adjustment. Losen that screw adn pull the blade back then tighten the screw down.

Put your test backer roll in and with the camera in single mode, frre away and all is well again.

OH check that the blad is 90degrees to the wafers?
 

paul ron

Member
Joined
Jan 22, 2004
Messages
2,709
Location
NYC
Format
Medium Format
Ive gotta go... im late as it is.

talk more later.
 
OP
OP
Orange555

Orange555

Member
Joined
Oct 13, 2017
Messages
16
Location
Denmark
Format
DSLR
My question there would be is there a slight outward bias on that pin from a small spring. If so, the pin from the back may push it in when the back is installed and the shutter firing does actually move the body pin outward. I have no hints -- experience or otherwise -- as to what "correct operation" of those interlocks actually looks like in terms of dimensions and locations. I might try firing just the body while gently pressing inward on that pin with a small widget and see if it tries to move outward.

(When I need an afternoon of frustration, I have an SQ-A body that won't fire, and it's definitely the body.)
Yes with the back attached, and the film insert loaded, the spring on the film loader will press the pin in, allowing it to engage.


Anyway I didn't feel comfortable actually modifying anything, but it's been 1.5 week since I got the camera and the eBay seller is horrible at communicating.

I solved the issue by simply lengthening the lever arm with some solder. Added maybe 0.3mm of length and now it works like a charm. See the attached picture.

hahaha I just opened a back with your configuration.... that one screw on teh blade at the wafer is the adjustment. Losen that screw adn pull the blade back then tighten the screw down.

Put your test backer roll in and with the camera in single mode, frre away and all is well again.

OH check that the blad is 90degrees to the wafers?

Guess if it starts bugging again I'll try that
 

Attachments

  • solder.jpg
    solder.jpg
    318.4 KB · Views: 472

paul ron

Member
Joined
Jan 22, 2004
Messages
2,709
Location
NYC
Format
Medium Format
OK if it works... the screw was the right adjustment though. I just tested it and mine is perfect now... another back in action thanks to you.
 
OP
OP
Orange555

Orange555

Member
Joined
Oct 13, 2017
Messages
16
Location
Denmark
Format
DSLR
OK if it works... the screw was the right adjustment though. I just tested it and mine is perfect now... another back in action thanks to you.
Just to make sure, the screw you're referring to is the one I outlined in the red box ?
 

paul ron

Member
Joined
Jan 22, 2004
Messages
2,709
Location
NYC
Format
Medium Format
its the screw at the wafer holding the blade on.
 

wiltw

Subscriber
Joined
Oct 4, 2008
Messages
6,455
Location
SF Bay area
Format
Multi Format
But dont mess inside the body unless you see the pin is being restricted.

Agree strongly. DO NOT mess with the body unless you have conclusively proven -- via demonstration of improper operation with MULTIPLE BACKS -- that the body itself is not functioning properly. It is far more common that A SINGLE BACK is what is malfunctioning!
 

paul ron

Member
Joined
Jan 22, 2004
Messages
2,709
Location
NYC
Format
Medium Format
well at least we have a good documentation for etrs back repairs. this is generally the most common problem area in these backs.

BTW the rb67 backs are very similar using that wafer to regulate the frame counter.

spacing is almost always the roller and tension problems.

happy trails
 

MarcoAmara

Member
Joined
Feb 18, 2025
Messages
1
Location
Italy
Format
Medium Format
its the screw at the wafer holding the blade on.

Hello, i know it's been a long time since this thread.
I'm runnig into the same issue, i'm trying to follow your instructions but it's not clear to me (eng is not my first language)
Which screw is the right one to adjust the pin lenght?1 or 2? or another one?
Edit: tried with both, it does not seem to change.
I politely ask for your help since you guys understood this problem way better than me

WhatsApp Image 2025-02-18 at 17.24.08.jpeg
 
Last edited:
Photrio.com contains affiliate links to products. We may receive a commission for purchases made through these links.
To read our full affiliate disclosure statement please click Here.

PHOTRIO PARTNERS EQUALLY FUNDING OUR COMMUNITY:


Ilford ADOX Freestyle Photographic Stearman Press Weldon Color Lab Blue Moon Camera & Machine
Top Bottom