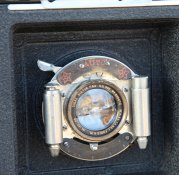
broken len element in an old brass lens

Near my home (2)

D
Near my home (2)

  • 2
  • 3
  • 54
Not Texas

H
Not Texas

  • 5
  • 1
  • 64
Floating

D
Floating

  • 4
  • 0
  • 31

Forum statistics

Threads
198,532
Messages
2,776,721
Members
99,638
Latest member
Jux9pr
Recent bookmarks
1

himself

Member
Joined
Apr 8, 2011
Messages
513
Format
Multi Format
Mornin'

I recently bought a 14" projector lens from an old magic lantern cheap off ebay, it was a bit banged up and dirty, anyway...

I managed to take it apart and clean it up, the brass cleaned nicely and except for a few stubborn marks looks good, the glass (which I expected to be a bit of a horror show) also came out spotless and except for a couple of chips near the edge on the rear elements was usable.

So I was happy, until, when tightening the ring on the rear elements there was a crack, crack went the element, and in half, broke clean in half.
Now I have a lens with 2 good elements and a decent body, but one, one that's now 2.

So is it worth trying to replace it?
Fix it?
Sell it?

Use it as a door stop?

Dafydd
 

bernard_L

Member
Joined
Feb 17, 2008
Messages
2,012
Format
Multi Format
You did not tell us did you intend to do with it?
Suggestion:
Glue the two pieces together. I would do it with UV-curing glue (need sunny day); do not use instant glue. Before you expose to sun, make sure they are precisely aligned, using the match of the crack surface and checking the surfaces and edges match.
Then:
- Either use as-is; at least do a first test
- Or, if you think you see objectionable flare, cover the region of the (glued) crack with a thin line of black paint. All you will suffer is a small loss of effecitve aperture (plus diffraction by the edges of the black region, but this should be negligible wrt te native geometrical aberrations).
When you finally re-mount the lens, use some foam or other between the ring and the glass; three small pieces in a triangle should be OK. Whatever method you use, make sure you preserve the centering as per the original design.
 
OP
OP

himself

Member
Joined
Apr 8, 2011
Messages
513
Format
Multi Format
:D

that would be a further option...
but I'm hoping someone with the bit I need will come along and give theirs away to me :wink:
 
OP
OP

himself

Member
Joined
Apr 8, 2011
Messages
513
Format
Multi Format
You did not tell us did you intend to do with it?
Suggestion:
Glue the two pieces together. I would do it with UV-curing glue (need sunny day); do not use instant glue. Before you expose to sun, make sure they are precisely aligned, using the match of the crack surface and checking the surfaces and edges match.
Then:
- Either use as-is; at least do a first test
- Or, if you think you see objectionable flare, cover the region of the (glued) crack with a thin line of black paint. All you will suffer is a small loss of effecitve aperture (plus diffraction by the edges of the black region, but this should be negligible wrt te native geometrical aberrations).
When you finally re-mount the lens, use some foam or other between the ring and the glass; three small pieces in a triangle should be OK. Whatever method you use, make sure you preserve the centering as per the original design.

I intended to use it on the camera I'm currently building.
I might give that a go, but would prefer not to glue anything just yet... having said that, I can't make it any worse really.
Tomorrow I'll rig something up to see how bad it effects the performance.
 

Gerald C Koch

Member
Joined
Jul 12, 2010
Messages
8,131
Location
Southern USA
Format
Multi Format
The curvature of the lens can be determined from one of the pieces. However you would have to find someone to grind a replacement for you. The lesson learned here is do not be hamhanded when working with lenses.
 
OP
OP

himself

Member
Joined
Apr 8, 2011
Messages
513
Format
Multi Format
The curvature of the lens can be determined from one of the pieces. However you would have to find someone to grind a replacement for you. The lesson learned here is do not be hamhanded when working with lenses.

how would I determine the curvature?

and I think the lesson here is that I'm a stupid boy with stupid hands :smile:
 

Tom1956

Member
Joined
May 6, 2013
Messages
1,989
Location
US
Format
Large Format
Sickening as the thought may be, I'm afraid it's finished.:sad:
 
OP
OP

himself

Member
Joined
Apr 8, 2011
Messages
513
Format
Multi Format
tom, tom, tom, tom, tom
nothing is ever finished until the end... I see what you mean
 

Ian Grant

Subscriber
Joined
Aug 2, 2004
Messages
23,257
Location
West Midland
Format
Multi Format
At the camera fair I go to one stall holder was selling off the spares etc from a retired camera repair shop, about 18 months ago. I had quite a few shutters, there was also a box of lens elements all wrapped in their original wrapping material, some marked indicating what lens.

Another trader bought the entire box, as far as I know he still has them. I can find his details (I won't see him until July) if you're interested - he may be able to help. Let me know the diameter, he owes me a favour, and I can see if he has anything the right size, and then that matches.

Ian
 

Gerald C Koch

Member
Joined
Jul 12, 2010
Messages
8,131
Location
Southern USA
Format
Multi Format
how would I determine the curvature?

Opticians have a machine that can do this. It is used to determine the prescription for glasses when the original paper prescription has been lost.
 

ic-racer

Member
Joined
Feb 25, 2007
Messages
16,530
Location
USA
Format
Multi Format
Just glue it back together. What is the concern, are you afraid the crack might improve the optical performance? :smile:
 

Jonathan R

Member
Joined
Jan 3, 2008
Messages
86
Location
UK
Format
35mm RF
If you can find a histology/microscopy lab, scrounge some DPX slide mountant. It's a thin, clear resin, dries quickly. I believe auto windscreen repairers use something similar. My bet is that if you glue the two parts neatly without too much resin, and carefully cut away any surplus with a sharp knife (glass is harder than steel), you won't be able to see any difference in performance.
 
OP
OP

himself

Member
Joined
Apr 8, 2011
Messages
513
Format
Multi Format
Ian,

That would be very kind of you, the element has a 50mm diameter and is 5mm thick. I'd owe you a favour then.

Ambaker,

Some good news on there and considering the fact that I have to make a ground glass anyway, this now gives me reason to do it sooner rather than later.

Thanks Jonathan and Gerald, I'll be trying that too.
And to you ic-racer, how very dare you, you sir are outrageous :smile:
 

Fotoguy20d

Subscriber
Joined
Jan 23, 2008
Messages
1,252
Location
NJ
Format
4x5 Format
What's the construction? Is it a petzval? If the front is a cemented pair, it'll make a nice meniscus lens with FL about twice the lens, and lots of coverage (and funky effects). I have a set of photos on flickr from a lantern lens minus the rear elements. Before you do anything else, try reassembling the two halves into the frame and shooting through it. You can also paint the broken edges with a sharpie (which is easily removed). And, the attached photos were taken using the shown Goerz Syntor ( a 4 element dialyt type - I dropped the front while cleaning it). There's some ghosting and loss of sharpness but I didnt blacken the edges.

Dan IMG_9480.jpg IMG_9486.jpg IMG_9506.jpg
 
Last edited by a moderator:
OP
OP

himself

Member
Joined
Apr 8, 2011
Messages
513
Format
Multi Format
What's the construction? Is it a petzval? If the front is a cemented pair, it'll make a nice meniscus lens with FL about twice the lens, and lots of coverage (and funky effects). I have a set of photos on flickr from a lantern lens minus the rear elements. Before you do anything else, try reassembling the two halves into the frame and shooting through it. You can also paint the broken edges with a sharpie (which is easily removed)./ATTACH]

It's probably a petzval (cemented pair at the front, then one larger element, a small spacing and a third thin element at the rear. It looks similar to the Dallmeyer design - but is unnamed)
Using it as a meniscus would be a bit problematic, the focal length would be close to 30", which is way too long for anything I have planned.
 

TheFlyingCamera

Membership Council
Advertiser
Joined
May 24, 2005
Messages
11,546
Location
Washington DC
Format
Multi Format
Ok- Fotoguy's broken lens example is more extreme even than I was thinking - Jim Galli once had a rare Cooke (or Pinkham & Smith, or some such portrait lens) that the front element looked like someone hit it with a hammer, but it still made excellent images so long as you zealously shaded the front to avoid flare. I think he had it in the classifieds here, or maybe it was a thread - search the forums for it.
 
OP
OP

himself

Member
Joined
Apr 8, 2011
Messages
513
Format
Multi Format
I just finished grinding my view screen (without breaking it), so after a bit of lunch I'll check out just how bad it is...
problem is, I don't have a before-the-brake to go off, so as long as there are no obvious problems I'll count myself lucky
 
OP
OP

himself

Member
Joined
Apr 8, 2011
Messages
513
Format
Multi Format
I just made a very quick and ugly box camera and it doesn't seem to effect it to a noticable degree...

lucky me then.

now, to glue or not...
 
Photrio.com contains affiliate links to products. We may receive a commission for purchases made through these links.
To read our full affiliate disclosure statement please click Here.

PHOTRIO PARTNERS EQUALLY FUNDING OUR COMMUNITY:


Ilford ADOX Freestyle Photographic Stearman Press Weldon Color Lab Blue Moon Camera & Machine
Top Bottom