book suggestions for experimental studio lighting

Three pillars.

D
Three pillars.

  • 1
  • 1
  • 28
Water from the Mountain

A
Water from the Mountain

  • 3
  • 0
  • 66
Rijksmuseum Amsterdam

A
Rijksmuseum Amsterdam

  • 0
  • 0
  • 52
Lotus

A
Lotus

  • 4
  • 0
  • 69
Magpies

A
Magpies

  • 4
  • 0
  • 101

Recent Classifieds

Forum statistics

Threads
197,521
Messages
2,760,544
Members
99,394
Latest member
Photogenic Mind
Recent bookmarks
0

gzinsel

Member
Joined
Mar 20, 2011
Messages
402
Format
Med. Format RF
hi everybody,

I recently acquired a Speedotron 4803cx, lights, umbrellas. SO, FOR TABLETOP/ STILL-LIFE. I am taking all suggestions on books to read about studio lighting, However I am interested in the more experimental aspects/techniques i.e muti-pops, multi exposures, layering, etc. . .
also A simple book or web site explaining what are the accessories and what they are intended for. specifically for the speedotron black line.

thank you (in advanced)

Greg
 

John Koehrer

Subscriber
Joined
Apr 3, 2004
Messages
8,275
Location
Aurora, Il
Format
Multi Format
Never cared enough to visit, but the strobist site has been suggested several times.
 

Dan Quan

Member
Joined
Jan 14, 2009
Messages
804
Location
Albuquerque,
Format
Multi Format
I have been thinking of getting this one myself: Masterclass: Professional Studio Photography just to get back into it all. But you could peruse amazon and B&H Commercial Photography books and see what catches your eye.

And any of the Dean Collins Lighting stuff fer sher! Big discount now at B&H.
 

Photo Engineer

Subscriber
Joined
Apr 19, 2005
Messages
29,018
Location
Rochester, NY
Format
Multi Format
Kodak published a "how to" booklet on studio lighting. Copies might be available but it is long out of print.

PE
 

M Carter

Member
Joined
Jan 23, 2013
Messages
2,147
Location
Dallas, TX
Format
Medium Format
I'm not aware of a lot of technique books for more esoteric work.

For speedotron, the accessories are fairly the same as any pro pack & head system - grid heads, barn doors, gel frames, and snoot. (My personal fave, as a decades-long speedo guy - the 11" reflector and grid heads. The grids make the light more directional but fairly soft - great to get hard highlights on jewelry and food. And I find the 11" to be a great rim light/hairlight with either grid. 7" grids are handy for smaller products.)

For tabletop stuff, a medium softbox with a fabric grid is pretty priceless for soft light.

I think the key for you may be to envision what you want to see and think it through step by step, and just test like a madman. When I was figuring stuff out, I burned through hundreds of dollars of 4x5 and pack polaroid - digital will save you a fortune for testing.

For example - here are a couple shots of a technique I developed in the 90's - these primarily used the modeling lights of my speedo stuff (or flash with full CTO gel), with grids and snoots, on 35mm Tungsten film pushed 3 stops (for the grainy sort of pastel texture) - then the "slides" were projected onto 8x10 sheet film in my enlarger with a small on-camera flash taped to the condenser box to give me daylight color. Products were multiple exposures, sometimes layered on stacked sheets of glass - single products use separate exposures for foreground and background, which made soft halos and silhouettes. These took weeks of playing and a small mountain of 35mm polaroid. I used lighting gels where I wanted intense color, which the pushed film really loved. But at the start, i had a hazy idea of color and texture, and kept my mind open for happy accidents, etc.

attachment.php
attachment.php
attachment.php
attachment.php
Watch1.jpg Canon.jpg
 

Attachments

  • marykay.jpg
    marykay.jpg
    60.9 KB · Views: 157
  • shoe.jpg
    shoe.jpg
    91.8 KB · Views: 154
  • movado.jpg
    movado.jpg
    100.4 KB · Views: 161
  • 320t.jpg
    320t.jpg
    151 KB · Views: 152
Last edited by a moderator:

Dan Quan

Member
Joined
Jan 14, 2009
Messages
804
Location
Albuquerque,
Format
Multi Format
Products were multiple exposures, sometimes layered on stacked sheets of glass - single products use separate exposures for foreground and background, which made soft halos and silhouettes. These took weeks of playing and a small mountain of 35mm polaroid. I used lighting gels where I wanted intense color, which the pushed film really loved. But at the start, i had a hazy idea of color and texture, and kept my mind open for happy accidents, etc.

attachment.php

So with this shot for example, are you saying these are on two different sheets of glass, one below the other? And perhaps looking straight down, then changing focus (with the rear standard) for each bottle and exposing each separately on one sheet of film?

If I am envisioning this correctly the rear standard focus will account for the halo, whereas a front standard focus would change the bottle sizes more and make for a much larger halo.

Does this sound about right from your recollection?
 

M Carter

Member
Joined
Jan 23, 2013
Messages
2,147
Location
Dallas, TX
Format
Medium Format
Sort-of, Dan - but per the post, these were all shot 35mm for grain.

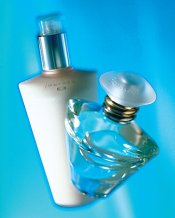
The lights were aimed on each level/layer, and I'd shoot the top layer, turn off those lights, turn on the bottom layer lights, and refocus on the bottom layer... this made the product on the top layer a soft silhouette that blocked some of the bottom layer. Then I'd light just the BG (the floor actually) and both products would be soft silhouettes.

I did some stuff like this 4x5, but mainly to really rack the DOF all to hell with shifts. Shot some 6x7MF as well, but the 35mm grain with EPJ was just (to me) luscious. That was my favorite film for some time for editorial stuff, and duping it onto sheet film really popped the grain and made it easy to show.

Usually by the time the shot was done, I had so many light stands, booms, and reflectors it was like a cage around the set... the dual products had to be only inches apart to keep the size relationships, lots of tiny black paper snoots, blackwrap, and snipped up metal flashing for reflectors.

The shot of the model, I had tungsten fresnels lighting the back wall, and a strobe on the model, with the modeling light turned off. I'd shoot at, say, a half second - after the flash popped I'd move the camera or twist the focus ring to soften the BG. This was a little difficult, usually I had an assistant on the model light switch. I also did this with two banks of tungsten lights on switches and would call "front - back!!" with longer exposures, racking focus as needed. I would also do the constant BG light with the foreground strobes, and just stick diffusion in front of the lens after the pop - usually just a 4x5 film sleeve rubbed on my forehead... long before the massive choice of diffusion the digital cinema era has given us. Diffusion tricks at least allowed me to stop down a bit more - some of this was really wide-open to get a good focus difference.

Those were some long nights, doing this commercially and waiting for snip tests from the lab in the morning!!! I'd push EPJ 2, 3 and 4 stops. Gorgeous stuff.
 
Last edited by a moderator:

Dan Quan

Member
Joined
Jan 14, 2009
Messages
804
Location
Albuquerque,
Format
Multi Format
Excellent! Thanks for the explanation! I am SOOO glad you found us and that you are willing to share. I hope I can pick your brain about more of your posts.

edit: I think I am going to try something like this on some old boots...
 

M Carter

Member
Joined
Jan 23, 2013
Messages
2,147
Location
Dallas, TX
Format
Medium Format
Thanks - it's kind of a deep black hole of possibilities... the #1 thing I found was keep my mind open for "gifts from the muse" kind of stuff... the dual perfume bottles, for instance - I was dialing it in, had some blue seamless on the floor. The polaroids had these odd silver streaks that at first I was like "damn it, another thing to fix" and then "that's really kind of pretty..."

Turned out to be the leg of a c-stand, my thought was I'd raise the paper over the floor and stands when all that mess was dialed in... I grabbed some 5/8 pipe from the grip pile and added some more, that's those sort of "rays" of highlight in the background. Thank you, gods of creativity... ya never know when they'll poke their heads in...
 

M Carter

Member
Joined
Jan 23, 2013
Messages
2,147
Location
Dallas, TX
Format
Medium Format
I'm humbled, I sometimes forget there are professionals like you on this site...

I've never created anything close to this.

Aaw, thanks - but that's just the product of lots of testing and playing.

Seems like half the questions asked on this site, the best answer is "go do a test!!!" - you usually learn a lot more than your initial question!
 

Dan Quan

Member
Joined
Jan 14, 2009
Messages
804
Location
Albuquerque,
Format
Multi Format
Excellent! Thanks for the explanation! I am SOOO glad you found us and that you are willing to share. I hope I can pick your brain about more of your posts.

edit: I think I am going to try something like this on some old boots...
Actually maybe this is not off-topic since it's a digiroid of my current progress. This is shot on an un-lit white BG because I planned to shoot it with a white BG and blur the outline of the subject onto the BG creating a white BG with a subject blur and then a subject with a highlight outline and etc. Anyway, I just need to workout the beauty etc...

I am not sure I can pull off a white or light grey BG with this subject and mindset while keeping the lighting "Drama" in B&W, but I will know more tomorrow.

As Always C&C are welcome.

edit: no need to be gentle.
 
Last edited by a moderator:

M Carter

Member
Joined
Jan 23, 2013
Messages
2,147
Location
Dallas, TX
Format
Medium Format
Your biggest problem may be the white or gray reflecting all over the subject and killing the contrast... in those cases, glass or some kind of stand (where the boot hides the pole & base) could help. Glass, you get into a fistfight with reflections! I like the shot, my personal hoo-ha would be hit it with some harder directional light, like it's sitting in hard window light - sometimes that gives a static item a sense of motion and direction (the hard rim of light under the sole seems odd, to me it's like "the bottom is where the shadows are", but then it does add a compositional sort of line... what the F do i know anyway!??!)... but I dig grungy old stuff under the lights.

On the attached shot, I lifted the metal box with a block... but you can see the shadow of the block, bottom left... I think I got tired of messing with this one.

And the hosemaster... I remember shooters that had that, and the guys doing DIY with big mag lights... and then the spinning diffusion disc that triggered different packs for each successive level of diffusion - I once made a "guillotine" style that tripped a pack with none and then a pack with "some"... but that look got dated very fast...

attachment.php
 

Attachments

  • bracelet.jpg
    bracelet.jpg
    144.9 KB · Views: 119

M Carter

Member
Joined
Jan 23, 2013
Messages
2,147
Location
Dallas, TX
Format
Medium Format
This was my DIY "guillotine diffuser"... an aluminum frame with a wooden panel with two round holes and a rubber band. When you "Dropped" it, it triggered a pack when hole #1 aligned with the lens... then when hole #2 passed the lens, it had diffusion (a 4x5 film sleeve rubbed on my forehead) (yeah, gross, I know) and triggered a second pack- the whole thing took about a half second, the rubber band pulled the wood down. The front light was clean, then the background diffused. Shot with Polagraph so - funky funky grain. God, I miss that awesome film.
attachment.php
 

Dan Quan

Member
Joined
Jan 14, 2009
Messages
804
Location
Albuquerque,
Format
Multi Format
are you still shooting?
 
Last edited by a moderator:

M Carter

Member
Joined
Jan 23, 2013
Messages
2,147
Location
Dallas, TX
Format
Medium Format
Yeah, way more video than stills most times. But I'm on APUG since I converted an old kitchen to a darkroom last year. Working my way up to big emulsion prints on canvas. I think it's the same brain tumor that got me into 35mm stacked product on glass and hand-duping sheet film...

This is a buddy I grew up with... shot his music video and my wife plays the "punk rock mom"... and now my alter ego is Dikkie Smythe, lead guitarist for the Samee Skumn band, every year or so.

[video=youtube;ZKmG-KvzcVk]https://www.youtube.com/watch?v=ZKmG-KvzcVk[/video]
 
Joined
Dec 10, 2009
Messages
6,297
Format
Multi Format
At one time in my short photo career, I learned about lighting by assisting some great studio photographers. After that, I just experimented a lot with polaroid. Nothing beats learning by doing. I shot a lot of polaroid and took careful notes.
Learn how to diagram your lights. Since polaroid is hard to come by, I'd shoot digital photos to take notes.
I wouldn't try to learn every technique, but learn to light that suits your style. Believe it or not, I learned a lot from watching old BW movies and looking at old paintings in museums. If you're really serious about studio lighting, get good grip equipment. Take a look at this website.

Dead Link Removed

I also made a lot of grip gear with black cards and foil. Use and make gear creatively. Learn the range of your film by knowing when your shadows will go completely black and when your highlights will blowout. From there, you can make decisions on gobos and fills. learning how to light can be frustrating but also has great rewards. I'm still learning about lighting. Light is not just to get an image on film, but can create a wide range of emotions if done correctly.
 
Photrio.com contains affiliate links to products. We may receive a commission for purchases made through these links.
To read our full affiliate disclosure statement please click Here.

PHOTRIO PARTNERS EQUALLY FUNDING OUR COMMUNITY:


Ilford ADOX Freestyle Photographic Stearman Press Weldon Color Lab Blue Moon Camera & Machine
Top Bottom