Blotch? Visual distortions at stop bath

End Table

A
End Table

  • 1
  • 1
  • 62
Cafe Art

A
Cafe Art

  • 8
  • 3
  • 191
Sciuridae

A
Sciuridae

  • 6
  • 3
  • 188
Takatoriyama

D
Takatoriyama

  • 6
  • 3
  • 176

Recent Classifieds

Forum statistics

Threads
197,659
Messages
2,762,549
Members
99,432
Latest member
sciencegirl100
Recent bookmarks
2

RWJgr

Member
Joined
Jan 27, 2023
Messages
16
Location
Netherlands
Format
35mm
Hi all šŸ‘‹

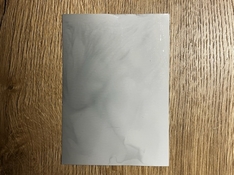
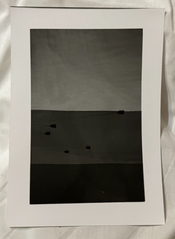
I very recently started exploring the world of darkrooms and I experimented with a couple of prints. While some came out great, in others I have significant visual distortions appearing when stopping development.

For your convenience, I ā€œburnedā€ a white paper to show you the visuals. Using Ilford PQ Universal diluted 1+9 & Ilfostop at 1+19.

Any thoughts on what am I doing wrong? šŸ˜…
 

Attachments

  • 682E2DDF-5707-42E7-BC4D-9B81C7B2FF02.jpeg
    682E2DDF-5707-42E7-BC4D-9B81C7B2FF02.jpeg
    114 KB · Views: 123

pentaxuser

Member
Joined
May 9, 2005
Messages
19,653
Location
Daventry, No
Format
35mm
It might help if you were able to show us some of the prints that had visual distortion instead of a burned white paper as I am unsure what this is

All that a stop bath does is to stop the development of a print after it is taken out of the developer and nothing more You could fix without a stop bath and all that would do is allow a carry-over of developer into your fixer which causes the fixer to be exhausted quicker

So unless there is something wrong with the stop bath I cannot work out why prints come out distorted

Here's something to try: Put a print that is fully developed in fresh developer and if it looks OK straight into fresh fixer and see what happens. If the distortion is not there then there is something wrong with your stop bath

Try this with several prints to be sure that one OK print is not just lucky

Let us know what happens

pentaxuser
 
Last edited:

MattKing

Moderator
Moderator
Joined
Apr 24, 2005
Messages
52,045
Location
Delta, BC Canada
Format
Medium Format
Are you agitating the prints continuously in both the developer and the stop bath?
 
OP
OP

RWJgr

Member
Joined
Jan 27, 2023
Messages
16
Location
Netherlands
Format
35mm
@pentaxuser thanks for your input. i thought that exposing a bit a blank paper might give a better impression than a photo; attached see the top half part of the test print I did.

I tried developing the paper and then running it directly through water, they seem to come out alright. Unfortunately I’m out of paper right now to do more tests 🤦

@MattKing I try ā€œslidingā€ the photo into the trays, (occasionally giving a small press with the tongues if the paper floats) and then gently giving a nudge 2-3 times in each tray.
 

Attachments

  • BE796C0B-9063-4088-B053-8EC440B426C5.jpeg
    BE796C0B-9063-4088-B053-8EC440B426C5.jpeg
    42.8 KB · Views: 116

Brendan Quirk

Subscriber
Joined
Dec 3, 2018
Messages
228
Location
Mayville, WI USA
Format
Medium Format
For what it is worth, when I was very new to this (1971), my friend and I made up Kodak indicator stop bath way too strong. The result was a mottled appearance on the prints. We had to pull them from the stop very quickly. After that, proper mixing removed the problem. I can not say if this is pertinent here, but it is a thing to think about.
 
OP
OP

RWJgr

Member
Joined
Jan 27, 2023
Messages
16
Location
Netherlands
Format
35mm
Hey Brendan,

I didn’t think of pulling them out of the stop bath earlier to be honest as I was aiming for a minimum of 10 sec. I’ll give it a shot as well next time, thanks for sharing your experience!

For what it is worth, when I was very new to this (1971), my friend and I made up Kodak indicator stop bath way to strong. The result was a mottled appearance on the prints. We had to pull them from the stop very quickly. After that, proper mixing removed the problem. I can not say if this is pertinent here, but it is a thing to think about.
 

MattKing

Moderator
Moderator
Joined
Apr 24, 2005
Messages
52,045
Location
Delta, BC Canada
Format
Medium Format
@MattKing I try ā€œslidingā€ the photo into the trays, (occasionally giving a small press with the tongues if the paper floats) and then gently giving a nudge 2-3 times in each tray.

I'd give it more agitation than that.
Edit: and to ensure evenness, I always leave prints in the stop for a minimum of 30 seconds.
By the way, I expect you mean "tongs" rather than "tongues", because as you know, "tongues" and photographic chemicals don't go well together :smile:
I agree with Brendan Quirk - check the dilutions!
And I forgot to say - welcome to Photrio!
 

Brendan Quirk

Subscriber
Joined
Dec 3, 2018
Messages
228
Location
Mayville, WI USA
Format
Medium Format
Hey Brendan,

I didn’t think of pulling them out of the stop bath earlier to be honest as I was aiming for a minimum of 10 sec. I’ll give it a shot as well next time, thanks for sharing your experience!
Having to pull from the stop that fast is not really a solution. The stop bath should have no effect on the print. In my case, the extremely strong acid bath must have caused some degradation of the print.
 

gone

Member
Joined
Jun 14, 2009
Messages
5,505
Location
gone
Format
Medium Format
10 or 15 seconds should be plenty for a print sitting in the stop bath. Are you picking the print up by the corner to let it get excessive stop fluid off? Like someone said, I would ck your dilution ratio, maybe buy new stop bath? If you did a water stop bath and they came out OK, then you know what your problem is.
 

MattKing

Moderator
Moderator
Joined
Apr 24, 2005
Messages
52,045
Location
Delta, BC Canada
Format
Medium Format
The only reason I leave it longer in the stop bath is that I can more easily ensure that every part of the print has been fully immersed in the stop and that the agitation ensures no part of the print has been incompletely stopped.
But yes, if full immersion and agitation is ensured, 10 - 15 seconds will do.
 

koraks

Moderator
Moderator
Joined
Nov 29, 2018
Messages
20,988
Location
Europe
Format
Multi Format
I have significant visual distortions appearing when stopping development.

Can you confirm you're still working under safelight conditions as the pattern emerges? I.e. you're not turning on the white room light as soon as you slide the paper into the stop bath?
Just to remove any possible source of confusion: it's best to keep the white light off until the paper is already in the fixing bath.
 

Anon Ymous

Member
Joined
Feb 7, 2008
Messages
3,660
Location
Greece
Format
35mm
I have a suspicion that you're not developing long enough. What paper is it and how long do you develop? What is the temperature of the solutions? If you "snatch" a print when it "looks right", then it might not be fully developed.
 

snusmumriken

Subscriber
Joined
Jul 22, 2021
Messages
2,369
Location
Salisbury, UK
Format
35mm
Is it possible that the paper stock has been exposed to light, either through careless handling, or because your safelight is too close to the trays? The paper looks quite creased, so I’d favour the former suggestion.
 
OP
OP

RWJgr

Member
Joined
Jan 27, 2023
Messages
16
Location
Netherlands
Format
35mm
I'd give it more agitation than that.
Edit: and to ensure evenness, I always leave prints in the stop for a minimum of 30 seconds.
By the way, I expect you mean "tongs" rather than "tongues", because as you know, "tongues" and photographic chemicals don't go well together :smile:
I agree with Brendan Quirk - check the dilutions!
And I forgot to say - welcome to Photrio!
@MattKing I meant tongs indeed, haha! Thanks for the support and warm welcome!

Having to pull from the stop that fast is not really a solution. The stop bath should have no effect on the print. In my case, the extremely strong acid bath must have caused some degradation of the print.
@brendan, I see your point. I tripled check my dilution ratio with what Ilford says, maybe I can break that down even further. I might try as well.
10 or 15 seconds should be plenty for a print sitting in the stop bath. Are you picking the print up by the corner to let it get excessive stop fluid off? Like someone said, I would ck your dilution ratio, maybe buy new stop bath? If you did a water stop bath and they came out OK, then you know what your problem is.
@momus, I am, though the ā€œdistortionsā€ start to appear within 3-4 sec in the stop bath. What surprises me is that the ilfostop is newly bought šŸ˜•
Can you confirm you're still working under safelight conditions as the pattern emerges? I.e. you're not turning on the white room light as soon as you slide the paper into the stop bath?
Just to remove any possible source of confusion: it's best to keep the white light off until the paper is already in the fixing bath.
@koraks,
@snusmumriken

I tested the safelight by exposing a blank paper on it, in direct contact with the light source and then developing it, came out 100% white is was from the box. I assume that this is an indication of being safe. (FYI I’m using an RGB led stick from Yongnuo (YN360), switching only the red light on and adding the CTO diffuser). I’ve got some prints 100% clear so that shouldn't be the problem. I’m opening up the room light once I’ve let it for about a minute in the fixer.

Attached is also another example of the distortions :
AECEB0D0-AFFC-4D60-94EC-BA90B8E4DA78.jpeg


839EC871-FFCB-4453-B26A-2884A7BC3905.jpeg


I have a suspicion that you're not developing long enough. What paper is it and how long do you develop? What is the temperature of the solutions? If you "snatch" a print when it "looks right", then it might not be fully developed.
@Anon Ymous, I usually expose the paper for 3-4 sec at f8. I use a multicontrast rc paper (https://fotofilmfabriek.nl/product/fotofilmfabriek-easy-print-rc-311-10x15cm-25vel/). I relatively leave it for 20-30 sec in the developer, having seen some good results so far on some occasions. In other cases where I must have overexposed, I’ve seen the paper getting complete dark after 5 sec in the developer. Temp varies between 22C and 19.7 the lowest. I must say that sometimes I definitely snatch it when I think that ā€œit looks rightā€ šŸ˜…
 
Last edited:

koraks

Moderator
Moderator
Joined
Nov 29, 2018
Messages
20,988
Location
Europe
Format
Multi Format
Well, the plot thickens, as they say. Perhaps some kind of contamination is playing a role here.

What kind of tray are you using for the stop bath? Do you always use the same tray? What happens if you use a different, clean/new tray (any plastic storage container will do just fine, or even an oven baking tray)?
Have you tried using cleaning vinegar diluted 1+5 or so instead of your Ilford stop? The odds that there's a problem with the Ilford product are next to zero, but if some form of contamination got into that jar, perhaps that could explain the issue.

Mind you, any contamination would have to be pretty odd/rare to have this effect. First thing that comes to mind is a sulfide, although I'd expect the clouds to be brown, not black. You don't use these trays for other stuff like PCB etching etc., right? Involving chemistry like tin chloride etc.?
 
OP
OP

RWJgr

Member
Joined
Jan 27, 2023
Messages
16
Location
Netherlands
Format
35mm
Well, the plot thickens, as they say. Perhaps some kind of contamination is playing a role here.

What kind of tray are you using for the stop bath? Do you always use the same tray? What happens if you use a different, clean/new tray (any plastic storage container will do just fine, or even an oven baking tray)?
Have you tried using cleaning vinegar diluted 1+5 or so instead of your Ilford stop? The odds that there's a problem with the Ilford product are next to zero, but if some form of contamination got into that jar, perhaps that could explain the issue.

Mind you, any contamination would have to be pretty odd/rare to have this effect. First thing that comes to mind is a sulfide, although I'd expect the clouds to be brown, not black. You don't use these trays for other stuff like PCB etching etc., right? Involving chemistry like tin chloride etc.?

I’m using the tri-color Paterson trays. I haven’t used any other containers to test this out but I can definitely add this to the ā€œhope this worksā€ list I’m building to solve this haha. The trays are exclusively for my darkroom so no other usage. I have changed trays one time but I made sure that I extensively washed it to remove any residue.
 

Anon Ymous

Member
Joined
Feb 7, 2008
Messages
3,660
Location
Greece
Format
35mm
@MattKing I meant tongs indeed, haha! Thanks for the support and warm welcome!


@brendan, I see your point. I tripled check my dilution ratio with what Ilford says, maybe I can break that down even further. I might try as well.

@momus, I am, though the ā€œdistortionsā€ start to appear within 3-4 sec in the stop bath. What surprises me is that the ilfostop is newly bought šŸ˜•

@koraks,
@snusmumriken

I tested the safelight by exposing a blank paper on it, in direct contact with the light source and then developing it, came out 100% white is was from the box. I assume that this is an indication of being safe. (FYI I’m using an RGB led stick from Yongnuo (YN360), switching only the red light on and adding the CTO diffuser). I’ve got some prints 100% clear so that shouldn't be the problem. I’m opening up the room light once I’ve let it for about a minute in the fixer.

Attached is also another example of the distortions : View attachment 327825

View attachment 327823


@Anon Ymous, I usually expose the paper for 3-4 sec at f8. I use a multicontrast rc paper (https://fotofilmfabriek.nl/product/fotofilmfabriek-easy-print-rc-311-10x15cm-25vel/). I relatively leave it for 20-30 sec in the developer, having seen some good results so far on some occasions. In other cases where I must have overexposed, I’ve seen the paper getting complete dark after 5 sec in the developer. Temp varies between 22C and 19.7 the lowest. I must say that sometimes I definitely snatch it when I think that ā€œit looks rightā€ šŸ˜…

Ah, there's your problem... You develop too little. At this temperature, a typical RC paper needs a minute or so. Developing more will not hurt. So you basically overexposed your paper and try to salvage a print by snatching it. It won't help as you've found out. The paper is still developing rather rapidly, but is brought to a stop abruptly, but above all not uniformly. That's why you get these streaks...
 
OP
OP

RWJgr

Member
Joined
Jan 27, 2023
Messages
16
Location
Netherlands
Format
35mm
I see
Ah, there's your problem... You develop too little. At this temperature, a typical RC paper needs a minute or so. Developing more will not hurt. So you basically overexposed your paper and try to salvage a print by snatching it. It won't help as you've found out. The paper is still developing rather rapidly, but is brought to a stop abruptly, but above all not uniformly. That's why you get these streaks...

I see. Thanks for the heads up here. I’ll run some tests in the coming week once I’ve got myself some paper while continuing digging through some threads/guides in this forum to help enhance my skills & do some trial and errors.

Thank you all for the support and knowledge sharing here, I’ll share once I have some new tests 😁
 

Don_ih

Member
Joined
Jan 24, 2021
Messages
7,411
Location
Ontario
Format
35mm RF
After a minute and a half, rc paper in the developing tray should be "done" - i.e., if you leave it there another minute, you won't see much or any change. You should try to get your exposure such that full development gives you your desired result.
If you're having difficulty getting short enough exposures, you can put a filter under the lens to decrease the light or you can try to find a weaker light bulb for your enlarger (if possible).
 
OP
OP

RWJgr

Member
Joined
Jan 27, 2023
Messages
16
Location
Netherlands
Format
35mm
After a minute and a half, rc paper in the developing tray should be "done" - i.e., if you leave it there another minute, you won't see much or any change. You should try to get your exposure such that full development gives you your desired result.
If you're having difficulty getting short enough exposures, you can put a filter under the lens to decrease the light or you can try to find a weaker light bulb for your enlarger (if possible).
Hey @Don Heisz, I do have this issue with short exposure times actually. i.e, a low key photograph exposed for 3 sec at f8, is becoming ā€œburnedā€ when left for more than 15 sec in the developer.
 

Don_ih

Member
Joined
Jan 24, 2021
Messages
7,411
Location
Ontario
Format
35mm RF
Go to f11. What developer and what dilution are you using? What enlarger and what wattage light bulb?

Also this:

1674908508842.png


looks like contamination from fixer and dev mixing. Are you using different tongs for each tray? Don't use your hands - no matter how many times you see someone doing it on a video.
 

cramej

Member
Joined
Dec 29, 2009
Messages
1,235
Format
Multi Format
All of your answers are in the posts above.

#1 problem - not developing fully. 1'30" in the developer will solve the swirlies.

#2 problem - short exposure time.
  • Enlarger bulb too bright.
    • Find the correct bulb if it's not
    • Use an inline dimmer
    • Stop down more
  • Negatives too thin. Under exposed and/or under developed
    • Use better exposed negatives
    • Check your film developing process to be sure you're developing for the right time
    • Check your camera and metering to be sure exposure is correct
#3 problem - Consistency.
  • Only change one variable at a time.
    • First, don't use fingers and keep your tongs separate. Wash and dry hands if you get developer or fixer on them before handling any paper.
    • Second, solve the swirlies. You don't need to use full sheets of paper for this, cut one into fourths
    • Third, work with the exposure time.
    • Etc....
 

snusmumriken

Subscriber
Joined
Jul 22, 2021
Messages
2,369
Location
Salisbury, UK
Format
35mm
This might help. For film, which will go on developing far beyond the ideal contrast, the stop bath does indeed stop development swiftly and cleanly. But for prints, ā€˜stop bath’ is arguably a misleading term, because - as others have said above - if you have correctly exposed the print, not much will change as a result of prolonged development. Instead the greater importance of the stop bath for prints is to protect your fixer by preventing developer carry-over.
 

mshchem

Subscriber
Joined
Nov 26, 2007
Messages
14,303
Location
Iowa City, Iowa USA
Format
Medium Format
Ah, there's your problem... You develop too little. At this temperature, a typical RC paper needs a minute or so. Developing more will not hurt. So you basically overexposed your paper and try to salvage a print by snatching it. It won't help as you've found out. The paper is still developing rather rapidly, but is brought to a stop abruptly, but above all not uniformly. That's why you get these streaks...

I agree with @Anon Ymous . You are overexposing and underdeveloping your prints. At 20°C 1.5 to 2 minutes developer, will give full scale unblotched prints. I use a standard 2 minute development time, ALWAYS, develop at the same time/temperature (at least as much as possible) . The practice of developing until it looks right and the snatching it out of the developer will lead to insanity šŸ˜€.
Also constant gentle agitation, read gentle, is the way to go.

In the past many RC papers had a developing agent incorporated in the paper's emulsion, these would develop in 30-45 seconds, crazy fast.
 
Photrio.com contains affiliate links to products. We may receive a commission for purchases made through these links.
To read our full affiliate disclosure statement please click Here.

PHOTRIO PARTNERS EQUALLY FUNDING OUR COMMUNITY:


Ilford ADOX Freestyle Photographic Stearman Press Weldon Color Lab Blue Moon Camera & Machine
Top Bottom