BIG prints

Curved Wall

A
Curved Wall

  • 3
  • 0
  • 51
Crossing beams

A
Crossing beams

  • 8
  • 1
  • 65
Shadow 2

A
Shadow 2

  • 3
  • 0
  • 52
Shadow 1

A
Shadow 1

  • 3
  • 0
  • 49
Darkroom c1972

A
Darkroom c1972

  • 3
  • 2
  • 94

Recent Classifieds

Forum statistics

Threads
198,836
Messages
2,781,594
Members
99,719
Latest member
alexreltonb
Recent bookmarks
0

rexp

Member
Joined
Oct 29, 2004
Messages
168
Location
Lincoln, Neb
Format
Med. Format RF
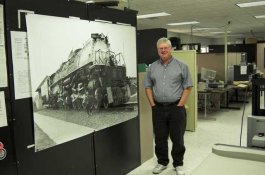
There is an Engineer I work with who is into photography, and has been intermittantly shooting an 8x10 for the past 10 years or so. A few weeks ago he brings in a print to hang on the wall. A 4x6. That is 4ft x 6ft. Razor sharp edge to edge, and you have to look really close to see the grain.

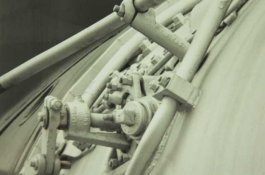
For about the last two years he has been building a horizontal enlarger for his 8x10 negatives. He designed the entire thing from scratch. The light box is illuminated with green & blue LEDs which are controllable for use with multicontrast paper (custom control circuitry with feedback for stability, and tons of light available for reasonable exposure times). He tinkered with & tested many ideas over the last couple of years, and has ended up with a great system for making BIG prints. The last few months we often discussed methods for handling large pieces of wet paper, which was his last obstacle to overcome.

Quite an accomplishment. If I can ever get over there & if he will let me shoot some picts, I will post them.
 

unregistered

Member
Joined
May 4, 2006
Messages
290
Format
Multi Format
What do you mean handle? Processing or for washing and drying?

BTW, how much did his enlarger cost to make? And can it do other formats or just 8x10?
 

Robert Hall

Member
Joined
Aug 18, 2004
Messages
2,033
Location
Lehi, Utah
Format
8x10 Format
Forget the wet paper, let's see the print!

Oh, and see if he would make a 12x20!! (or at least show pics of the enlarger)
 
OP
OP

rexp

Member
Joined
Oct 29, 2004
Messages
168
Location
Lincoln, Neb
Format
Med. Format RF
"Handling paper" in my note meant how to process, dry to dry. He ended up with a two-roller contraption with the paper in a loop around them. Think of it as a conveyer belt where the print is the belt. This hung into a home-made tray of chemistry. Four trays, dev stop fix & wash. Dump the wash a couple of times. Easy to visualize, difficult to make work in practice.

As far as cost, I haven't a clue. The easel alone took 2 or 3 4x8 sheets of 3/4" MDF. The negative is held in place by taping to a piece of glass, so any format up to at least 10"x10" is workable.

I don't think he is interested in making these for people, or sharing the design for that matter. I just thought this group would appreciate his efforts, and results. Maybe it will gently nudge some individual who has thought of doing the same... the results are incredible. My recommendation for anyone interested would be to realistically decide on your strenths & weaknesses for a construction project like this, figure out which parts will be the absolute toughest to accomplish, and do them first. I would suggest the light source. Stable (both with voltage and temperature), uniform over a 10" square diffuser, with green & blue sources that are individually controlled. Oh, and bright (think in hundreds and hundreds of LEDs). Makes a Durst 138 look like a bargain. I have seen old horizontal enlargers from graphics art shops which would be an excellent starting point, and some of those are available for carting them out.
 

Donald Miller

Member
Joined
Dec 21, 2002
Messages
6,230
Format
Large Format
Robert Hall said:
Forget the wet paper, let's see the print!

Oh, and see if he would make a 12x20!! (or at least show pics of the enlarger)

Robert if you are looking for enlargements from 12X20 you might check with this guy.

http://www.f32.net/Associates/TomYanul.html

I don't hear much about him anymore...he was enlarging from 12X20
 

unregistered

Member
Joined
May 4, 2006
Messages
290
Format
Multi Format
Well here is Ilfords publication on processing, and its pretty decent, although I don't insert the paper the way they do, and their way seems weird. Ilford mural printing guide But it will give you an idea. You can buy plastic troughs for hanging wallpaper and use them or if he's going to be doing this a lot, I'd suggest making a 5 or 6 bath dedicated system out of 3/8" or thicker plexiglass, with drains that have a screw tube into them for easy drainage. I've got plans for that if he's interested. Its pretty basic but after doing mural printing for a while, you figure out easy ways to do things, processing wise.

As for drying, the easiest way, although you do need some space, is taping them on particle board that has that smooth, white surface on it. You squeegie the excess water off, them use kraft tape, the kind thats brown and has fiber web in it. It has a wet activated glue on 1 side. You attach this tape to the print and board. This will make the print dry flat, and therefore you don't need any type of press to flatten out the dry print. If space allows, you can then either lay these flat, and stack them on top of each other with spacers inbetween, or stand them verticle.

I've done hundreds of murals and didn't have a press. This made the most sense to me, and reduced prost production of flattening the prints.

I am currently looking for a horizontal enlarger and thats why I was curious. Used one are usually far away, thus increasing the price thru shipping. Plus, the sellers still are trying to charge to much for them.

Hope this helps.
 

unregistered

Member
Joined
May 4, 2006
Messages
290
Format
Multi Format
Well I still have an Agfa stock...the MCC. I'd assume Ilford and Forte still produce it. And I'd bet Bergger would make a special package if asked.

John???
 

Nick Zentena

Member
Joined
Nov 21, 2004
Messages
4,666
Location
Italia
Format
Multi Format
Kentmere is in rolls to.

If people do a search on LEDs they should have some discussions on building LED light heads. Unless the prices have come down a lot since last year it must have cost ALOT. A lot more then any used 8x10 enlarger that's for sure.
 
OP
OP

rexp

Member
Joined
Oct 29, 2004
Messages
168
Location
Lincoln, Neb
Format
Med. Format RF
Here is a photo of Bob standing next to the print, and a close-up from the upper center of the print showing an area approx 2.75" tall.
 

Attachments

  • DSC_2506-02a.jpg
    DSC_2506-02a.jpg
    31.3 KB · Views: 398
  • DSC_2507-01.jpg
    DSC_2507-01.jpg
    23.5 KB · Views: 357

Ed_Davor

Member
Joined
Jan 22, 2006
Messages
252
Format
Multi Format
Hey, that's a UP 4-8-8-4 , isn't it? Love those things
 

tommy5c

Member
Joined
Feb 6, 2006
Messages
161
Location
Wyoming
Format
Large Format
I know that this takes the discussion a little off topic , but...
There is a new company creating lighting for sets using LEDs and they come in 1'x1' panels. and I belive they run at 5600k. anyone looking to create a custom enlarger of their own might be able to use them. here's their web site http://www.litepanels.com/
 

glbeas

Member
Joined
Sep 25, 2002
Messages
3,931
Location
Marietta, Ga. USA
Format
Multi Format
tommy5c said:
I know that this takes the discussion a little off topic , but...
There is a new company creating lighting for sets using LEDs and they come in 1'x1' panels. and I belive they run at 5600k. anyone looking to create a custom enlarger of their own might be able to use them. here's their web site http://www.litepanels.com/

Wow, for the price I can buy a good used 10x10 enlarger complete. It'd be good for converting a process camera into a ULF enlarger when banked in a 2x2 array.
 

tommy5c

Member
Joined
Feb 6, 2006
Messages
161
Location
Wyoming
Format
Large Format
I didn't say it was a cheap way, but they are low temp and when looking at 11x14 or 12x20 maybe it's worth it. they will come down in price in the next 6mos. I'm not an advocate, but just thought they would be better than DIY
 

r-brian

Member
Joined
Feb 25, 2003
Messages
721
Location
Albuquerque, NM
Format
DSLR
Take a look at Clyde Butcher's web site: http://www.clydebutcher.com/

Clyde has been printing 5'x7' and larger for years now. You just need an enlarger that weighs a ton, literally. It is amazing to see a print so large that you feel like you are standing in it.
 
Joined
Oct 20, 2004
Messages
1,093
Location
Fond du Lac, WI
Format
Multi Format
Well, I have an 8x10 De Vere mural enlarger in the basement, but so far I've only enlarged to 16x20, which looks pretty big since I've stuck to 8x10 prints for years. Conceivably I could do a 5 ft by 6 ft picture, which would be fun, but the cost of mural sized paper is not for the monetarily challenged, like me. Maybe someday.
 

Donald Miller

Member
Joined
Dec 21, 2002
Messages
6,230
Format
Large Format
I don't think that these present a viable source for large format (8X10 and larger) enlargers. The light output is too small for one thing and for another they would only work on graded materials unless one used printing filters even if the output were adequate. Printing filters would further diminish the light output.

Most enlargers of that size have 1000 watt minimum and more likely 2000 watt lamps for the 8X10's...11X14 and 16X20 enlargers will be up in the 5000 watt size.

That model in the illustration would not be holding the panel that near her if it were 1000 watts. I know because I have 1000 watts installed in my 5X7 enlarger. You do not want to look at it...
 
OP
OP

rexp

Member
Joined
Oct 29, 2004
Messages
168
Location
Lincoln, Neb
Format
Med. Format RF
While it is true you need lots of light to make big enlargements, that doesn't mean you need 1KW lamps. Unfortunately, the wavelengths of light needed for printing on multigrade paper just happen to be those least efficiently produced in a filament lamp. Since this print was made on Ilford MGIVRC paper (easy to find rolls on ePay) you can refer to the document at http://www.ilfordphoto.com/Webfiles/2006130201152306.pdf to see the effect of color on print contrast for this paper. Incandescent lamps are poor generators of blue and green light. While you may well need 1KW to efficently enlarge using an incandescent bulb, the majority of the light available is being absorbed by your filtering. By using blue and green LEDs, Bob's enlarger is able to produce the needed light flux much more efficently, and since the colors are what you want, there is no need for additional filtration.

For the print shown in my first post, the exposure was 100 seconds using a 300mm el-Nikkor lens at f16. Pretty reasonable exposure time. Each color of light in his enlarger is dissipating 50W of power, or 1/10 of what is traditionally used. It works because the wavelengths of light being produced in the light head are those that are needed by the paper. His setup gives good contrast control and maintains printing speed by being able to vary the intensity of the blue or green LEDs independently. By this I don't mean each LED, but each color of LEDs. Think of it as a knob for adjusting the blue, and a knob for adjusting the green. If things are calibrated correctly, you turn both knobs to the max for a print grade of 2. Turn the blue knob down for a lower contrast print, or turn the green knob down for a higher contrast print. If you need a longer exposure time, turn both knobs down.

Oh - yes the train is a 4-8-8-4, #4023. The photo was taken about 13 years ago in Omaha Nebraska at the park area ran by the Union Pacific Railroad near their offices. The train has since been moved to a city park somewhere in Omaha.
 

Joost

Member
Joined
Apr 24, 2006
Messages
8
Location
Eindhoven, N
Format
Multi Format
I think the idea to use green and blue LEDs is pretty smart. All light is used efficiently so like rexp rightfully states, one can do with much less power. A factor 10 is pretty amazing though. I'm not sure about today's LED prices, but what I do know is that year by year both efficiency (lumen/watt) increases and price ($/watt) decreases in an amazing speed. As a result the overall cost ($/lumen) decreases on average with a factor 2 (TWO) per year. So, even if it is too expensive today, it will be very affordable soon.
 

michael9793

Member
Joined
Feb 4, 2003
Messages
2,018
Location
Fort Myers,
Format
ULarge Format
REXP,

Clyde Butcher who is known for his 4x6 foot prints and larger can help you on processing. He may even have something on his website about how he processes his prints.

mike
 
OP
OP

rexp

Member
Joined
Oct 29, 2004
Messages
168
Location
Lincoln, Neb
Format
Med. Format RF
Funny... last evening my daughter had a soccer game in Council Bluffs (just across the river from Omaha) and on the way home, there is old #4023. It is all painted up on top of the hill where I-80 comes into Nebraska. Here is a link to some photos showing the moving process, and final location.

http://www.uphs.org/4023move.html

I just might have to go take some picts myself, although they will never be printed larger than 11x14 or 16x20 (inches - not feet).

later
 

Mongo

Member
Joined
Jan 17, 2004
Messages
960
Location
Pittsburgh,
Format
Multi Format
I'm going to be building an 8x10 enlarger when I build my new darkroom later this year, and the enlarger will basically consist of a light source (yet to be designed, but something like the one Adams shows in his darkroom...can't remeber if it's in "The Negative" or "The Print") and a Korona Pictorial View camera that I purchased and rebuilt. I have a bunch of process lenses and will play with them to find which ones work well for enlarging.

For the negative holder I'm going to try to build something out of springs and clips that will hold the negative tight without having any glass involved. (Bruce Wehman shows one on his web site in the Tech section under "Corner Pull Negative Carrier".)

I'll probably use some form of flourescent for the light source, and use Ilford 6x6 filters behind the lens for contrast control.
 

unregistered

Member
Joined
May 4, 2006
Messages
290
Format
Multi Format
I have an 8x10 Alan Ross/Aristo/Beseler style cold light head and negative stage for sale if you are inteested. It was designed for the Beseler 45 series, with the 8x10 conversion kit, and I'm sure could be tweaked to fit your unit. If interested, email me.
 

Mongo

Member
Joined
Jan 17, 2004
Messages
960
Location
Pittsburgh,
Format
Multi Format
Thanks Alexis. I'll be in touch when I'm back from Paris in a few weeks.
 

unregistered

Member
Joined
May 4, 2006
Messages
290
Format
Multi Format
Ah Paris. J'ai vécu là pendant 3 années. Have a Pastis on any sidewalk cafe for me.

Of course you'll have to pay for it...but it will be worth it.

Bon Voyage
 
Photrio.com contains affiliate links to products. We may receive a commission for purchases made through these links.
To read our full affiliate disclosure statement please click Here.

PHOTRIO PARTNERS EQUALLY FUNDING OUR COMMUNITY:


Ilford ADOX Freestyle Photographic Stearman Press Weldon Color Lab Blue Moon Camera & Machine
Top Bottom