I have an elderly Beseler 45MXT that has a sticky focus issue.
Possibly part of the issue is the plastic guides on the focus rack which when tightened to point where there is no movement leads to a click click as the focus is adjusted and focus is missed be it going up or down the rack.
Do the plastic guides/ slide bearings need to be replaced?
The other issue is the so called focus locking cartridge .
The Beseler parts breakdown offers no detail on what the part consists of.
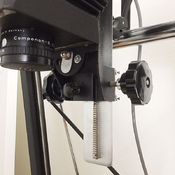
My enlarger has knob and an all metal plunger that grabs , or doesn't, the focus shaft.
This seems primitive ; I expected a friction spring or nylon plunger; just what should be in the part?
Any help please.?
Should I dump it and fin an LPL 4500 ?
TB
Possibly part of the issue is the plastic guides on the focus rack which when tightened to point where there is no movement leads to a click click as the focus is adjusted and focus is missed be it going up or down the rack.
Do the plastic guides/ slide bearings need to be replaced?
The other issue is the so called focus locking cartridge .
The Beseler parts breakdown offers no detail on what the part consists of.
My enlarger has knob and an all metal plunger that grabs , or doesn't, the focus shaft.
This seems primitive ; I expected a friction spring or nylon plunger; just what should be in the part?
Any help please.?
Should I dump it and fin an LPL 4500 ?
TB