
Is anyone out there able to give me an easy to understand explanation of this 'bellows extension compensation' that I have been hearing about. Just bought my first 4x5 camera (Zone VI) with a 210mm and 80mm lens. I haven't taken any photos yet, but like to be prepared for when I do.
-
Welcome to Photrio!Registration is fast and free. Join today to unlock search, see fewer ads, and access all forum features.Click here to sign up
- Home
- Forums
- Analog Workflow Forums (100% Analog/Traditional)
- Analog Equipment
- Large Format Cameras and Accessories
You are using an out of date browser. It may not display this or other websites correctly.
You should upgrade or use an alternative browser.
You should upgrade or use an alternative browser.
Bellows extension
-
A
- Thread starter Terry Bowyer
- Start date

Recent Classifieds
-
For Sale Olympus Pen F 60mm and 50-90mm Original Hood $40
- Started by loccdor
-
For Sale Olympus Pen F G.Zuiko Auto-S 40mm F/1.4 Lens $150
- Started by loccdor
-
For Sale Will Travel 4x10 camera Fujinon SW120mm f8 lens in Copal
- Started by Simon Benton
-
For Sale Sinar Norma / S2 8x10 camera
- Started by Guivd
-
For Sale Mint Nikon D2X Camera Body
- Started by Barlow
Forum statistics
simply put, the exposure reading from your light meter will only be accurate when the camera is focused at infinity. To focus on objects closer to the camera the lens must be moved farther from the film plane, and less light falls on the film. So additional exposure needs to be provided to make up for this light loss. The farther the bellows is extended, the more compensation is required.
This is a pretty common question, but I can't seem to find a good thread on it on APUG, so let's make this a sticky and hope everyone chips in to give all the standard answers.
There are several methods for calculating bellows exposure factor.
I determine bellows factor in relation to magnification of the subject. You can do this by putting a ruler in the scene and measuring the size of the ruler on the groundglass to determine the magnification ratio, which I do for still life setups, but for most situations I can usually estimate the magnification of the subject in relation to the size of the format. For instance, on 8x10", a tight headshot--head and shoulders--is about 24" across, so 8/24 is a magnification factor of 1:3. Then I have a table that I keep taped to my light meter, my notebook, and the back of each camera, to convert (and to remind myself to convert) magnification factor to bellows factor. I've attached that table in DOC format here.
There are several copies of the table on the same page, so you can cut them out and attach them to everything.
I like this method because it works well with any format, even if you can't put a ruler up to the groundglass, and I can have a single method for every camera I use.
Attachments
Last edited:
Hve you ever used tubes on a smaller camera? Cameras like the Mamiya RZ/RB actually have compensation guides on the side.
OP
OP
http://www.youtube.com/watch?v=vwfRA615Mx8
I just came across this video on youtube that kind of explains bellows extension compensation. Thanks jason Brunner. Hope this helps someone else.
I just came across this video on youtube that kind of explains bellows extension compensation. Thanks jason Brunner. Hope this helps someone else.
Hve you ever used tubes on a smaller camera? Cameras like the Mamiya RZ/RB actually have compensation guides on the side.
While a rb67 has guides on the side of the camera (great idea mamiya), you have to compensate for the macro tubes. Those values for the type 1 and type 2 tubes are listed in the macro tube documentation. Write if you need this info.
For LF lens.. measure the ratio of the extension at infinity vs the extension at your shooting focus. Multiply the time based on that ratio.
tim in san jose
Some Mamiya Cs also have those bellows factor markings that are indicated by the parallax correction bar. Even the early ones that don't technically have them marked (like my C33) will give you an idea, as they still have the parallax correction bar. Yes; a very simple and good feature. I love my C33 for close-up pix (although I probably would not if I did not have the Paramender).
For the OP, these are the basic considerations that create the "problem":
1. Your light readings give you an exposure that is accurate at infinity, to which your lens' f stops are calibrated.
2. Amount of light falling diminishes (exponentially) as distance from a light source increases.
3. When a lens focuses on something closer than infinity, the distance between the lens and the film is greater than when it is focused at infinity. (Turn the focusing collar on any external focus fixed-length lens to see this.)
4. From your film's point of view, the lens is considered the light source, not the light source itself.
Now, apply this stuff to an actual situation:
A. Due to 3 above, when you focus on anything closer than infinity, you are moving you lens farther from the film than it is at infinity.
B. Due to number 4 and number 2 above, this makes less light fall on the film versus that which falls when the lens is at infinity.
C. Due to number 1 above, your calculated exposure will actually provide less exposure any time you are focused closer than infinity.
If you add more specifically to number 2 above, you learn how to calculate how just much light falls off using the inverse square law. This law means that if distance from the source doubles, the amount of light falling is quartered. Vise versa: If distance from the source halves, amount of light falling quadruples.
You need to state this as an equation so you can plug your measurements into it. You compare the square of the extension at infinity, where f stops are accurate, to the square of the extension at wherever your shot is focused. To state this mathematically, to get correct results with your calculations, the measurements all have to be squared.
"Compare" means state as a ratio, which can also be stated as an act of division. When you divide, you end up with a correction factor that tells you how many more times the amount of light that you needed at infinity you will need to make up. It will always be greater than 1x, so, that helps you remember that you always need to be dividing the longer measurement squared (actual extension) by the shorter measurement squared (extension at infinity AKA the focal length of the lens).
Algebra states that when you have something raised to a certain power divided by something raised to the same power, you get the same solution if you remove the exponents and perform the act of division, and then raise the result to the power of whatever that removed exponent was. This just means that you can remove a step by squaring the factor at the end rather than by squaring each measurement individually before dividing.
The minimum amount of compensation you can provide is, of course, limited by the precision of your exposure controls. If you end up with a factor of 1.10 in the end, you need 110% of the amount of light that you decided would give the correct exposure. That is not even 1/3 stop more. I guess you could estimate that 10% more with "in between" an f stop adjustment or by adding a little time if you have exposure times that are long enough to time, but for the most part, 1/3 stop, and often 1/2 stop is as precise as you can easily get. So, basically, you just decide what your cutoff is for when you add that first 33% more light (or 50% more light if you only have 1/2 stop precision). I simply round to the next highest or lowest 1/3 stop. This means if my factor hits the 1.17 mark, I round up to 1.33 and add the 1/3 stop, but below that, I go with the exposure that would be correct for infinity.
To get your measurements, it first helps to determine what your measuring spot on the lens will be. Go somewhere outside and focus on something that is at infinity focus. Something way in the distance, miles away would be good. Now, say you have a 150mm lens. Measure 150mm from the film plane and remember (or mark) where exactly 150mm from the film plane is on the lens case. In the future, that is the spot at which you take all your measurements. You know what the point of reference is at infinity, and to be accurate, you need to always measure to that point.
This is picking nits. You could just measure to the diaphragm and you would be fine.
So, you know the bottom of the division problem without even having to measure it. It is the focal length of your lens. You just need to measure the actual extension, divide it by the focal length, and square the result to get your factor.
For instance, say you are using a 360mm lens to shoot a portrait. You are focused on the subject. Measure from the film plane to your lens. Say it is 550mm. So, you divide 550mm by 360mm and get 1.53. Multiply that by itself and you get 2.34. You need to give the film 234% of the exposure you have decided is appropriate. Multiply the shutter speed by 2.34, or open up to let in 2.35 times more light. I always just call this 1 1/3 stops and am happy, but it is not technically accurate, I believe. Someone else should chime in with exactly why it isn't.
Last edited by a moderator:
Just bought my first 4x5 camera (Zone VI) with a 210mm and 80mm lens.
Welcome to the Dark Side

Initialy LF is tricky to handle but you should very quickly master it and then wonder why you didn't do this some time ago.
Have fun
Martin
Exposure compensation calculations
There are two easy formulas.
The first uses the actual bellows draw of your camera, divided by the focal length of the lens you are using. The formula is X = BD/FL; exposure factor equals the bellows draw divided by the focal length of your lens. If you have the bellows racked out to about 30cm, and your lens is 21cm, then the formula is (30x30)/(21x21), which equals 900/441, which gives you 2.04; round that off to 2.0. You would have to give 2 times more exposure (one f/stop) to compensate for the bellows draw.
I prefer to use inches when calculating my exposure factors with this formula, as my main lens is a venerable 8-inch Kodak Ektar. You can use any units of measurement for these calculations, as long as you don't mix, say, inches and centimeters. Doing that will give you the quickest route to exposure disaster.
The second uses the magnification, which is the best one to use when you are photographing something small. First calculate the magnification, which is the object height (the size of the image of what you are photographing, as imaged on your ground glass (gg); measure it with a ruler) divided by the subject height (the actual size of the your subject). It is expressed mathematically as follows: M = h/h'. For example, if you have an image on your gg which is 4.5", and the original is 2.5", then M = 4.5/2.5 = 1.80.
Next, plug it into this formula X = (M + 1)(M + 1). That should read "M plus 1, squared." In this case, it would be X = (1.8 + 1)(1.8 + 1), which equals 7.84; round that off to 8.0. You would have to give 8 times more exposure (three f/stops) to compensate for the bellows draw.
I keep a folding ruler, a tape measure and an inexpensive calculator in my 4x5 kit; there are often calculators built into most cell phones, as well. And cameras, too; I won't go there, though...
BTW, if you are eight times your focal length, or more, away from your subject, you need not bother with an exposure compensation calculation; it won't be necessary. For your 210mm lens, that would be 210x8, or 1.68m, approximately 5.5 feet.
Is anyone out there able to give me an easy to understand explanation of this 'bellows extension compensation' that I have been hearing about. Just bought my first 4x5 camera (Zone VI) with a 210mm and 80mm lens. I haven't taken any photos yet, but like to be prepared for when I do.
There are two easy formulas.
The first uses the actual bellows draw of your camera, divided by the focal length of the lens you are using. The formula is X = BD/FL; exposure factor equals the bellows draw divided by the focal length of your lens. If you have the bellows racked out to about 30cm, and your lens is 21cm, then the formula is (30x30)/(21x21), which equals 900/441, which gives you 2.04; round that off to 2.0. You would have to give 2 times more exposure (one f/stop) to compensate for the bellows draw.
I prefer to use inches when calculating my exposure factors with this formula, as my main lens is a venerable 8-inch Kodak Ektar. You can use any units of measurement for these calculations, as long as you don't mix, say, inches and centimeters. Doing that will give you the quickest route to exposure disaster.
The second uses the magnification, which is the best one to use when you are photographing something small. First calculate the magnification, which is the object height (the size of the image of what you are photographing, as imaged on your ground glass (gg); measure it with a ruler) divided by the subject height (the actual size of the your subject). It is expressed mathematically as follows: M = h/h'. For example, if you have an image on your gg which is 4.5", and the original is 2.5", then M = 4.5/2.5 = 1.80.
Next, plug it into this formula X = (M + 1)(M + 1). That should read "M plus 1, squared." In this case, it would be X = (1.8 + 1)(1.8 + 1), which equals 7.84; round that off to 8.0. You would have to give 8 times more exposure (three f/stops) to compensate for the bellows draw.
I keep a folding ruler, a tape measure and an inexpensive calculator in my 4x5 kit; there are often calculators built into most cell phones, as well. And cameras, too; I won't go there, though...
BTW, if you are eight times your focal length, or more, away from your subject, you need not bother with an exposure compensation calculation; it won't be necessary. For your 210mm lens, that would be 210x8, or 1.68m, approximately 5.5 feet.
bellows extension factor (BEF):
BEF = bellows extension ^2 / focal length ^2
(determine bellows extension by measuring the distance from the lens plane to the film plane when the distance is forward of infinity focus)
Ex:
My 210 mm lens is at infinity when the lens and film planes are separated by 8.25" (210 mm / 25.4 mm per inch = 8.25") . If after focusing the lens is now at 10.25", then:
BEF = (10.25^2 / 8.25^2)
BEF = 1.5x
Just one more way of thinking about it:
F stops are worked out as the focal length divided by the aperture. e.g. 160mm focal length / 20mm opening = f8
If you extend the bellows to 320mm you are doubling the distance from the film to the lens (I am assuming at infinity focus the bellows extension equals the focal length). Therefore you are effectively doubling the focal length.
The new formula is: 320mm / 20mm (because the aperture stays the same) = f16
Therefore you need to give two stops more light than you would at infinity focus.
Steve.
I have had success using the Quickdisc. Pretty simple to use, fast, and no calculations required.
It's here at: http://www.salzgeber.at/disc/index.html and it's FREE.
Cheers Michael.
It's here at: http://www.salzgeber.at/disc/index.html and it's FREE.
Cheers Michael.
Welcome to the Dark Side
Initialy LF is tricky to handle but you should very quickly master it and then wonder why you didn't do this some time ago.
Have fun
Martin
Good morning, Martin;
While welcoming Terry Bowyer to the World of Large Format is certainly a fine social gesture, for which I also commend you, I am wondering if there is a spelling error in the first line of your message.
Should that not be "Welcome to the Dark Slide?"
Polybun
Is anyone out there able to give me an easy to understand explanation of this 'bellows extension compensation' that I have been hearing about. Just bought my first 4x5 camera (Zone VI) with a 210mm and 80mm lens. I haven't taken any photos yet, but like to be prepared for when I do.
Have you seen the "Bellows Correction with Bacon" video yet?
To sum it up, think of it this way. In a macro situation, you are radically changing the focal plane of the lens, such that you end up firing a good deal of the light gathered by the lens into the bellows, rather than onto the focal plane.
With a view camera it can be done fairly easy with some simple tools. You just need an object of known size, then measure the size that that object apears to be on the ground glass. From those two measurments you can calculate out how many stops to open up. If you want, we could get into the specifics of the math.
http://www.youtube.com/watch?v=vwfRA615Mx8
mmmmmm bacon
Cor
Member
I have had success using the Quickdisc. Pretty simple to use, fast, and no calculations required.
It's here at: http://www.salzgeber.at/disc/index.html and it's FREE.
Cheers Michael.
I echo this, works like a charm..before that I had a metal tapeline which I used to measure the bellows extension with small colored stickers for each lens I used and the subsequent correction factors to be applied after extension in the colors matching the lens...
Best,
Cor
Consider a subject, and estimate some dimension of it. For example, if your subject is US quarter, then you might say the diameter is an inch or so.
Next ask yourself, how big is that subject on the ground glass (GG)?
From the actual dimension of the subject and the GG dimension, deduce an approximate magnification (m). For example if the quarter is the same size on the GG, then m=1. If it is twice as big on the GG then m=2.
Next compute the bellows factor from this simple relation:
Bellows factor= (1+m)^2
Example: if you have the quarter at life-size on your GG, then the factor is (1+1)^2=2^2=4.
Multiply your exposure by this factor. So if your hand-metered exposure for a 1:1 shot is 1/25 sec, then your exposure corrected for bellows factor will be 1 sec.
That's it. For b&w film especially, that's all I've ever needed. For slide, I sometimes reach for a ruler or set a coin or piece of paper next to my subject to get a more precise measurement. But 99.44% of the time, the magnification is what I guessed by eye.
I think it's important to remember this basic approach because I always forget rulers and meters and whatever. It's really easy. Easier than computing reciprocity factor. I mean, people often just wing it on reciprocity corrections or dev times, but when it comes to bellows factor they schlep all manner of tools and tape measures and so forth. Pack less stuff. Keep it simple
The Quick Disc works for me and travels in my filter pouch. I laminated one for durability.
A friend of mine said he always at least thought about bellows compensation is the composition was less than 4x5 feet when using a 4x5 camera. In my experience, you don't need compensation at that point, but it's a good and easy-to-remember piece of advice.
Cheers,
Steve
A friend of mine said he always at least thought about bellows compensation is the composition was less than 4x5 feet when using a 4x5 camera. In my experience, you don't need compensation at that point, but it's a good and easy-to-remember piece of advice.
Cheers,
Steve
I seem to recall the Kodak's Master Photo Guide had something in it on this. Again from recollection, place a two inch target at the subject and then hold a scale (provided) against the GG to determine exposure compensation. Now if I could just find mine.
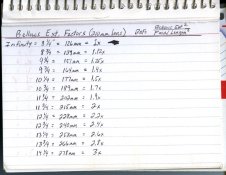
In case anyone is using a monorail in the field like me (it's not that bad really), there is an extemely easy and totally free method of determining bellows ext factors using the mm scale on the rail. The only calculations are very simple and takes a few minutes. I included my chart as an example:
The inch column is the distance from the lens plane to the film plane in 1/2 inch increments for 6 inches of extension, I may change it to 1 inch increments; the mm scale is the distance from inside to inside of the front and rear standards to equal the lens and film plane distances shown--I can quickly set my focus to infinity by setting the standards apart by 126mm inside to inside anywhere along the rail. The last column is the calculated factor. I always multiply the factor by the shutter speed.
Ex: My recent image in the gallery of the leaf and bark required a bellows ext factor (BEF). I simply read the distance on the monorail from inside to inside of the standards and it was 166mm to equal about 9 3/4" from lens to film, read the chart and used a factor of 1.4x
Attachments
- Joined
- Nov 20, 2008
- Messages
- 15
- Format
- Large Format
a simpler way
The system I learned was very simpole and straight forward. For evey 25% beyond the infinity focus extension you simply add one-half stop to your exposuree. I carry around a cloth measuring tape in my camera bag. Works everytime.
eric
The system I learned was very simpole and straight forward. For evey 25% beyond the infinity focus extension you simply add one-half stop to your exposuree. I carry around a cloth measuring tape in my camera bag. Works everytime.
eric
I've found this method to be the easiest and fastest way:
1. measure the extension and square it.
2. divide 1's resulting number by the square of the focal length of the lens
3. divide your films iso by 2's resulting number
4. meter the scene with your new iso.
1. measure the extension and square it.
2. divide 1's resulting number by the square of the focal length of the lens
3. divide your films iso by 2's resulting number
4. meter the scene with your new iso.
- Joined
- Nov 20, 2008
- Messages
- 15
- Format
- Large Format
My method is much simpler
eric
eric
Is anyone out there able to give me an easy to understand explanation of this 'bellows extension compensation' that I have been hearing about. Just bought my first 4x5 camera (Zone VI) with a 210mm and 80mm lens. I haven't taken any photos yet, but like to be prepared for when I do.
Hi Terry,
I'm somewhat new at this too, but the easiest method I've heard described is that every 25% increase in your bellows extension from infinity focus = 50% increase in required exposure.
For example, you have an 8 inch lens (210mm), then your bellows extension for infinity focus is 8 inches. If you're focusing closer, you extend your bellows. So if you extend your bellows to 10 inches, you've increased your bellows extension by 25%. Increase your exposure by 1/2 stop.
This is born out by the more complicated formula (for me to do in my head) of bellows extension squared divided by focal length squared = exposure comensation.
Other methods are given in earlier posts to this thread or at:
http://www.largeformatphotography.info/bellows-factor.html
Best,
Bob
If you are new to view cameras you really should purchase one of the excellent books available, either new or used. I have an older copy of Stroebel (sp) which I would be happy to part withfor a couple of dollars plus shipping. I believe Steve Simmons has a book out on the view camera, and there are doubtless others. The age of the book hardly matters as view cameras have changed hardly at all in the last 100? years. Stroebel, or one of the others will teach you all the insand outs plus bellows extension. I don't mean to diss what you reas here, but there is more to the view camera!
I use a Quickdisc too. Very handy. You can have your local lab print it out for you and spray glue or gluestick it onto some cardboard or foam board.
Don't forget about reciprocity failure too, if you're doing macro work with long exposures..
Fun!
Don't forget about reciprocity failure too, if you're doing macro work with long exposures..
Fun!
| Photrio.com contains affiliate links to products. We may receive a commission for purchases made through these links. To read our full affiliate disclosure statement please click Here. |
PHOTRIO PARTNERS EQUALLY FUNDING OUR COMMUNITY:  |