Basic cyanotype advice needed please...

Flying Lady

A
Flying Lady

  • 2
  • 0
  • 25
Wren

D
Wren

  • 0
  • 0
  • 17
Not a photo

D
Not a photo

  • 1
  • 0
  • 31

Recent Classifieds

Forum statistics

Threads
199,034
Messages
2,785,022
Members
99,784
Latest member
Michael McClintock
Recent bookmarks
0

banana_legs

Member
Joined
Jan 9, 2010
Messages
48
Location
Wiltshire, U
Format
4x5 Format
David,

Did the cyanotype look blotchy when it came out of the developing rinse and before you enhanced the blue with the bleach wash? It may be worth checking to see if it is just hydrogen peroxide in the bleach as any other additives may have an unknown effect on the image. I just leave my cyanotypes to oxidise naturally.

I like the toning you have applied; I do not have tannic acid to hand so I use teabags. I find that normal black tea stains my handmade paper really quite dark, whereas green tea is far better and only tints the paper slightly whilst still giving a good change in the blue colour.

Best regards,

Evan
 
OP
OP
vickersdc

vickersdc

Member
Joined
Jan 8, 2007
Messages
454
Location
Somerset, UK.
Format
Multi Format
The cyanotype looked blotchy before it got washed; so at the end of development / exposure.

The toning completely changes the feel of the image, and it seems a bit odd calling it a 'cyanotype' when there's not a hint of blue anywhere :wink:

I popped into a home-brew store on my way home from work and bought a small container of 'Wine Tannin' to do the toning with. It was really quick: 20 seconds in the tannic acid, and a minute or so in the sodium carbonate.

Cheers,
David.
 

Loris Medici

Member
Joined
Sep 13, 2005
Messages
1,154
Location
Istanbul, Tu
Format
Multi Format
Whoa!? I detect several errors that should be corrected:

- Cyanotypes are pretty consistent as long as one is able to control exposure (= which is the absolute amnt. of useful energy the emulsion gets) AND (both the environment's and the paper's) humidity levels. I've gone thru several batches of several papers - such as COT 320, Masa, Fabriano Artistico (acidified) and Fabriano 5 to name few... - w/o noticing any inconsistencies. When you're printing with an artificial lightsource (= having full control over the amnt. of energy that reaches the emulsion, unlike printing under sun), keeping everything else constant, humidity is the single most important variable in determining exposure times. And please note that RH % values aren't much informative in determining "the absolute water content in air and paper" (which is "the" crucial parameter), as long as they're paired with temperature. In other words; 50% RH will require different exposure times while working at 18C and 25C, for instance... My solution to that problem was to print on bone dry paper. Thanks to that method, I can get consistent exposures/results both in winter and summer, regardless of the RH levels, but with the expense of speed loss. (Because emulsion speed is directly proportional with the moisture level in the paper...)

- More later; I have to go now...

Regards,
Loris.
 

Loris Medici

Member
Joined
Sep 13, 2005
Messages
1,154
Location
Istanbul, Tu
Format
Multi Format
I continue from where I left:

- Sizing is very important indeed. First of all, you need a right amnt. of sizing to have nice cyanotypes; if there's more sizing than what is needed, you'll loose some density because cyanotype needs to be "in" the paper not over it (the image / prussian blue particles should be trapped "in" the paper's fibers), and especially traditional cyanotype is notorious for not wanting to get in the paper (unlike new cyanotype). OTOH, if there's less sizing than what is needed then the image looses snap and/or (most importantly) the paper disintegrates and/or gets damaged and/or handling gets much harder during processing stages. BOTH alkali paper or sizing (and mounting / storage materials) are detrimental to the process; in terms of yellow staining (because of formation of iron hydroxide) and fading of the image. For instance if you print cyanotype on non neutralized Fabriano Artistico (which is a paper that has a substantial amnt. of calcium carbonate - an alkaline compound - "in" it as a buffer, in order to increase longevity) you'll experience longer than normal exposure times and a weaker image - which may get even weaker with time.

- Bleach isn't the best oxidizing agent for cyanotype processing because it's an alkaline solution. (See above.) 5-10 ml of ordinary household hydrogen peroxide to a liter is the best tool for the purpose of quickly oxidizing the image to full density without having to wait (at least) 12 - 24 hours.

BTW, David, your image is weak and from what I see, I infer you need some more exposure. (Since there aren't any strong darks under the negative.) IME, the best negative for traditional cyanotype has to have a density range around log 1.4 - 1.5.

- You DEFINITELY need to have solarized portions under the negative as an indication of correct exposure and to able to get maximum print density. (I mean if you have true blacks in the original scene...) If you don't see any solarized (to slate gray) portions under the negative (right after exposure, before processing) then you're definitely underexposing the negative. Washing steps and oxidation bath will take care of the solarization and will render that parts of the print as maximum density...

Regards,
Loris.
 
Last edited by a moderator:

banana_legs

Member
Joined
Jan 9, 2010
Messages
48
Location
Wiltshire, U
Format
4x5 Format
I agree with Loris that humidity can have very pronounced effects with some paper/size combinations. I always dry my paper with a hair-drier to try to remove as much water as possible.

I did some tests a while ago where I sized a sheet of (hand-made) paper with bands of different sizings, then coated the sheet of paper with cyanotype mix. I then cut the sheet in half (ie across the bands of sizing); let one piece air dry on a humid day, and hair-dried the other. I then exposed both halves with a step-wedge at the same time. By all the samples having the same base paper pH, same coating mix and same exposure time, I fixed many of the key variables.

What happened next depended on what sizing has been used, and how it had been dried. All of the test patches looked different when they came out of the contact frame; some had pronounced solarisation (ie seemed more sensitive), some not etc. When developed in water, they all developed differently too; some washing quickly, others with the blue 'floating off' (acrylic gesso as a size). When they dried and had oxidised fully, some of the sizes had very different results for the air dry/ hot dry (eg flour+alum), however with some (pure gelatine for example), there was little discernible difference.

Best regards,

Evan
 
OP
OP
vickersdc

vickersdc

Member
Joined
Jan 8, 2007
Messages
454
Location
Somerset, UK.
Format
Multi Format
Wow! So much information! I've been taking photographs for 20+ years, but I'm very new to the cyanotype scene, so it's a steep learning curve. Firstly, can I just thank you for your time in providing all this information.

Secondly, I do believe I finally got a decent print (it helps when the sun shines and you really get to see that solarisation)...

4294091756_186bbdf681.jpg

Now, back to the paper. I've made some paper again (this time using far less source material, not quite to your standards yet Evan, but I've cut in half the amount I use to get one sheet!).

At the moment, the source was standard cartridge paper used for photocopying, etc. I have not added any size to it at all - but I did want to try brushing some arrowroot into it. So, here's the question... should I forget the idea, and mix up some gelatin instead, or go ahead with the arrowroot? I could always try both :wink:

Cheers,
David.
 

Loris Medici

Member
Joined
Sep 13, 2005
Messages
1,154
Location
Istanbul, Tu
Format
Multi Format
David, that's much better but there's some kind of graininess and unevenness.

- Don't overbrush (if you do so); you start to remove emulsion from the paper when the brush gets too dry due overbrushing... Plus, you also risk damaging the surface (causing a grainy appearance).
- (If you're force drying) Do you let the coated paper sit until surface sheen is gone before force drying? Start to blow hot air only after the surface gets completely matte.
- How much sensitizer per print area do you use? You'll need a "minimum" amnt. of 0.2ml sensitizer per 10 sq. inches (when using a glass rod applicator, working with a heavily sized paper), you'll need more when using brushes (even more with sponge brushes) for coating and/or depending on paper's absorption. (0.25 - 0.3ml being more realistic...) Do some tests and then stick to the figure that you have worked out. Don forget, it depends on application method and paper! (BTW, I highly recommend red handled synthethic Da Vinci wash brushes for application, they are very kind to paper and they don't absorb too much emulsion.) Always use moist (not wet!) brushes for application; if not, your brush will suck substantial amnts. of sensitizer - and too much water will dilute it.

Regards,
Loris.
 
OP
OP
vickersdc

vickersdc

Member
Joined
Jan 8, 2007
Messages
454
Location
Somerset, UK.
Format
Multi Format
Hi Loris,

I do use a brush (actually it's just a standard watercolour brush), although I'm thinking about trying the blanchard brush that I made and see what difference it makes.

I also dry the paper with a hairdryer, and although I wait for the sensitiser to soak in a little bit, I'm not aware of actually waiting until the surface is matte - I'll be doing some cyanotypes this weekend, so that's certainly one thing I'll make sure I do.

I couldn't tell you how much sensitiser I use - I just brush it on! I do dip the brush in distilled water first, so that it doesn't take up a whole load of sensitiser though.

You mentioned about the overbrushing, the following image (which I sort of like, despite not being technically great) has a lot of the signs of the emulsion being removed (let's just say it's 'artistic' :wink:)...

4294095676_5133ed5eea.jpg
 

banana_legs

Member
Joined
Jan 9, 2010
Messages
48
Location
Wiltshire, U
Format
4x5 Format
David,

For the hand-made paper, sizing not only helps to slow the absorbtion of water into the paper, but also helps to 'glue' the fibres together so that it can tolerate being wet. Starches such as arrowroot mainly provide a hydrophobic action and help to repel water and prevent it soaking in too fast, they do not do much for the paper strength. Gelatine acts as a glue and helps to hold the paper together. It also coats the fibres but does not seal them completely (such as an acrylic medium would do). The gelatine itself will absorb the cyanotype mix as I discovered when I printed onto glass with a gelatine coating.

As you have true water-leaf paper with no engine sizing, you will find the paper becomes very fragile when you apply the first coat of size. I would try cool gelatine first, then use the arrowroot as a final coat. I suspect that if you size with arrow root alone, the paper may disintegrate when you apply the cyanotype sensitiser, the washing process would be very risky.

I use 3 coats of gelatine and for an 8"x10" sheet, I use 2ml of cyanotype solution which I apply either with a damp pastry brush, or with a damp foam brush. As Loris says, I also let the paper sit for a short while until the wet sheen goes off, then use a hair-drier to dry the coating. In areas where the paper is thin (towards the edges typically), if I turn the paper over, the yellow coating has often soaked right through.

Best regards,

Evan
 
OP
OP
vickersdc

vickersdc

Member
Joined
Jan 8, 2007
Messages
454
Location
Somerset, UK.
Format
Multi Format
Thank you Evan,

Might I ask just one last quick question - when do I add the gelatine size? If I remember, you mentioned about brushing on the gelatine when the paper was still damp after making it. Is this the best time to do this, or (as I made a piece earlier in the week) can I stick the paper down on to a flat surface and brush the gelatine into it?

Or, should I be adding the gelatine into the pulp before pouring it into the mold & deckle?

That was more than one question wasn't it?....

Cheers,
David.
 

Loris Medici

Member
Joined
Sep 13, 2005
Messages
1,154
Location
Istanbul, Tu
Format
Multi Format
David, it's better to measure the sensitizer for sake of consistency. I use plastic pipettes and count drops (a la pt/pd). Even if you don't opt to measure exact amnts., make sure you have at least 2ml of sensitizer per 8x10 coating area, just like Evan does...

Good luck,
Loris.
 

banana_legs

Member
Joined
Jan 9, 2010
Messages
48
Location
Wiltshire, U
Format
4x5 Format
David,

Apply the gelatine when the paper has dried. I paint it on with a soft brush and let the paper dry fully between coats. Melt the gelatine and then wait until it has cooled but not begun to set; the hotter it is the more likely it is that the paper will revert back to pulp. If you can add gelatine to the pulp when you make the paper, that will help enormously with the wet strength of the water-leaf paper; I add PVA glue to the pulp (something like 200ml to 300ml of PVA to pulp made from about 40 sheets of A4 paper) to increase the wet-strength of the paper. The PVA internal size is still very weak in practice and does not seem to influence the cyanotype.

I use plastic pipettes from here; they hold 2ml when full to the little marker line at the top of the barrel.

Best regards,

Evan
 
OP
OP
vickersdc

vickersdc

Member
Joined
Jan 8, 2007
Messages
454
Location
Somerset, UK.
Format
Multi Format
I did it! I had a go at cyanotype printing on to my own handmade paper. How did it go? Errr, results were interesting. No, I mean it, they were interesting!

One piece of paper got completely destroyed as it had completely stuck to the flat board I had used to coat the paper on! Total disaster.

The other piece wasn't exactly a saleable item either, but it did work - I got an image, and a very contrasty one at that. The blue image is such a dark blue. What with that and the texture of the handmade paper, I'm enthused enough to make some more paper and try again, now that I have the benefit of hindsight :smile:

It's currently drying in front of the fire, I'll scan it in and show you all once it is dry (it seems to takes forever)... :wink:

Cheers,
David.
 
Last edited by a moderator:

Dana Sullivan

Advertiser
Advertiser
Joined
Apr 7, 2005
Messages
174
The paper you are making is probably acidic, which will produce a deep blue. The Xerox copier paper you were using has tons of buffers and chemical whiteners that give poor results.

Cyanotype is a pH indicator. Soak a cyanotype in an alkaline solution and the image will disappear. Transfer it to a mild organic acid solution and the color will come back. The stronger the acid, the deeper the color.

-Dana
 
OP
OP
vickersdc

vickersdc

Member
Joined
Jan 8, 2007
Messages
454
Location
Somerset, UK.
Format
Multi Format
Hi Dana,

I actually use the copier paper to make my own, although I tend to rip it up into small pieces, then pour very hot water over it and leave it for 24 hours before going any further. In my head, I guess I'm thinking that using very hot water will destroy some of those checmicals & buffers that are used in the original paper...

I think it was Evan that mentioned that he had had very dark blue results from his cyanotypes when he had used arrowroot too - so maybe the arrowroot is slightly acidic?

So much to learn...

Thanks,
David.
 

Loris Medici

Member
Joined
Sep 13, 2005
Messages
1,154
Location
Istanbul, Tu
Format
Multi Format
David, if you haven't tried it before, do yourself a favour and buy few sheets of Fabriano 5. It's only 50% cotton, but prints very nice and is definitely not overpriced... You can use it straight out of the box.

My current favourite is neutralized Fabriano Artistico, because it's a wonderful paper for gum dichromates, and gum over cyanotypes simply look gorgeous! (You can use very dilute hydrochloric, acetic or oxalic acid baths to eliminate the calcium carbonate buffer in Artistico. I like the first two and won't recommend the last, but there are people using oxalic acid for this purpose, so it's worth to mention...)

See this: http://www.artsupplies.co.uk/item-fabriano-5-watercolour-paper.htm
 
Last edited by a moderator:

banana_legs

Member
Joined
Jan 9, 2010
Messages
48
Location
Wiltshire, U
Format
4x5 Format
David,

Congratulations! I have found that it does not take too much practice to get saleable results so keep going.

If you wish to change the pH of paper, 'brick cleaner' from most DIY stores is dilute hydrochloric acid. It is worth getting some litmus test papers though as it is really easy to add too much acid and really reduce the pH a lot. Rapid electronics that do the pipettes (in my previous post) also sell litmus papers. My copier paper has a pH of 9; when you add the acid to the pulp, it fizzes quite alarmingly!

The debate about colour and base paper pH is interesting; yes I agree that acidifying does change the colour with commercial paper, however there is far more complex chemistry going on than just pH of the paper. My hypothesis that it is the size that counts more is really easy to test, hence why I printed onto glass as I could be pretty sure that the support had minimal effect on the final image results. The colour of the cyanotype on glass is, as far as my scanner can measure, *exactly* the same as the colour on pH9 hand-made paper with the same gelatine size, which is the same colour as on pH6 hand-made paper. I have now also used sulphuric acid and caustic soda to make paper with pH2 and pH 12 respectively; that did change the colour a bit, but not by as much as I see between different brands of commercial water colour papers. I found a simple plain gelatine size worked well and is pretty consistent across different supports.

If you want to print without any sizing, you need a support that can take being washed; 100% cotton cloth is great fun as you can print on it in its raw form, and also test to see how different sizes may react with the cyanotype process.

Best regards,

Evan
 

Loris Medici

Member
Joined
Sep 13, 2005
Messages
1,154
Location
Istanbul, Tu
Format
Multi Format
Evan, if you have made that comparison, how the color and density of your cyanotypes compare betwen say Fabriano 5 (or similar "suitable" "neutral/acidic base" watercolor papers) and your handmade papers? IME, cyanotype prints with a slightly weaker density on papers with extra sizing (= 3% gelatin, formalin hardened), simply because you loose more pigment in the wash/rinse baths, due weaker absorption... My usual practice with gum over cyanotypes is to print cyanotype on the original surface first, and only then size for later gum dichromate layers, since the original sizing isn't strong enough to prevent pigment stain with the particular pigments I prefer to use...

Regards,
Loris.

BTW, I highly recommend that you read Mike Ware's Cyanotype book for extremely detailed practical and scientific/chemistry information about the process... (The price is high because it's a highly sought-after book which is out of print, therefore try to find it in local libraries...)
 
Last edited by a moderator:

Loris Medici

Member
Joined
Sep 13, 2005
Messages
1,154
Location
Istanbul, Tu
Format
Multi Format
BTW, your claim that you get equal color/density from slightly acidic handmade paper and glass makes me think that your handmade papers are somehow non-suitable regardless their pH; I did some experiments on glass and the density wasn't even close to what I was able to get from paper. Therefore it seems that you have problems with paper too... (Or I have a serious problem with glass!!!)

PM me your address if you like -> I'll be happy to send you two copies of the same image (one for sharing with David, you're in the same country - UK - right? Maybe you can forward one copy to him?), made on cheap Masa paper (machine made neutral base thin Japanese watercolor paper) using the traditional formula, letting you compare your results with mines in terms of color / density and tonality...
 
Last edited by a moderator:
OP
OP
vickersdc

vickersdc

Member
Joined
Jan 8, 2007
Messages
454
Location
Somerset, UK.
Format
Multi Format
I sort of feel that I'm just about hanging on here with this conversation :wink:

Loris,

If I read it correctly, Evan is saying that the support has a lesser effect on colour / density than size - hence the reason that glass and paper can be similar (if the size type & application is comparable). But your experiments lead you to a different conclusion... so what did you do for your experiments? What problems do you think that Evan may have with his paper?

This is one of those subjects where it is really easy to get a result, but once you start delving into it, it's much tougher!

PS: Thanks for the info on the Fabriano 5, I'll check our local art shop; but I'm also keen to carry on with the whole handmade thing too!
 

Loris Medici

Member
Joined
Sep 13, 2005
Messages
1,154
Location
Istanbul, Tu
Format
Multi Format
Hand-made paper is interesting and much more valuable indeed. Therefore, you should definitely go for it. It's very expensive but I would suggest that you try an aquapel (AKD - alkene ketene dimer) sized, pure cotton hand-made paper, "Buxton" as a benchmark... (See "Buxton Platinotype" @ Dead Link Removed...) BTW, don't you have suppliers providing high quality pure raw materials (cotton pulp) for paper-making? Just to eliminate the unknown ingredients in recycled paper...

I don't have an idea what problems Evan may have with his papers (if any), but I'm completely sure on the facts a) what's "in" the paper (pulp) is as critical as the sizing (glue) for good results, and b) with a paper with extra sizing, you have higher chances of loosing image density because of poor absorption...

Regards,
Loris.
 
Last edited by a moderator:
OP
OP
vickersdc

vickersdc

Member
Joined
Jan 8, 2007
Messages
454
Location
Somerset, UK.
Format
Multi Format
I can understand the absorption thing - it was a particular concern of mine when I was applying the arrowroot, as it initially seems to sit on the surface of the paper and give it an almost glossy coating. Of course, cyanotypes need to sit 'in' the substrate, rather than on top of it, and I was worried that when I used that arrowroot, the image would just wash off.

Using the gelatine / arrowroot combination, I can see that one would need to be very careful about how much to apply; and it also takes hours to dry a print that's been coated with arrowroot!

The 'commercial' handmade paper is one thing, but for now, I will be continuing the learning cycle with making my own paper. The texture, colour, etc. is great and although my first try wasn't an outstanding success, there were the seeds of a revolution :wink:
 

banana_legs

Member
Joined
Jan 9, 2010
Messages
48
Location
Wiltshire, U
Format
4x5 Format
Loris,

I absolutely agree with you. I think I need to clarify a few points about the glass experiment too, there were also some other surprising consequences.

I have only done limited testing with commercial papers; I gave up on them when I realised that in one of the pads of water colour paper I had, every 3rd sheet behaved differently to the others and must have been from a different production run. I have not tried Fabriano 5, but I will as it sounds really interesting. I need to print some stereo pairs of images where my hand-made paper has too many surface artefacts and spoils the effect; I think the hot pressed variant could be ideal.

I do not have problems with the blue washing out at all and the cyanotype goes very dark, however I have seen other examples that are darker so you are right that my paper is not giving the Dmax possible from the process; the blues I have though are deeper than any commercial paper I have to hand. I have a few images where a real near-black tone would be very useful, but for many images I actually print for a slightly shorter time to rein back the contrast a touch.

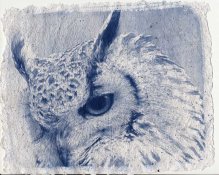
I have attached an example scan I have to hand of a 10 minute exposure that has a nice dark tone, but not as dark as possible; I was comparing it to paper soaked in alum which reacts about a stop faster. For my maximum depth I need to give the print 20 minutes under my UV lamp (after at least a 5 min warm up). I have trouble scanning some of the images as when viewed in the hand, they have a metallic 'shimmer' that gives uneven tones in the scan (making producing photoshop curves a pain!)

I have only tried hardening the gelatin in alum as formalin is not so easy to get hold of here. The change is dramatic and I do start to experience loss of blue and also difficulty in washing, although the exposure time decreases. I can quite imagine the issues you have with the sizing for use with gum.

The effects of previous layers of size and also any additives in the paper do have an impact on later layers. The changes can be quite subtle though which makes comparisons tricky. One example was where I air dried and hair-dried half/half a sheet of paper. I exposed both halves at the same time under the warmed-up UV lamp and the printed-out images before development looked different. I washed them together in the same water and they washed at different rates too. After 24 hours when they were dry and pretty well oxidised, I could not tell them apart. If I had printed each one in the sun and gauged the exposure based on the print-out image, the final results of the test would have shown a marked difference.

The glass experiment was tricky as I normally wash in cold running water to prevent the paper base making the wash water acidic or alkaline (makes a big difference with pH12 paper as the image bleaches out if you tray wash). In running water, the gelatine slipped off the glass and went down the sink :sad: Instead I immersed the glass gently into a bowl full of water in an attempt to dilute-out any washing effects. The paper I washed in running water. The first attempt that worked for glass had a fascinating twist in that the gelatine in the highlights still floated off, but the gelatine in the shadow areas was hardened by the cyanotype process. My hypothesis was that it was the UV light curing the gelatin in the shadows so I coated some glass and gave it an hour of UV before coating with the cyanotype solution. The gelatine in the highlight areas washed off just as before! I can only assume there is a similar interaction on paper but have yet to test it (I plan on the tinting the final layer of gelatine size).

My main conclusion is that experimenting with cyanotypes is just really tough! I have had to go to extremes to make many of the experiments repeatable from scratch and any change of variables can result in a very unexpected output. I still have not decided on a definitive way for making my paper and the corresponding curve if I am using digital negatives.

Best regards,

Evan
 

Attachments

  • owl_ref.jpg
    owl_ref.jpg
    87.8 KB · Views: 142

Loris Medici

Member
Joined
Sep 13, 2005
Messages
1,154
Location
Istanbul, Tu
Format
Multi Format
First of all the image is gorgeous. As for darks, there's still a little bit (only!) bit room for improvement, but only in the academic (nitpicking - if you like) sense. The image/print totally works for me. Nice portrait, congratulations!

About glass: You're right, exposure to UV will harden gelatin ->" but only if there's ammonium iron(III) citrate (AFC) in the mixture". Try to mix gelatin by adding some AFC and then expose it. I'm sure you'll have a nice hardened layer of gelatin. (But I'm not sure about color/transparency change...) This phenomenon is used in "Chiba System" carbon printing. Search for it in the web, you'll find a comprehensive .PDF about the technique...

To my knowing chrome-alum hardening is slower compared to formalin. Maybe you can give it some time before printing on the subbed glass. (I'd try two layers of hardened gelatin, and wait at least 1 week before printing...) Have you heard about Galina Manikova's method? She puts two layers of formalin hardened gelatin on the glass, then prepare unhardened gelatin, dilute it 1:1 with cyanotype sensitizer (you can prepare double - or 1.5x - strength stock solutions if you want a strong image) and coat the plate with that; I mean gelatin becomes part of the sensitizer. Cleaning the glass thoroughly (alcohol + cleaning powder) helps much.

Regards,
Loris.
 

banana_legs

Member
Joined
Jan 9, 2010
Messages
48
Location
Wiltshire, U
Format
4x5 Format
Loris,

Thanks for the nice comments. Yes I have heard about the hardened layers and then the gelatin/ cyanotype layer. One attempt I had at coating the glass ended up with an impromptu gelatine/ sensitiser mix, but mixed on the glass itself, which was not too pretty! I am using potassium alum as I can get it from the local chemist. Enough alum to give a good hardening effect does change the properties of the cyanotype unfortunately, so I think formalin is really the way to go if I can find some.

An alternative that I am considering is to use potassium dichromate and then exposure to UV to harden the layer in a similar manner to the approach I use for gum-oil printing. I think it will be a case of managing the degree of exposure relative to how well the orange stain washes out. I may try a paper test equivalent first though to see if there is an impact of the dichromate residue on the cyanotype print.

Best regards,

Evan

PS. I have sent a PM.
 
Photrio.com contains affiliate links to products. We may receive a commission for purchases made through these links.
To read our full affiliate disclosure statement please click Here.

PHOTRIO PARTNERS EQUALLY FUNDING OUR COMMUNITY:


Ilford ADOX Freestyle Photographic Stearman Press Weldon Color Lab Blue Moon Camera & Machine
Top Bottom