Anybody with Vacuum easel construction experience??

Tyndall Bruce

A
Tyndall Bruce

  • 0
  • 0
  • 0
TEXTURES

A
TEXTURES

  • 3
  • 0
  • 28
Small Craft Club

A
Small Craft Club

  • 2
  • 0
  • 33
RED FILTER

A
RED FILTER

  • 1
  • 0
  • 29
The Small Craft Club

A
The Small Craft Club

  • 3
  • 0
  • 33

Recent Classifieds

Forum statistics

Threads
198,895
Messages
2,782,698
Members
99,741
Latest member
likes_life
Recent bookmarks
0

Sparky

Member
Joined
Jun 19, 2005
Messages
2,096
Location
Los Angeles
Format
Multi Format
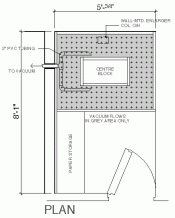
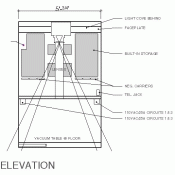
I'm in phase II of trying to complete my darkroom. So - since I'd like to do a fair volume of murals, I decided to build a 4x5 foot vacuum easel on the floor out of 2x3 lumber. The basic idea is to seal it all up with silicone and/or whatever caulking I have laying around and then attach the shop vac to the thing through the adjacent wall (controllable with a switch inside the D/R). So- I've drilled through the wall at an angle, down through the 2x3 frame (2"hole).

Next - I want to install PVC tubing for the vacuum connection. (and this is where I need the help!) - It seems to me that it might be a good idea to run 1.5 -2" PVC inside the easel/platform to regulate the suction - otherwise - it seems to me - that I might get too much suction on one side (not enough on the far end, 5' away)! Has anyone dealt with this before?

I figured 6 or so outlets inside the frame - each to a different zone. Conical holes are going to be drilled from the backside of a 3/4" ply+masonite composite to form suction venturis to allow for better flow. I figured every 2-3 inches ought to do it... though maybe I need more?

The problem also remains - how to plug the perimeter holes when I've got paper in there. I COULD just lay other paper or sheeting on the perimeter... but I'd like something more elegant (in the mathematical sense).

Any pneumatic engineers here??
 

glbeas

Member
Joined
Sep 25, 2002
Messages
3,932
Location
Marietta, Ga. USA
Format
Multi Format
The most elegant solution I've seen was a sliding valve that opened more vacuum up in a concentric pattern on the film bed of a process camera.
 
OP
OP
Sparky

Sparky

Member
Joined
Jun 19, 2005
Messages
2,096
Location
Los Angeles
Format
Multi Format
Thanks - appreciate the input (despite that being the minor point)- would be cool to see how that works... I was more trying to figure out if I should treat this as a 'sealed chamber' or 'direct the suck' with some tubing... if anyone can give me an idea on that...
 

glbeas

Member
Joined
Sep 25, 2002
Messages
3,932
Location
Marietta, Ga. USA
Format
Multi Format
You could do a mix with piping and concentric chambers to get the best effect. I've noticed no difference in pressure due to distance from the vacuum connection on my vacuum easel.
 
OP
OP
Sparky

Sparky

Member
Joined
Jun 19, 2005
Messages
2,096
Location
Los Angeles
Format
Multi Format
Well - I don't know how ideal it is - but it seems like a pretty good compromise... it's what I came up with last night and built. I blocked out the whole center area - thinking that the suction would be more effective at the perimeter, in case of loss in the system. Everything's pretty well sealed with silicone and caulking. I think that the centre should stay pretty flat anyway.
 

Attachments

  • plan.gif
    plan.gif
    48.1 KB · Views: 491
  • elev.gif
    elev.gif
    35 KB · Views: 377
Last edited by a moderator:

Jim Jones

Subscriber
Joined
Jan 16, 2006
Messages
3,740
Location
Chillicothe MO
Format
Multi Format
Sparky -- The requirements for graphic arts printing frames are far more stringent than those for a vacuum enlarging easel. Depth of field is generous at your easel. Blocking off the center area isn't necessary. If the edges draw down tightly, that will sealed off the center, and there is no loss of vacuum at the center. As the paper is drawn down onto the easel, the vacuum increases and the air flow diminishes. This causes the vacuum to be evenly distributed without the need for any ducting within the easel.

On the home-made 11x14 vacuum easel I used long ago, double weight paper that was cupped due to storage and dry air sometimes wouldn't draw down at the edges until temporarily pressed down. Strips of thin paper to seal off part of the easel for small prints weren't elegant, but they worked.
 

Bob Carnie

Subscriber
Joined
Apr 18, 2004
Messages
7,735
Location
toronto
Format
Med. Format RF
Sparky
All the vacum easels I work with have channels Or blocks of wood that support the metal surface so that when the vacumn is turned on the middle dosen't collapse,. If this is in your design sorry.*internal ribs that channel the flow of suction.*
As well I would put the whole easel on a floating platform so that the easel can be aligned properly. It looks like this can be easily done.
I have seen multiple port vacumn systems to evenly distribute the suction and for the size you are doing you may want to have two ports. As well do not mount the vacumn on the base area to reduce vibration.
To hold a large sheet of paper is tough with only vacumn, we always combined magnets with the vacumn for the best overall suction.
 
OP
OP
Sparky

Sparky

Member
Joined
Jun 19, 2005
Messages
2,096
Location
Los Angeles
Format
Multi Format
Sparky -- The requirements for graphic arts printing frames are far more stringent than those for a vacuum enlarging easel. Depth of field is generous at your easel. Blocking off the center area isn't necessary. If the edges draw down tightly, that will sealed off the center, and there is no loss of vacuum at the center. As the paper is drawn down onto the easel, the vacuum increases and the air flow diminishes. This causes the vacuum to be evenly distributed without the need for any ducting within the easel.

Yes- that's a good point I KNEW - but hadn't really CONSIDERED in the design. Oh well - less holes to drill!!
 
OP
OP
Sparky

Sparky

Member
Joined
Jun 19, 2005
Messages
2,096
Location
Los Angeles
Format
Multi Format
Sparky
All the vacum easels I work with have channels Or blocks of wood that support the metal surface so that when the vacumn is turned on the middle dosen't collapse,. If this is in your design sorry.*internal ribs that channel the flow of suction.*
As well I would put the whole easel on a floating platform so that the easel can be aligned properly. It looks like this can be easily done.
I have seen multiple port vacumn systems to evenly distribute the suction and for the size you are doing you may want to have two ports. As well do not mount the vacumn on the base area to reduce vibration.
To hold a large sheet of paper is tough with only vacumn, we always combined magnets with the vacumn for the best overall suction.

Yes - I hadn't really considered that effect in the design, Bob! Though I wanted it to have SOME rigidity anyway - there would be times I'd definitely need to stand on it! So - the way it's built - the longest open span of unsupported hardwood ply is only about 14"! So - it would have even less flex than a normal floor under even the worst conditions! So - we're good there.

The whole thing is bolted and glued to a concrete floor... so - alignment is pretty much up to altering things at the projection stage (wall mounted devere 504).

As for the vibration issue. The vacuum source is a large model home depot shop vac on wheels attached to the wall inlet (or is it considered an OUTLET if it's a vacuum??). And that's via a shortened 3" hose. So - shouldn't be an issue that I can think of.
 

Bob Carnie

Subscriber
Joined
Apr 18, 2004
Messages
7,735
Location
toronto
Format
Med. Format RF
Sounds like you got everything under control

Paint the concrete floor so dust is not a problem

Also don't forget to use magnets for positioning the paper and as well as extra holding power.

good luck
Bob
 

Bob Carnie

Subscriber
Joined
Apr 18, 2004
Messages
7,735
Location
toronto
Format
Med. Format RF
BTW when you get to the actual stage of printing , post, I have some neat tips on how to put the paper on the easel using the magnets , as well a good easy method of cutting exact lengths of paper from your roll.
 
OP
OP
Sparky

Sparky

Member
Joined
Jun 19, 2005
Messages
2,096
Location
Los Angeles
Format
Multi Format
Thanks Bob. The surface construction is masonite over ply however. How to use magnets with that? I assume yours is a steel face? I'd imagine the whole magnet thing is probably more useful with a vertical (wall-mounted) assembly? I'll probably just make a go of it as-is before trying anything 'magnetic'...

I'd love to hear your paper roll ideas -for sure. I was thinking of putting a kraft paper dispenser in a light-tight box and then wall mounting the whole affair - but I'm not sure that would be significantly easier than just taking the paper out of the original box and cutting it, really.
 

Bob Carnie

Subscriber
Joined
Apr 18, 2004
Messages
7,735
Location
toronto
Format
Med. Format RF
You can source out the metal with small holes that works perfectly on a wall as you suggest as well when flat . We work both ways . the magnets will be a life saver in time and wastage.
Cut a metal bar to the size of the roll you are using and have a sign maker fold over the metal , lets say one inch on either side.
Use this as a cutting guide on the box of paper.
With a tape measure put the one end on the top of the metal which is on the inside lip of the box, Measure a spot on your body which corresponds to the length you need. I am 5ft 6 so thats my max.
Then when you pull the paper from the box to that point on your body, gently let the paper roll back into your hands and hang it over the outside of the lip and cut along the metal.
The weight of the paper in the box will hold your pull to exactly the length on your body. You should be able to cut with one inch of your desired length.
I have done this method since 1980 with all types of material and roll size and it is the easiest method , short of an autocutter.


Y
Thanks Bob. The surface construction is masonite over ply however. How to use magnets with that? I assume yours is a steel face? I'd imagine the whole magnet thing is probably more useful with a vertical (wall-mounted) assembly? I'll probably just make a go of it as-is before trying anything 'magnetic'...

I'd love to hear your paper roll ideas -for sure. I was thinking of putting a kraft paper dispenser in a light-tight box and then wall mounting the whole affair - but I'm not sure that would be significantly easier than just taking the paper out of the original box and cutting it, really.
 
Photrio.com contains affiliate links to products. We may receive a commission for purchases made through these links.
To read our full affiliate disclosure statement please click Here.

PHOTRIO PARTNERS EQUALLY FUNDING OUR COMMUNITY:


Ilford ADOX Freestyle Photographic Stearman Press Weldon Color Lab Blue Moon Camera & Machine
Top Bottom