An inexpensive, effective enlarger alignment tool

In the Vondelpark

A
In the Vondelpark

  • 0
  • 0
  • 18
Cascade

A
Cascade

  • sly
  • May 22, 2025
  • 2
  • 0
  • 18
submini house

A
submini house

  • 0
  • 0
  • 49
Diner

A
Diner

  • 5
  • 0
  • 93
Gulf Nonox

A
Gulf Nonox

  • 10
  • 3
  • 116

Forum statistics

Threads
197,818
Messages
2,764,944
Members
99,481
Latest member
chopfalne
Recent bookmarks
0

Arvee

Member
Joined
Aug 23, 2006
Messages
976
Location
Great Basin
Format
Multi Format
I have been less than successful in completing a satisfactory alignment on my enlargers so I decided to improve on the mirror concept. I made some changes to the basic instructions I found on the web and now have a very accurate and simple (inexpensive) alignment tool that is quite sensitive. I can detect a few thousandths of movement quite easily. I was unable to achieve a good alignment using the tiny donut hole.

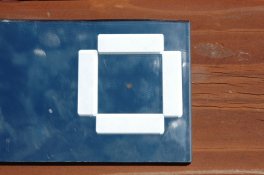
I bought a 12"x12" mirror at the craft store and split it into 3-4" widths by 12" long. I scraped out a hole about 3/16" for viewing and added four Avery labels (3/4"x1-1/2") and assembled them into box shape about 1-1/2" square (id).

This 4x12" mirror is placed mirror down inserted into the negative stage. Another 4x12" mirror is rotated 90 degrees and placed mirror side up on the baseboard. The enlarger was raised to the height to make an 8x10.

View down through the 3/16" hole and you will see the succession of boxes disappearing into the center (when properly aligned). Also, if you leave a slight gap between the corners of the Avery labels (I didn't leave much and am going to modify mine in the future), you will see a darkish 'X' disappearing into the center. Adjust enlarger for concentric boxes and the 'X' sinking into the center. You can see the center of the X shift with the slightest movement of the negative stage adjustments.

I could never get a proper presentation with the donut hole arrangement and this presentation is extremely sensitive and it is very easy to do a check before a printing session....and it doesn't cost hundreds of $$$.

Checking the lens stage isn't quite as simple as I have to hold the mirror up against the rim of the enlarging lens with the presumption that the rim is square with the optical axis. Also, there is the probability that upward pressure on the lens rim will change the position of the head and bias the alignment. I am going to work on find a way to attach the top mirror to the lens without me holding it in place. I am going to experiment with large rubber bands around the mirror and negative stage snugging it up against the rim. Any suggestions would be appreciated.

Bottom line: I have an enlarger that doesn't have lens stage adjustments but is parallel with the negative stage. When I finished, I checked grain with a Peak 2020 and have the best alignment corner to corner I have had in some time.

Fred

Please excuse the fingerprints on the mirror in the photo.
 

Attachments

  • alignment mirror.jpg
    alignment mirror.jpg
    57 KB · Views: 1,033

Michel Hardy-Vallée

Membership Council
Subscriber
Joined
Apr 2, 2005
Messages
4,793
Location
Montréal, QC
Format
Multi Format
I have tried to do the same thing, but it took me a while to realize that the hole I looked through had to be outside of the enlarger's optical path. I was trying to do something with the light source inside the enlarger, etc.

I think you mean "180 degrees" (mirrors facing each other) and not 90 degs.

Lens stage: if your lens has a fillet, you could use a screw-in ring glued to the mirror. To check alignment, you just screw the mirror onto the lens.
 

walter23

Member
Joined
Sep 19, 2006
Messages
1,206
Location
Victoria BC
Format
4x5 Format
I've just done my best to level everything with a bubble level. Never seen any hint of unsharpness due to misalignment even in 16x20 prints.
 
OP
OP

Arvee

Member
Joined
Aug 23, 2006
Messages
976
Location
Great Basin
Format
Multi Format
MHV,

The mirrors face each other (180 deg.) but the long axes of the mirrors are 90 from each other. I almost knocked the baseboard mirror to the floor; I felt it was appropriate to rotate it 90 from the top mirror to prevent an accident.

Walter 23,

What kind of bubble are you talking about? I have tried to buy a good circular bubble but haven't found one. I bought one from Lowe's but it wasn't even close to level compared to my long level.

Fred
 

epatsellis

Member
Joined
Jan 1, 2006
Messages
926
Format
Multi Format
Fred, out of curiosity, have you checked your long level, swapping end for end? you may find quite a bit of discrepency. I have yet to buy a 4' level under $100 that agreed when flipped, even the good ones will need tweaking after bouncing around for a year or two.


erie
 

wildbill

Member
Joined
Nov 28, 2004
Messages
2,828
Location
Grand Rapids
Format
Multi Format
Fred, out of curiosity, have you checked your long level, swapping end for end? you may find quite a bit of discrepency. I have yet to buy a 4' level under $100 that agreed when flipped, even the good ones will need tweaking after bouncing around for a year or two.


erie
Especially when guys like my dad use them to pack the dirt around post holes. He's been doing it that way for at least 30years! I couldn't ever convince him it was a bad idea.
 

MartinP

Member
Joined
Jun 23, 2007
Messages
1,569
Location
Netherlands
Format
Medium Format
I have previously used a spirit-level with a magnifier in it, from some old lab equipment, and I have the idea that it may not be accurate anymore, but it is still consistent. An assumption is that the column is straight, but given the size of the thing I couldn't change it even if it wasn't . . . I will have a go at the double mirror idea, with the hole to look through etc. and see how that works out.
 

RJS

Member
Joined
Jan 4, 2005
Messages
246
Location
Southern Cal
Format
Multi Format
enlarger alignment

I have used a filter of the appropriate size screwed into my enlarger lens with my Versalab; one could cement a mirror to the filter quite easily I think. The alignment of the enlarging lens with the front of the barrel has been discussed as I remember by Ctein in his book - there is possibly a discrepancy between the face of the barrel and the barrel itself, but how picky are you going to be? I did find that a cheap filter gave me different results than a B&W. The fit of the filter glass in the ring seems variable. How many of those angels are dancing on that pin?
 
OP
OP

Arvee

Member
Joined
Aug 23, 2006
Messages
976
Location
Great Basin
Format
Multi Format
I have two good levels, one 4' and one 2', both are identical and read the same when swapped end for end. I have a couple of torpedo levels that aren't in that league.

In light of the fact that most enlarging lenses are not perfectly centered, I am using the exposed/developed leader that had been abraded with 100 grit sandpaper as a test neg and that gives me very fine lines to check overall focus. Then, on the enlargers that have negative stage pitch and yaw, I simply adjust for best presentation. Of course, the enlarging lenses at 2.8 are a tad softer at the edges but are great down about 1-1/2 to 2 stops for final check.

I am contemplating renting a 6-8 inch machinists level to see if that is an accurate way to go. Still, the mirror setup is so quick when beginning a session and it gives me the confidence that I am starting on solid ground.

My worst enlarger, a salvaged 23CII that was stored in a shed for several years and severely banged around (a lot of sheet metal was out of square), has come right into alignment with little tweaking.

I am pretty happy with the setup but I don't know that spirit levels are any quicker/better but I want to do some experimentation with how far out can an enlarger before it is visible in a print. Ballpark guess: I would guess a lot of enlargers are out a bit but are still producing reasonbly sharp prints, especially at the 8x10 size. A 16x20 would scream at you if the enlarger was much out of alignment.

It could be that a bubble alignment/check is just as good when it comes to viewing the final print. My mirror setup is very sensitive and what little drift I see from session to session may be inconsequential.

Later,

Fred
 

john_s

Subscriber
Joined
Nov 19, 2002
Messages
2,122
Location
Melbourne, A
Format
Medium Format
One way to attach the mirror to the rim of the enlarging lens:

Dead Link Removed
 

Mike Wilde

Member
Joined
Aug 10, 2006
Messages
2,903
Location
Misissauaga
Format
Multi Format
why not low tech?

how about take a fogged film leader, and put in the neg holder. Scratch around the outside with a pin. Then outside of the holder, scratch the pin across the diagonals. Then project it and look at the image on the baseboard. If it is not sharp when the lens is stopped down a bit, why worry. If not opposite sides measure the same too.

If you find a problem, then start getting the level out, mirror etc.
 

RobC

Member
Joined
Nov 5, 2007
Messages
3,880
Location
UK
Format
Multi Format
you can build your own laser alignment tool very very cheaply.

You just take one of those £1.50 key ring laser pointers and drill a hole in a block of wood or aluminium which is just deep enough so that the top of the pointer is not sticking out. Then you put some blutac around the top of it so that you can alter its angle. Now the obvious bit (once you know how) is to align it so its perpendicular to the base of your block of wood. You put it on rotating base such as a record turntable and turn the base and watch the track of the pointer on the ceiling. Move the block until the circle it gives on the ceiling is as small as possible and then when you can't get it any smaller, you adjust the position of the pointer in its hole until the point on the ceiling stays stationary when you rotate it on its base. Its now 100% perpendicular to its base. You can place a piece of paper with a hole in it over the top as your reflection target.
Use mirrors or glass as described in the verslab web site to align enlarger. Thats less than $5 and not $200 and it will be just as accurate. Only thing is that you will need to check perpendicular alignment of pointer each time you want to use it. You need to switch it on and off.:smile:
 
Joined
Sep 10, 2002
Messages
3,573
Location
Eugene, Oregon
Format
4x5 Format
My alternate method:

Tape threads across the negative carrier, vertically, horizontally and diagonally (to make an eight-pointed star pattern). Make sure they are tight and lie in as close to the same plane as possible. (A test-pattern negative of assured sharpness would be great too, but this is easy and available...)

Rack the enlarger up to the greatest height you can while still keeping the edges of the negative carrier on the baseboard.

Focus the center with your expensive grain magnifier. Use your largest aperture (or the one you normally focus with). Now check the sides and corners. If they are not sharp, adjust whatever is needed till everything is in focus together. Voilà, your enlarger is aligned.

No smoke no mirrors :smile:

Best,

Doremus Scudder

www.DoremusScudder.com
 
OP
OP

Arvee

Member
Joined
Aug 23, 2006
Messages
976
Location
Great Basin
Format
Multi Format
Excellent contributions, guys! Always helpful to know how the other guy gets the job done!

Thanks!

Fred
 

dancqu

Member
Joined
Sep 7, 2002
Messages
3,649
Location
Willamette V
Format
Medium Format
If you find a problem, then start getting the
level out, mirror etc.

I've aligned my enlarger by merely observing the
projected image of the negative carrier. If the image
corners are square and each are sharp the enlarger
is aligned. If not, out with screw drivers and pliers.
A square and those tools are all that are needed.

Alignment by that method is more exact. Assurance
extends to the very maximum of coverage. Dan
 

jgjbowen

Member
Joined
Oct 13, 2003
Messages
879
Location
Richmond, VA
Format
Large Format
Fred Picker discussed an enlarger alignment method in his newsletters. He used a piece of glass from a medicine cabinet and 2 unused #2 pencils. Can't get much cheaper than that.
 

jgjbowen

Member
Joined
Oct 13, 2003
Messages
879
Location
Richmond, VA
Format
Large Format
Fred,

I'll see if I can find it. The newsletters are in my office, and I won't be back in my office until next Wednesday.

John
 
Last edited by a moderator:
OP
OP

Arvee

Member
Joined
Aug 23, 2006
Messages
976
Location
Great Basin
Format
Multi Format
Thanks! I have the book but don't have a single newsletter. Looking forward to Fred's solution.

Fred
 

jgjbowen

Member
Joined
Oct 13, 2003
Messages
879
Location
Richmond, VA
Format
Large Format
From Mr. Picker's Newsletters....

I figured out a precise way to
level an enlarger. You need a piece of glass
about 3x14 inches and two unsharpened pencils.
For the glass, a medicine cabinet shelf works
well. First, replace the negative carrier with
the glass. It should extend from left to
right. Lower the head of the enlarger until a
pencil fits snugly between one end of the
glass and the easel or counter top. Lock the
head at that height. Then feel with the pencil
under the other end of the glass and adjust
until the pressure on the pencil is even at
both ends of the glass. Then turn the glass
front to back, feel both ends with the pencil,
and adjust. If you can't slide the glass right
through, feel close to the head with the
pencil and then farther out.
Next, raise the enlarger head and press
the glass up against the lens flange with the
eraser end of a pencil. Focus down until the
pencil feels snug between the lens and the
easel or counter top. With another unsharpened
pencil, feel out to the right, then to the
left. Make the necessary adjustments.
Check the lens stage front to back the
same way. Your enlarger will now be perfectly
aligned. No standing on chairs, no squinting
at bubbles. With this method you not only
become aware of how far your enlarger was off,
you may learn that the alignment controls are
difficult to control.
 
OP
OP

Arvee

Member
Joined
Aug 23, 2006
Messages
976
Location
Great Basin
Format
Multi Format
Much obliged, John!

I just tried it and the mirror method is a bit more convenient, but it verified that I am right on.

The mirrors are much quicker for alignment checking after the initial alignment is complete.


Fred
 
Last edited by a moderator:

kkaiser

Member
Joined
May 7, 2008
Messages
1
Format
35mm
Precision Enlarger Alignment System_APUG

This Precision Enlarger Alignment System_APUG description is a cut down version from a 1.18 Mb file for APUG.
I can email the detailed version directly to anyone that is interested.
Ken Kaiser
 

Attachments

  • Precision Enlarger Alignment System_APUG.doc
    349 KB · Views: 527
Photrio.com contains affiliate links to products. We may receive a commission for purchases made through these links.
To read our full affiliate disclosure statement please click Here.

PHOTRIO PARTNERS EQUALLY FUNDING OUR COMMUNITY:


Ilford ADOX Freestyle Photographic Stearman Press Weldon Color Lab Blue Moon Camera & Machine
Top Bottom