sanking
Member
Here are some thoughts on an alternative method of developing film using tubes.
Development of Sheet Film in Trays in Open-Ended PVC Tubes
Although most people are able to get satisfactory results when developing sheet film in trays with shuffle development the fact is that many others have experienced difficulties of one type or another, primarily with uneven development and/or scratching or gouges on the film. Uneven development at the edge of the film is caused by local hot areas that result from the increased speed of the developer as it bounces of the edge of the tray during agitation. The use of trays one size larger than the film being developed reduces but does not entirely eliminate this problem and in practice it will be found virtually impossible to get as even development with tray development as with rotary processing in tubes and drums.
Scratching and gouging of the film is another issue. Many people who develop sheet film in trays with shuffle development are capable of making excellent negatives, with no scratches or gouges. Unfortunately this is a talent that some never learn and in spite of best intentions wind up ruining many important negatives when using this type of development.
Fortunately there is a simple variation on tray development that will give very even development and significantly minimize the risk of scratching or gouging the film. With this method we continue to develop the film in trays, but first place them in individual PVC tubes. Since the specific gravity of PVC is greater than that of water the tubes sink to the bottom of the tray and to insure continuous contact of the developer with the film we need only make sure that the developer in the tray covers the tubes. Agitation is carried out moving the tubes around in the water using some consistent pattern. However, since the film is in always in contact with the developer agitation need not be constant as when developing in tubes or drums with rotary agitation. This fact makes it possible to develop multiple sheets of film in the same tray with minimal agitation procedures, not recommend with shuffle development. Another advantage is that one can develop more sheets of film per sessions using tubes than with shuffle agitation because the logistics of handling the film and moving it from solution to solution is much easier.
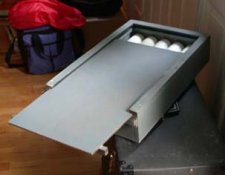
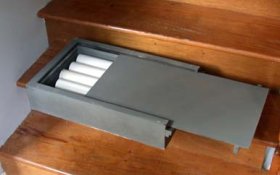
One could also use a light tight tank instead of a normal darkroom tray and carry out most of the operations in the dark. For example, my preferred method at this time of developing 7X17 film is in a light tight wooden container that measures 20X13X4. I fitted this container with slots on the top to accept a 1/4 plywood top which I slide into the slots and thus seal out the light. I place the film in 3 diameter PVC tubes and four of these tubes will fit in the container at the same time. I generally use minimal agitation with these system, which means that every threee minutes or so I slide the top out of the slots (in the dark of course), agitate the film by rolling the tubes, and then replace it. This is a very convenient method of develoment as most of the time I can have the light on, and you get great results. I am thinking of building one of these containers for 12X20 film, but the 4 diameter tubes required will probably limit me to two or three sheets at a time.
To use this method of development you must first prepare the tubes. You will need sections of PVC tubing of the proper diameter cut to about an inch longer than the long dimension of the film. Use the following diameter tube according to film format: 1.5 for 4X5, 2 for 5X7, 3 for 8X10 and 7X17, and 4 for 11X14 and 12X20. This material is easily cut with a table saw or circular saw fitted with a smooth tooth carbide blade. After cutting to the right length sand off the edges with a medium-grit sandpaper to eliminate rough edges that might scratch the film.
1. Begin as for regular tray processing by washing and arranging in proper order your trays.
2. Now turn off the light and place your holders containing the exposed film on a clean work bench or table well away from the developing chemistry and remove the film that you plan to develop. Remove the film from the holders, cup it in one hand and slide it into the tube, and set it aside. Leave just a bit of film protruding from the tubes. Repeat until all of the tubes are loaded.
3. Now move the tubes, one at a time, into the tray containing the pre-soak water. As soon as the tube is in the water grab the protruding end of the film and gently move it partially in and out of the tube. This will ensure that the base side of the emulsion is wetted and will promote even clearing of the anti-halation coating on the base of the film. Finish by pushing the film all the way back into the tube so that no part of it could come into contact with other tubes during processing. Repeat for all of the tubes and allow the films to soak in the pre-soak bath for five minutes.
3. Now set your timer for the required development time and move the sheets, one at a time and as quickly as possible, into the developer tray, rocking the tray vigorously after each sheet of film goes in. This can be done as vigorously as desired because there is no concern with scratching film.
4. Agitation is carried out by gently rotating the tubes in the water and by moving them from side to side, or by rotating the tubes and sloshing rocking the tray from side to side so that the solution flows through the tubes. Agitation could be continuous if desired but one of the primary advantages of this system is that it allows for minimal and extreme minimal procedures.
5. At the end of the development period transfer each of the tubes to a tray that contains the stop bath and agitate by rotting the tube for a few seconds as soon as it goes into the solution. Development is completely stopped within about ten seconds and the film can then be drained and transferred to the fixer.
6. Now remove the film from the tubes and transfer it into the fixing bath. Agitate gently by rocking the tray as each sheet goes into the fixer, then begin shuffling gently through the stack. Lights can go on as soon as all of the films are in the fixer. As fixing continues the milky/cloudy emulsion will begin to clear. Note the time when clearing is complete as general procedures calls for films to be fixed for about two times the clearing time. In theory you could fix the film while it is still in the tubes but in practice removing it from the tubes allows for faster clearing of the anti-halation back.
7. After fixing transfer the sheets to a the tray containing a clearing bath and shuffle through them a couple of times.
8. Finally, transfer the films to a film washer or tray of running water and wash for fifteen minutes.
9. After washing soak the negatives for about one minute in a one-half strength Phot-Flo solution made up from distilled water, adding about 25ml of 90% Isopropyl Alcohol per liter of solution.
10. Hang the negatives to dry without squeegeeing.
Give this method a try. Very easy, inexpensive, and almost guarantees even develoment and scratch free negatives.
Sandy
Development of Sheet Film in Trays in Open-Ended PVC Tubes
Although most people are able to get satisfactory results when developing sheet film in trays with shuffle development the fact is that many others have experienced difficulties of one type or another, primarily with uneven development and/or scratching or gouges on the film. Uneven development at the edge of the film is caused by local hot areas that result from the increased speed of the developer as it bounces of the edge of the tray during agitation. The use of trays one size larger than the film being developed reduces but does not entirely eliminate this problem and in practice it will be found virtually impossible to get as even development with tray development as with rotary processing in tubes and drums.
Scratching and gouging of the film is another issue. Many people who develop sheet film in trays with shuffle development are capable of making excellent negatives, with no scratches or gouges. Unfortunately this is a talent that some never learn and in spite of best intentions wind up ruining many important negatives when using this type of development.
Fortunately there is a simple variation on tray development that will give very even development and significantly minimize the risk of scratching or gouging the film. With this method we continue to develop the film in trays, but first place them in individual PVC tubes. Since the specific gravity of PVC is greater than that of water the tubes sink to the bottom of the tray and to insure continuous contact of the developer with the film we need only make sure that the developer in the tray covers the tubes. Agitation is carried out moving the tubes around in the water using some consistent pattern. However, since the film is in always in contact with the developer agitation need not be constant as when developing in tubes or drums with rotary agitation. This fact makes it possible to develop multiple sheets of film in the same tray with minimal agitation procedures, not recommend with shuffle development. Another advantage is that one can develop more sheets of film per sessions using tubes than with shuffle agitation because the logistics of handling the film and moving it from solution to solution is much easier.
One could also use a light tight tank instead of a normal darkroom tray and carry out most of the operations in the dark. For example, my preferred method at this time of developing 7X17 film is in a light tight wooden container that measures 20X13X4. I fitted this container with slots on the top to accept a 1/4 plywood top which I slide into the slots and thus seal out the light. I place the film in 3 diameter PVC tubes and four of these tubes will fit in the container at the same time. I generally use minimal agitation with these system, which means that every threee minutes or so I slide the top out of the slots (in the dark of course), agitate the film by rolling the tubes, and then replace it. This is a very convenient method of develoment as most of the time I can have the light on, and you get great results. I am thinking of building one of these containers for 12X20 film, but the 4 diameter tubes required will probably limit me to two or three sheets at a time.
To use this method of development you must first prepare the tubes. You will need sections of PVC tubing of the proper diameter cut to about an inch longer than the long dimension of the film. Use the following diameter tube according to film format: 1.5 for 4X5, 2 for 5X7, 3 for 8X10 and 7X17, and 4 for 11X14 and 12X20. This material is easily cut with a table saw or circular saw fitted with a smooth tooth carbide blade. After cutting to the right length sand off the edges with a medium-grit sandpaper to eliminate rough edges that might scratch the film.
1. Begin as for regular tray processing by washing and arranging in proper order your trays.
2. Now turn off the light and place your holders containing the exposed film on a clean work bench or table well away from the developing chemistry and remove the film that you plan to develop. Remove the film from the holders, cup it in one hand and slide it into the tube, and set it aside. Leave just a bit of film protruding from the tubes. Repeat until all of the tubes are loaded.
3. Now move the tubes, one at a time, into the tray containing the pre-soak water. As soon as the tube is in the water grab the protruding end of the film and gently move it partially in and out of the tube. This will ensure that the base side of the emulsion is wetted and will promote even clearing of the anti-halation coating on the base of the film. Finish by pushing the film all the way back into the tube so that no part of it could come into contact with other tubes during processing. Repeat for all of the tubes and allow the films to soak in the pre-soak bath for five minutes.
3. Now set your timer for the required development time and move the sheets, one at a time and as quickly as possible, into the developer tray, rocking the tray vigorously after each sheet of film goes in. This can be done as vigorously as desired because there is no concern with scratching film.
4. Agitation is carried out by gently rotating the tubes in the water and by moving them from side to side, or by rotating the tubes and sloshing rocking the tray from side to side so that the solution flows through the tubes. Agitation could be continuous if desired but one of the primary advantages of this system is that it allows for minimal and extreme minimal procedures.
5. At the end of the development period transfer each of the tubes to a tray that contains the stop bath and agitate by rotting the tube for a few seconds as soon as it goes into the solution. Development is completely stopped within about ten seconds and the film can then be drained and transferred to the fixer.
6. Now remove the film from the tubes and transfer it into the fixing bath. Agitate gently by rocking the tray as each sheet goes into the fixer, then begin shuffling gently through the stack. Lights can go on as soon as all of the films are in the fixer. As fixing continues the milky/cloudy emulsion will begin to clear. Note the time when clearing is complete as general procedures calls for films to be fixed for about two times the clearing time. In theory you could fix the film while it is still in the tubes but in practice removing it from the tubes allows for faster clearing of the anti-halation back.
7. After fixing transfer the sheets to a the tray containing a clearing bath and shuffle through them a couple of times.
8. Finally, transfer the films to a film washer or tray of running water and wash for fifteen minutes.
9. After washing soak the negatives for about one minute in a one-half strength Phot-Flo solution made up from distilled water, adding about 25ml of 90% Isopropyl Alcohol per liter of solution.
10. Hang the negatives to dry without squeegeeing.
Give this method a try. Very easy, inexpensive, and almost guarantees even develoment and scratch free negatives.
Sandy