There may be a reason Kodak used yellow paint and tiles in all their DR's.
-
Welcome to Photrio!Registration is fast and free. Join today to unlock search, see fewer ads, and access all forum features.Click here to sign up
You are using an out of date browser. It may not display this or other websites correctly.
You should upgrade or use an alternative browser.
You should upgrade or use an alternative browser.
Advice needed... Basement darkroom
-
A
- Thread starter J Rollinger
- Start date


Recent Classifieds
-
Want to Buy Hasselblad A12 type III or IV back (Black or Silver)
- Started by jshcrlsn
-
For Sale Nikon F2S (body only, meter not working)
- Started by MCB18
-
For Sale 210mm f/5.6 Apo Sironar (W) MC in Copal 3
- Started by Steve Goldstein
Forum statistics
ROL
That's a pretty good looking darkroom!
That's a pretty good looking darkroom!
I think the theory is mainly related to reflected light, the best example being the cracks in the enlarger around the film holder. Any Paper exposing light would in theory be absorbed by the walls. Maybe this would be better than black around the enlarger. I would try it if I hadn't painted mine black like everybody recommended, 30 years ago.
The colour might be a representation of wavelength that the paper is insensitive to. Like a kodak #1 or OC
I have never been in a bordello, so I don't know what they look like.
When I look at my bamboo tongs I can't tell the yellow from the red under safelight.
The colour might be a representation of wavelength that the paper is insensitive to. Like a kodak #1 or OC
I have never been in a bordello, so I don't know what they look like.
When I look at my bamboo tongs I can't tell the yellow from the red under safelight.
No wall color absorbs more light than black, but that's the problem. We don't want all light absorbed. We want 'safe' light evenly distributed!
By the way, a CD is a good tool to find out how 'safe' safelight really are.
By the way, a CD is a good tool to find out how 'safe' safelight really are.
I've actually got a new-to-me 23C II enlarger in my van ready to come to it's new home in my basement darkroom. I've still goto to light proof it but I've been developing film using a dark box (which I love) and hanging it with clips on the 6 gauge bare copper ground line in the ceiling.
I plan on hanging canvas around my enlarger to capture light.
Also, I stole one of my wife's old work out matts and it has been AmAZING on my feet! If it wasn't for that, I'd be all over horse matts!
I didn't spluge for a darkroom sink, instead got a cheap utility sink from Lowes. Got shelves from the Habitat for Humanity ReStore. As for counter top, I've been using a 3/4 in thick wood counter top in my kitchen for years - just treat it regularly with mineral oil, same as i use on my Boss Block (the kitchen is my other favorite room in the house.) I used the same wood in the basement.
The only thing I need to do now is get a print washer and run some lines for drying. Bur for a print dryer, I'm going to use a funnel into a piece of PVC pipe attached to a piece of Plexiglass with holes in it. And I'll probably build a drying box for my negatives.
I'm also installing a computer and my scanner in my dark room, should be fun killing all those lights! Of course, I should just use my old laptop for that...
But I would definatly get something to go under your feet!
Paint... Does color matter? Does finish matter? Will a gloss paint have any affect while printing?
APUG seems to have semi-annual long threads about this. You've just missed the most recent one.
I'd go with a beige or puce, and aubergene behind the enlargers.

No wall color absorbs more light than black, but that's the problem. We don't want all light absorbed. We want 'safe' light evenly distributed!
By the way, a CD is a good tool to find out how 'safe' safelight really are.
Please do tell.
r
Mats
Please do tell.
r
Mats
Turn on your safelights, take the CD, look at the back of it until you see a reflection of the safelight and bend it slightly until it breaks the light and you can see the spectrum. A 'safe' safelight will not have any blue and very little green content.
Practice first in white light to appreciate the difference.
I never knew that Ralph - Thank you for sharing!!
Thanks Isaac Newton. In 1670, he demonstrated that a prism could decompose white light into a spectrum of colors. I just replaced the prism with a CD and tested how 'white' the safelight is. Missing the blue and green components of the spectrum will indicate relatively 'safe' conditions.
Last edited by a moderator:
Remember that all safelight are limited to a certain 'safe' time. Only, a safelight test will tell how 'safe' they really are.
Having worked in both commercial color and b&w darkrooms and built a couple of my own, I, like the rest have a few recommendations. For the floor, use a waterproof paint in a neutral color (I used gray), and get the restaurant kitchen pads to step on in black. Do not use the red ones. They are easy to pick up and clean, plus they last darned near forever! On the walls, use a very neutral semigloss white paint. Darkrooms are called that for a reason and you want your safelights to give you enough light to work with. I found that having the walls on the enlarger side and the wet side covered with pegboard very helpful. You might not even need the shelving with that up. My last suggestion is to wall mount your enlarger(s) and build your enlarging table so you can adjust the height of the paper surface similar to the shelf adjusters in an oven. These things have worked great for me.
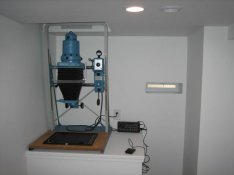
Thanks for all the adivce everyone!! I finished the platforms for the enlargers, all electrical and painting. I fellow Apuger earlier in this thread mentioned wired shelves from Home Depot so i went there.. They were perfect for what i needed and came in 6ft lengths to match sink. If they rust i will just snap it off and put a new one on. The floor is a lost cause... I tried to even it out today but its just bad so I'm going with painting the floor gray and using black mats. I'm getting very excited to complete it so i can print again!!!! I will scrub the floor good in the next 2 days so it dries out for painting this weekend. After the floor all i have to do is put the sink in and find a base cabinet at Home Depot then I'm done! Below is a photo of the platform and enlarger. I was surprised that the enlarger would not fit but luckily there is only 8 screws to remove the chassis from the baseboard, not it fits.
Thanks again for the help, I appreciate it!
Jim
Thanks again for the help, I appreciate it!
Jim
Attachments
| Photrio.com contains affiliate links to products. We may receive a commission for purchases made through these links. To read our full affiliate disclosure statement please click Here. |
PHOTRIO PARTNERS EQUALLY FUNDING OUR COMMUNITY:  |