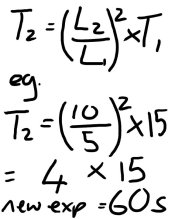
I recall reading a while ago a formula for adjusting print exposure time as the enlargement size changes. But, I cannot recall where I read this. I assume that with an f-stop timer it's relatively simple to make these adjustments.
My reason for asking is that I have several negatives I'd like to print on 5x7", 8x10" and 11x14" paper to test my theory that different images look best at one size; at least, they look better than when larger or smaller. It would be nice to quickly adjust the exposure time (or lens aperture) and make a series of three prints while the negative is still in the enlarger.
Rich