1st time printmaker

Have A Seat

A
Have A Seat

  • 0
  • 0
  • 346
Cotswold landscape

H
Cotswold landscape

  • 4
  • 1
  • 478
Carpenter Gothic Spires

H
Carpenter Gothic Spires

  • 3
  • 0
  • 2K

Recent Classifieds

Forum statistics

Threads
199,623
Messages
2,794,349
Members
99,970
Latest member
microcassettefan
Recent bookmarks
0

onadraw

Member
Joined
Sep 18, 2011
Messages
16
Format
Medium Format
I made some contact prints and a few enlargements for the first time. I got some good results and I have a lot to learn.

Couple questions:

I'm using a Gralab timer. Why is it necessary to plug the safelight into the timer and have it go off during the paper exposure? It seems like the safelight could just stay on all the time.

Also, I'm using an easel with two adjustable arms and I don't know what I'm doing. Anyone care to share "how to use a 2 blade easel"?

Thanks
 

MattKing

Moderator
Moderator
Joined
Apr 24, 2005
Messages
53,533
Location
Delta, BC Canada
Format
Medium Format
Glad you are enjoying yourself.

On the safelight question, it is important to understand that "safelight" is a relative term. Anything that shortens the amount of safelight exposure will help assure that the safelight adds no fog. Anything that extends the safelight exposure increases the risk that the light won't really be safe.

Remember that for some prints, you can end up with print times of several minutes, when all dodging and burning is included.

And for the easel, what sort of problems are you having? If they are related to achieving equal margins, I would suggest starting either with a scrap print or a sheet of paper cut to the right size, and experiment in the light with the adjustments - remember that you can use a pencil to indicate the edges of the printed area.
 

John Koehrer

Subscriber
Joined
Apr 3, 2004
Messages
8,277
Location
Aurora, Il
Format
Multi Format
The safelight can stay on all the time. But you should test it to see if it fogs your paper. take a piece of the paper you use, a small piece will do, lay a coin on it and set it on your easel with only the safelight on. give it a minute or two and process it . If there's a darkening of the area around the coin the light isn't completely safe and needs to be changed to a different color or moved further away
Two armed easels are meant to have the paper pushed to the upper left hand corner and the arms adjusted to the print size you want. You will need to trim the paper if you're printing smaller sizes. A four blade easel will allow you to make more even borders though.
 

Rick A

Subscriber
Joined
Mar 31, 2009
Messages
9,966
Location
Laurel Highlands
Format
8x10 Format
On the two bladed easel, measure the border under the fixed arms, then set the adjustable arms to give the same border for the print size. On my two blade easel, I have lines drawn on the board and marked for the print sizes I use, then all I have to do is move the arm to the correct line that matches my print.
 
OP
OP

onadraw

Member
Joined
Sep 18, 2011
Messages
16
Format
Medium Format
I'm having a hard time getting straight borders when using the easel. The 2 enlargements I liked best were made without the easel by laying the paper directly on the baseboard. Is it really necessary to use an easel?
 

andrewf

Member
Joined
Jul 24, 2010
Messages
51
Location
Melbourne, Australia
Format
Multi Format
I'm having a hard time getting straight borders when using the easel. The 2 enlargements I liked best were made without the easel by laying the paper directly on the baseboard. Is it really necessary to use an easel?

I never used an easel when I used to print but then you can have a problem with paper that doesn't sit flat on the base board which renders the picture out of focus in the centre of the print. Mainly an issue with smaller sizes.
 

eddie

Member
Joined
Jul 24, 2005
Messages
3,259
Location
Northern Vir
Format
Multi Format
Another reason the safe light goes out during exposure is it makes it easier to see the paper while dodging/burning.
 

MattKing

Moderator
Moderator
Joined
Apr 24, 2005
Messages
53,533
Location
Delta, BC Canada
Format
Medium Format
I'm having a hard time getting straight borders when using the easel. The 2 enlargements I liked best were made without the easel by laying the paper directly on the baseboard. Is it really necessary to use an easel?

Some easels have been bent or are out of alignment, so check to see if that is your problem.

And blades can loosen over time (especially with 2 blade models), so check that.

There is a bit of technique involved in positioning paper into an open easel, and then closing it without moving the paper, so it may be that you need to practise that in the light.
 

Bob-D659

Member
Joined
Feb 10, 2008
Messages
1,273
Location
Winnipeg, Ca
Format
Multi Format
Also make sure the paper stop is adjusted for the border width you want and that it is square to the frame, then you adjust the moveable arms to be square to the frame.
 

zsas

Member
Joined
May 12, 2011
Messages
1,955
Location
Chicago, IL
Format
35mm RF
Congrats for your accomplishment! Great advice above, nothing to add but a congrats!
 

vpwphoto

Member
Joined
Feb 21, 2011
Messages
1,202
Location
Indiana
Format
Multi Format
Hi, You will find many opinions as to safe light use/types etc.
First as reccomended find out how safe it is. If you can do the coint test and not notice an issue after 5 to 10 minutes you are ok. (Not all papers react the same).
I leave mine ON when printing, have for decades. I use flourescent tubes with OC filters and bouced the light off a white ceiling.
A word of warning for anyone reading... THE NEW HIGH EFFICENCY SPIRAL BULBS CONTINUE TO FLOURECE AFTER THEY ARE SWITCHED OFF... THEY MAY FOG FILM IF THEY ARE IN YOUR LOADING ROOM!

Chreers..
 

Rick A

Subscriber
Joined
Mar 31, 2009
Messages
9,966
Location
Laurel Highlands
Format
8x10 Format
One thing you may want to consider as to a safelight, color. A red safelight positioned approx. one meter or more from your work area is far safer than an OC safelight, and for some papers is required. My red light(5x7 Premier) gives me well over 30 minutes of open time with any paper before showing signs of fogging. It is safer to use the safe light option on the timer for any light, giving extra time before the paper will start to fog.

BTW, for got to congratulate you on joining a dwindling group of folks that hold dear, the art of wet printing. Continue on having fun, I've been at it for nearing a half century, and it's still magic.
 
OP
OP

onadraw

Member
Joined
Sep 18, 2011
Messages
16
Format
Medium Format
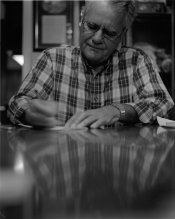
This was my first enlargement. Its 8x10 from a 2 1/4 x 2 1/4 negative.


dad.jpg
 

Molli

Member
Joined
Dec 28, 2009
Messages
1,016
Location
Victoria, Australia
Format
Multi Format
Very nice work! While comparisons may be odious, I have to say, if I'd been making prints like yours from the outset I'd never, ever want to leave the darkroom! :smile:
 

RPippin

Subscriber
Joined
Apr 28, 2008
Messages
286
Location
Staunton VA
Format
Multi Format
When I used a two bladed easel I found it helpful to square up the blades with a tape measure first and then simply put a strip of tape where they cross to keep them from drifting apart. I also switched to a Thomas Duplex safelight and leave it on the whole time I'm printing. It's bright enough to read by and I've never had any problem with paper fogging. I did an experiment once to test for paper fogging with the coins after being shocked to see all the light leaks in my darkroom. I used to only print at night to be safe, but after installing the Thomas I decided to test in the daytime, light leaks and all, and to my surprise there were no problems with fogging. Keep at it and have fun, it wont be long before you get where you want to be. You might also think about taking a workshop or find other darkroom users and hang out in their darkrooms to see how other folks work.
 

MattKing

Moderator
Moderator
Joined
Apr 24, 2005
Messages
53,533
Location
Delta, BC Canada
Format
Medium Format
When I used a two bladed easel I found it helpful to square up the blades with a tape measure first and then simply put a strip of tape where they cross to keep them from drifting apart.

This is a really good idea that in 40+ years of using easels never occurred to me - thank you!
 

pentaxuser

Member
Joined
May 9, 2005
Messages
20,090
Location
Daventry, No
Format
35mm
Paterson do three fixed size easels(5x7,8x10 and I think 12x16). Easy to use with absolutely straight and equal borders but of course no option to alter border sizes and of no use with paper outside of the 3 sizes mentioned.

As you are new to printing I'd be inclined to go with fixed easels. Good 2 bladed ones which can be altered for different border sizes and different sizes of paper are expensive. Good 4 bladed ones are even more expensive.

pentaxuser
 
Photrio.com contains affiliate links to products. We may receive a commission for purchases made through these links.
To read our full affiliate disclosure statement please click Here.

PHOTRIO PARTNERS EQUALLY FUNDING OUR COMMUNITY:


Ilford ADOX Freestyle Photographic Stearman Press Weldon Color Lab Blue Moon Camera & Machine
Top Bottom