Update:
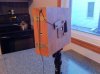
I spent most of today working on a new but still "prototype" version of the same camera made out of cut double-black mat board. The paper holder is a sandwich of two mat boards with a window cut out of one.. like you would make for a frame -- I made the window 4 x 6.5 inches centered on the 5x7 paper, which is a format I like. That part is working great, and it seems to be a good idea. The back area sticks up 1 inch and the lid fits over that and there is a baffle for light. There is a storage area behind the window for exposed and unexposed paper, and there is a fitted lid to access and change paper. The back is lower than the piece with the window, which makes putting the paper in easy and smooth and I think it could be done in my changing bag easily enough. BUT... I've gotten very frustrated with the rest of it... I think my design is too complicated. I have a bunch of 4x4" pieces of mat board cut and was going to fashion a lens board, with aperture stops behind that and a simple shutter ( like I use on some other pinhole cameras ) behind that. All of them were to be held in place by four bolts and wing nuts... I got as far as drilling the holes for the bolts on my drill press when I realized I can't reach inside the box to hold the bolts fast. Yes I can work around this, maybe by epoxying the bolts in place... but it would be better to make then entire front of the camera removable.... so now it's almost turning into a sliding box camera! And I don't like the idea of epoxying the bolts to mat paper. And I'm spending so much time that I'm wishing it was made with something more permanent like wood. It looks really nice, but if I'm going to put this much effort and time into something, maybe it should be the larger format camera that I can use my rapid rectilinear lens/shutter on. I wanted this one to be simpler, more like just a box with a removable lens board, and it is turning into a bigger project than I imagined. But it has served the purpose of learning. I'll probably use the paper holder idea in my future cameras, but now I wish I'd just used a flat back with tape since this is supposed to be a test camera.
Anyway... a lot of hours into this and I'm not sure if I will finish it. I now wish I'd made a simple wooden box first and then added the mat board parts to the front and back of that. I might still do that. I wish I'd just hammered together some pine into roughly a 5x7 box without a front and back... that would have made a sturdy frame to attach to, and I could have made custom pieces for the the back and the front from the black mat board. Some lessons I've learned so far:
1. A simple shutter is a good idea, even if you plan to use a "hat shutter" or a "Jim Galli" shutter. A lens cap really isn't enough. This way you can get the hat or black card in front, slide the shutter open, and then make the exposure without jiggling the camera. I was able to make reasonable exposures in my cardboard box version by using this approach ( I inserted a "paddle of black card, with a little light trap...it worked fine for blocking the lens long enough to get ready for the hat trick. )
2. I got 1/4 -20 T-fittings to make the tripod mount. Mine is just a pine wood platform with the fitting and some rubber bands to hold the camera on it. I was so happy to find them right away at the hardware store! But when I installed the first one, I thought it went in a bit too easy and it didn't bother me when I used a 1/4" drill bit.... oops. It turned out that some T-fittings the wrong size were mixed in with the right ones at the hardware store... and I installed one that was too small. They *are not* easy to remove! So double check that they are the right size before installing. I had only one that was the wrong size and Murphy's Law made that the one I installed first!
3. Finding the infinity focus point on the lens was pretty easy by taking it outside at night and focusing on a distant light... and my initial guess was very wrong. On this lens the 144mm is measured almost from the front of the lens... and my original carboard box was too long by almost 3/4 of an inch. A small movement of the lens changes the focus *a lot*. So making some kind of contraption to get close to the focal length first will be a good idea if the camera will be fixed focus... if the camera can be focused, it's still probably a good idea to do this to make sure the focal length is well covered.
We'll see where this all goes. I will sleep on it before I junk this design, but it's gotten a lot more complicated than I intended for this quick fixed focus experiment with the 114mm lens. What I'm aiming for eventually is a camera that can use my RR at 170mm or about 300mm with the front lens removed. I want the back to be replaceable to use 5x7 or 8x10 paper with these cut mat windows to use variable aspect ratios... and some kind of focusing screen. With the amount of work and time I put in today, I think it would be better spent working on parts of what I really want rather than fooling around with making a super nice mat board box. I could have spent the same time working with wood and had something more permanent and sturdy at the end of the day instead of a cool-looking but not very practical fitted black box!