-
Welcome to Photrio!Registration is fast and free. Join today to unlock search, see fewer ads, and access all forum features.Click here to sign up
You are using an out of date browser. It may not display this or other websites correctly.
You should upgrade or use an alternative browser.
You should upgrade or use an alternative browser.
Zone VI Enlarger
-
A
- Thread starter FotoRR
- Start date


Recent Classifieds
-
Want to Buy Hasselblad A12 type III or IV back (Black or Silver)
- Started by jshcrlsn
-
For Sale Nikon F2S (body only, meter not working)
- Started by MCB18
-
For Sale 210mm f/5.6 Apo Sironar (W) MC in Copal 3
- Started by Steve Goldstein
Forum statistics
This head is infinitely variable. You pretty much have to determine this for yourself, for each make of paper and developer. Grossly:
Hard (Blue) G (max), Soft (Green) A (min) ~ Grades 4,5.
Hard (Blue) A (min), Soft (Green) G (max) ~ Grades 0,1.
and everything in between.
also depends on your light intensity setting (0-10).
Might try split printing, for which this head excels.
Hard (Blue) G (max), Soft (Green) A (min) ~ Grades 4,5.
Hard (Blue) A (min), Soft (Green) G (max) ~ Grades 0,1.
and everything in between.
also depends on your light intensity setting (0-10).
Might try split printing, for which this head excels.
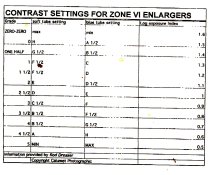
You can make a calibration table for it so you can use it like a color dichroic head to get a series of 'constant exposure' contrast settings of the knobs.
Also, have you seen the manual? They give some hints on how to use it on page 8 : http://www.seattlecreative.com/Cold Light Head.pdf
Also, have you seen the manual? They give some hints on how to use it on page 8 : http://www.seattlecreative.com/Cold Light Head.pdf
See this thread as well: (there was a url link here which no longer exists)
- Joined
- Sep 15, 2002
- Messages
- 8
Folks- Thanks for the suggestions. Yes, I have used the split printing method. For production work this method is time consuming-much on/off of switches. Sadly there doesn't seem to be a single method of producing various grades. Trial an error just to get in the "ballpark"! Too many choices with not a lot of direction.
Folks- Thanks for the suggestions. Yes, I have used the split printing method. For production work this method is time consuming-much on/off of switches. Sadly there doesn't seem to be a single method of producing various grades. Trial an error just to get in the "ballpark"! Too many choices with not a lot of direction.
Brightening the green light will darken highlights and brightening the blue light will darken shadows. You don't need to know the "Grades" to use it.
But, if you want to use it like a dichroic head to simulate the individual Ilford MG filters (which all print with the same exposure) you can calibrate it as demonstrated here: http://www.jbhphoto.com/articles/vcc...ljbharlin1.pdf
Please let us know how this works out and if you fine tune it. If I understand this correctly the different settings will be different times.
The brass ring would be blue and green settings for each grade that keep the time the same.
The brass ring would be blue and green settings for each grade that keep the time the same.
- Joined
- Sep 15, 2002
- Messages
- 8
cowanw-
Will get to this Zone VI enlarger testing in a few days. Managed to obtain a Durst M670 VC enlarger. Will be used with my 6x7 negatives. When the Durst is fine tuned, will attempt to transfer the data/information to the Zone VI machine.
Richard Rodgers
Will get to this Zone VI enlarger testing in a few days. Managed to obtain a Durst M670 VC enlarger. Will be used with my 6x7 negatives. When the Durst is fine tuned, will attempt to transfer the data/information to the Zone VI machine.
Richard Rodgers
- Joined
- May 28, 2005
- Messages
- 528
- Format
- 4x5 Format
Folks- Thanks for the suggestions. Yes, I have used the split printing method. For production work this method is time consuming-much on/off of switches. Sadly there doesn't seem to be a single method of producing various grades. Trial an error just to get in the "ballpark"! Too many choices with not a lot of direction.
Split printing is the best way to use this enlarger, as long as you have the Zone VI Compensating Enlarger Timer. I suppose it can be used without, but then you are at the mercy of the inconsistencies of a cold light tube.
Even with the compensating timer, I would not use this head except for split printing. The problem is that the green and blue aren't separately controlled on the Type I as they are on the Type II. The compensating timer will only "control" both light outputs at the same time. So, one might obtain a "consistent" overall exposure with the compensating timer, each head can still vary on it's own and together produce different contrasts over time at the same settings.
However, using the green and blue tubes separately, as in split printing, each tube becomes separately controlled by the single compensating timer. So, both consistent exposure and consistent contrast can be obtained.
I know this, because I have the Type I. I would get what I wanted in a print, come back later to reporduce the print, and the contrast was wrong. Printing notes obviously didn't help. I don't like split printing, so I adapted a different head to this enlarger.
- Joined
- May 28, 2005
- Messages
- 528
- Format
- 4x5 Format
Neil Poulsen stated--" I don't like split printing, so I adapted a different head to this enlarger" Indeed, what head did you use??
Richard Rodgers
I have the Beseler adaptor that was made for this enlarger. So, I use a 45S color head.
I found an extra sensor for the Zone VI compensating timer on EBay. I've installed it in the head to work with this timer. This was necessary, because the head had an unpredictable delay after it was turned on. I bypassed the circuitry that caused the delay and use the compensating timer to obtain consistent exposures.
- Joined
- May 28, 2005
- Messages
- 528
- Format
- 4x5 Format
Neil Poulsen-
Thank you for your response w.r.t. the head used. This sounds a bit beyond my ability to deal with. While adapt in a darkroom, my electronic skills are nil!
There were some electronics, but very little. It was a matter of tracing the two wires from the light bulb, cutting them, and connecting them to the AC power wall plug, almost.
I say almost, because it was necessary to splice in the proper rectifier that turns the 120 volt AC power to the 83 volts that's needed by the bulb. It gets spliced into one of the two AC wires, much like splicing in a switch for a lamp.
See the following thread for more detail:
(there was a url link here which no longer exists)
In making this alteration, one splices out the controller that's supposed to provide a consistent light source. But, this controller had clearly failed on my 45S head. (They often do.)
I added the Zone VI compensating timer sensor to this head to replace the controller. But I wonder if the light wouldn't be fairly consistent, even without compensating timer? I'm thinking that incandescent would be at least as consistent as a cold light, at least for black and white enlarging? Perhaps there's a problem with the aging, quartz-halogen light bulb, whose characteristics may change over time.
Last edited by a moderator:
Usually equal amounts of green/blue will give a #2 grade. Max blue and zero green will be 4 or 5. Test. Then split the green reduction in equal steps to get from 2 to max.
That or buy a pack of #2 and match it.
That or buy a pack of #2 and match it.
Usually equal amounts of green/blue will give a #2 grade.
Not necessarily, time for each may vary; or do you know for sure?
Well I have been motivated to try to calibrate for grades and I think my variable dials are not working. All I get is full green and full blue. Max blue and min green give the same print as min blue and max green making contact prints with a 4x5 stouffer scale.
Back to split printing for me.
Back to split printing for me.
Exactly
A couple things to check:
1) the switch on the control box, both what position it is in, and that it is working
2) the "telephone jack" style connections from box to head.
I had similar problems once, but all it turned out to be was a need to wiggle the connector at the lamphead.
1) the switch on the control box, both what position it is in, and that it is working
2) the "telephone jack" style connections from box to head.
I had similar problems once, but all it turned out to be was a need to wiggle the connector at the lamphead.
A couple things to check:
1) the switch on the control box, both what position it is in, and that it is working
2) the "telephone jack" style connections from box to head.
I had similar problems once, but all it turned out to be was a need to wiggle the connector at the lamphead.
No luck, but thanks for your suggestions.I would look inside but the parts are riveted together not screwed
No luck, but thanks for your suggestions.I would look inside but the parts are riveted together not screwed
Richard Ritter worked for Zone VI for many years and may be able to offer additional help and/or troubleshooting guidance. (802)365-7807.
thanks
| Photrio.com contains affiliate links to products. We may receive a commission for purchases made through these links. To read our full affiliate disclosure statement please click Here. |
PHOTRIO PARTNERS EQUALLY FUNDING OUR COMMUNITY:  |