Yashica T3 - Pressure plate instead of actual images??

first-church.jpg

D
first-church.jpg

  • 4
  • 2
  • 41
Grape Vines

A
Grape Vines

  • sly
  • May 31, 2025
  • 5
  • 1
  • 38
Plot Foiled

H
Plot Foiled

  • 2
  • 0
  • 43
FedEx Bread

H
FedEx Bread

  • 1
  • 0
  • 33
Unusual House Design

D
Unusual House Design

  • 5
  • 2
  • 76

Forum statistics

Threads
197,971
Messages
2,767,496
Members
99,519
Latest member
JR1051
Recent bookmarks
0

nxr1

Member
Joined
Sep 30, 2022
Messages
3
Location
Romania
Format
35mm
Hello all,

Good to be a part of this forum.

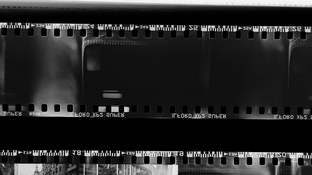
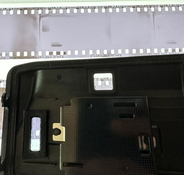
I have a little problem with a Yashica T3 - starting with frame #19 I have mainly pictures of the pressure plate more or less sharp :D
I'm pretty stumped, never had this happen to me before and I was curious if anyone has an explanation for this. I will add some images to illustrate the situation.

Thanks for taking the time to read ✌️

Adrian
 

Attachments

  • 941DFA8A-722E-4302-A380-7D06B5D1AA2F.jpg
    941DFA8A-722E-4302-A380-7D06B5D1AA2F.jpg
    323.8 KB · Views: 134
  • IMG_0088 copy.jpg
    IMG_0088 copy.jpg
    573.8 KB · Views: 147

__Brian

Member
Joined
Jun 29, 2019
Messages
343
Location
US
Format
35mm RF
It looks like a light leak. I would suspect the seals around the film cannister windows. Probably time to tape over it.
 

Donald Qualls

Subscriber
Joined
Jan 19, 2005
Messages
12,169
Location
North Carolina
Format
Multi Format
I would suspect the seals around the film cannister windows. Probably time to tape over it.

At the least, replace the foam. I completely agree, BTW, that's edge light from the upper left as the image is oriented.
 

xkaes

Subscriber
Joined
Mar 25, 2006
Messages
4,598
Location
Colorado
Format
Multi Format
The T3 is not exactly a new camera, and cameras that age have this problem -- depending in part on its environment. I suspect this type of foam is easy to get, and even easier to repair -- but if you only use one type of film, just tape over it, as suggested.
 

__Brian

Member
Joined
Jun 29, 2019
Messages
343
Location
US
Format
35mm RF

Found an auction with pictures of the back of the camera.
The seals around the viewfinder are probably leaking. I had a Ricoh 400 that opened up like this one, back closed over the viewfinder. It was a nightmare for light leaks, and took a lot of work to make the light seals.

So- you need a seal kit for the camera. Self-sticking black foam rubber sheets from an art department usually work well. Did on the Ricoh.
 

xkaes

Subscriber
Joined
Mar 25, 2006
Messages
4,598
Location
Colorado
Format
Multi Format
I do not see how a leak located at the finder can produce this artefact.

Exactly. The film is exposed at the both sides of the film. A viewfinder leak would only be on one side -- the top.
 

Huss

Member
Joined
Feb 11, 2016
Messages
9,058
Location
Hermosa Beach, CA
Format
Multi Format
Go for the easiest, most obvious answer first. Put a piece of tape over the film window. See if that fixes it. If not, move on to other solutions.
The film window leak is very common w older cameras.
 

xkaes

Subscriber
Joined
Mar 25, 2006
Messages
4,598
Location
Colorado
Format
Multi Format
Along the same lines, have you done a close-up inspection of the film window foam? Hopefully with a magnifying glass of some sort. Sometimes the deterioration is obvious. I'm sure there are plenty of pictures on the WEB.
 

__Brian

Member
Joined
Jun 29, 2019
Messages
343
Location
US
Format
35mm RF
The OP has not checked back since posting the question.

As for all the speculation on right and wrong- whatever. I've fixed a lot of light leaks.

Light from the opening around the eyepiece could be shining under the pressure plate, which will expose the film from the slots in the plate. The slots are near the eyepiece. Again- this is like the Ricoh that I had, huge back with lots of seals.
The OP has not checked back, or given anymore information. Not nearly as complex has hunting down a light leak on a Contax IIIa.
 
Last edited:

250swb

Member
Joined
Apr 22, 2012
Messages
1,483
Location
Peak District
Format
Multi Format
The light is clearly getting in from 'somewhere' behind the pressure plate because its exposing the film where the cut outs in the pressure plate are. But I think a bigger question is why are there no other indications of the camera making an exposure on those same frames, like a landscape or a portrait etc.?
 
OP
OP
nxr1

nxr1

Member
Joined
Sep 30, 2022
Messages
3
Location
Romania
Format
35mm
Hello all, and thank you for your replies! I tend to agree that this is very hard to file under light leaks for a number of reasons:
- the camera did not exhibit any sort of light leaks up or problems, until frame #19
- even if they were light leaks I fail to understand why is there no information from the actual photograph that was taken; we only see the pressure plate and nothing else, not even a hint of what the camera saw out the front lens.
 
OP
OP
nxr1

nxr1

Member
Joined
Sep 30, 2022
Messages
3
Location
Romania
Format
35mm
The light is clearly getting in from 'somewhere' behind the pressure plate because its exposing the film where the cut outs in the pressure plate are. But I think a bigger question is why are there no other indications of the camera making an exposure on those same frames, like a landscape or a portrait etc.?

Yep, this. Main reason I chose to post about it. Have and had many cameras with light leaks but this had me puzzled :smile:
 

gone

Member
Joined
Jun 14, 2009
Messages
5,505
Location
gone
Format
Medium Format
Like Huff said, you'll need to do a step by step procedure w/ another roll of film. Shoot some shots w/ the viewfinder taped up, some w/ the entire back taped at the seams, and some w/ everything taped. Should give you some empirical results. Don't forget to write down the steps to keep track of things.
 

xkaes

Subscriber
Joined
Mar 25, 2006
Messages
4,598
Location
Colorado
Format
Multi Format
Add to these great testing approaches -- not need to use up a whole roll of film, especially if you do your own processing.

For example, put a roll of film in the camera and simple expose the ENTIRE camera, from all sides to very bright light for quite a while. No need to take a picture. Then take a picture or two to separate the next test.

Cover up the film windows and repeat the same test.

Then uncover the film window and cover up the viewfinder.

Rinse and repeat.

Then develop the film.
 
Photrio.com contains affiliate links to products. We may receive a commission for purchases made through these links.
To read our full affiliate disclosure statement please click Here.

PHOTRIO PARTNERS EQUALLY FUNDING OUR COMMUNITY:


Ilford ADOX Freestyle Photographic Stearman Press Weldon Color Lab Blue Moon Camera & Machine
Top Bottom