Yashica FX-7 Super shutter problem

$12.66

A
$12.66

  • 0
  • 0
  • 0
A street portrait

A
A street portrait

  • 0
  • 0
  • 83
A street portrait

A
A street portrait

  • 1
  • 1
  • 74
img746.jpg

img746.jpg

  • 4
  • 0
  • 74
No Hall

No Hall

  • 1
  • 2
  • 73

Recent Classifieds

Forum statistics

Threads
198,794
Messages
2,780,923
Members
99,705
Latest member
Hey_You
Recent bookmarks
0

sleepyjack

Member
Joined
Oct 5, 2019
Messages
12
Location
California
Format
35mm
Hi all, I just bought a used Yashica FX-7 super for cheap which seemed to be working fine when I got it, but shortly after, it began locking up the mirror mid-stroke and then opening the shutter as soon as I released the advance lever. It’s exactly what’s happening in this video:


The weird part is that it’s totally unpredictable. Sometimes it will do this 10 times in a row and then will cock the shutter and fire normally for a shot or 2, possibly after tilting the camera at a different angle?

Anybody else come across this problem before or know know what’s going on here? It was cheap enough that I’m prepared to dismantle the thing and tinker around...
 
OP
OP

sleepyjack

Member
Joined
Oct 5, 2019
Messages
12
Location
California
Format
35mm
Well thanks for the resources. I got as far as getting the top, front, and bottom plates off (the shutter dial screw was on incredibly tight). Racer- I couldn't figure out how to access the QR base plate area that you talk about in your other post, which seems to be the nexus of my problem as the service manual references this issue 3 different times. Then I absentmindedly tried to advance the lever after unscrewing the "winding stopper lever spring" and everything ground to a halt, won't function even after replacing the spring. Looks like I've killed it at this point :sad:
 

ic-racer

Member
Joined
Feb 25, 2007
Messages
16,544
Location
USA
Format
Multi Format
You might need to take the mirror box out to get to that area. If you are in film for the 'long haul' it might not be a bad idea to get to know the innards of this one well and get another. My long term tactics with equipment are to get to know one or two brands very well, collect all the service manuals, etc. Yashica is a good base camera because it will take ML lenses and Zeiss.
 
OP
OP

sleepyjack

Member
Joined
Oct 5, 2019
Messages
12
Location
California
Format
35mm
I was able to get the entire mirror box out with the attached QR assembly fairly easily after removing 2 screws underneath the screws holding the viewfinder prism to the chassis on the back of the camera. The problem was exactly as the manual had described - basically the "QRL-2" lever was slipping from the groove where it connected with the "QRL-4" lever. The QRL-4 turned out to be the only piece of plastic in the whole assembly, which seems like it was a bad choice, as the lower part of the groove had been eaten away by the metal tip of QRL-2. There was no way I was going to be able to bend the QRL-2 tip as the manual suggests. I thought about trying to shim the plastic groove somehow, but after actuating it a few more times, the plastic QRL-4 just broke completely. I suppose it was already on its last legs. I don't think there's even any sense in trying to replace the QRL-4 at this point, but it was a fun little foray into camera repair.

02ACAE7D-47CE-4708-9FF3-961E8C843D7D.png
F0F53BA2-9791-499F-8E50-4C8C20AD0FC0.jpeg
955AC66D-170D-418C-BCCD-BFD660115D90.jpeg
 

ic-racer

Member
Joined
Feb 25, 2007
Messages
16,544
Location
USA
Format
Multi Format
NIce work, to get that far and show the results; makes a nice future reference. I have wanted a 'repair' subforum since joining many years ago. Until then I just post threads as I go; maybe someone will find them.
 

ralea1313

Member
Joined
Aug 28, 2020
Messages
1
Location
Romania
Format
35mm
Hi @sleepyjack and thanks for the info you provided.
I managed to fix the camera, and is now working as it should.

I also went and removed the whole mirror box and managed to shim the QRL-4 piece.
I used superglue plus baking powder (as advised by a friend) and then I filed it down to look almost as new.
Here's a before and after:
P1010023.JPG
P1010034.JPG
 
OP
OP

sleepyjack

Member
Joined
Oct 5, 2019
Messages
12
Location
California
Format
35mm
@ralea1313 - that's terrific! I'm glad that something actually came of my tinkering. Seems like that QRL-4 was really the Achilles heel of this camera.
I like the baking soda trick. I will have to keep that in mind for the future. Maybe I will even put it to the ultimate test and try to repair my snapped QRL-4 lever with it
 

Guglielmo

Member
Joined
Feb 5, 2025
Messages
2
Location
Italy
Format
35mm
I was able to get the entire mirror box out with the attached QR assembly fairly easily after removing 2 screws underneath the screws holding the viewfinder prism to the chassis on the back of the camera. The problem was exactly as the manual had described - basically the "QRL-2" lever was slipping from the groove where it connected with the "QRL-4" lever. The QRL-4 turned out to be the only piece of plastic in the whole assembly, which seems like it was a bad choice, as the lower part of the groove had been eaten away by the metal tip of QRL-2. There was no way I was going to be able to bend the QRL-2 tip as the manual suggests. I thought about trying to shim the plastic groove somehow, but after actuating it a few more times, the plastic QRL-4 just broke completely. I suppose it was already on its last legs. I don't think there's even any sense in trying to replace the QRL-4 at this point, but it was a fun little foray into camera repair.

View attachment 234077 View attachment 234078 View attachment 234079

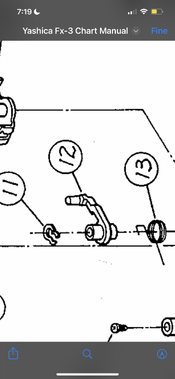
Hi there, I have the same problem on a fx-3 super, after unscrewing everything now I can’t understand how i can remove the e. Ring (number 11 on the repair chart) that keeps attached the qlr-4, so how can I remove it without break it ? Thanks in advance !
 

Attachments

  • 2ABC4EC1-6097-49DA-9519-6460B9320736.png
    2ABC4EC1-6097-49DA-9519-6460B9320736.png
    1.1 MB · Views: 19
Last edited:
Photrio.com contains affiliate links to products. We may receive a commission for purchases made through these links.
To read our full affiliate disclosure statement please click Here.

PHOTRIO PARTNERS EQUALLY FUNDING OUR COMMUNITY:


Ilford ADOX Freestyle Photographic Stearman Press Weldon Color Lab Blue Moon Camera & Machine
Top Bottom