Workshop results

Pre-WPPD and WPPD shots

A
Pre-WPPD and WPPD shots

  • 0
  • 0
  • 0
Shhhhh

A
Shhhhh

  • 0
  • 0
  • 0
rooflines

A
rooflines

  • 0
  • 0
  • 5

Recent Classifieds

Forum statistics

Threads
197,457
Messages
2,759,472
Members
99,377
Latest member
Rh_WCL
Recent bookmarks
0

Photo Engineer

Subscriber
Joined
Apr 19, 2005
Messages
29,018
Location
Rochester, NY
Format
Multi Format
Well, the workshop at the Formulary is over and the results were, as usual, mixed but overall good.

Coating quality of the papers was very good. The Azo type paper was a bit foggier than I wanted and lower in contrast and speed than my home made samples that I brought with me.

The Brovira/Kodabromide type paper was right on speed, equal to the Ilford MGIV paper comparisons, but again a bit low in contrast and a bit foggier than I wanted. I think we overfinished with sulfur in our exuberance! Thats what it looked like to me. The paper was about a grade 1.5, just by eyeballing the results. The fog didn't help evaluation of the contrast though.

The Ortho film was coated on both Estar and paper support. The coatings on film were low in quality due mainly to severe reticulation. This was most likely because we processed after only about 20 hours keeping and the hardener was not fully reacted. In any event, the film coatings were a good ISO 80 speed and the paper negatives were at least 200 speed. We experienced difficulties coating on the film support but not on the paper support. The emulsion appeared to be too low in viscosity. Addition of some gelatin boosted coating quality.

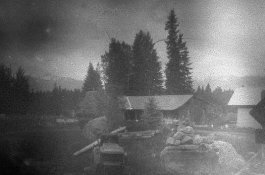
Appended is a sample scan of one of the negatives coated exposed and processed by one of the students. This is about a 2x3 area of a 4x5 negative. If you examine it, you can see two coating streaks and the reticulation. This was taken on a rather rainy, foggy morning over the central area of the Formulary by one of the students. The process was done using a Dektol equivalent at ~68 deg F for 3 minutes under red safelight.

Due to the high speed of the paper coatings, many of them ended up being foggy, but quite a few were good. The students seemed to go away happy and for that I am happy. We all learned a lot again.

This shows you that making good quality emulsions by hand and coating them with production quality is an art form that must be learned, just like any other alternative photographic system. It also shows that moving the making of the emulsions from site to site or from person to person involves a bit of 'fiddling' to get things right just as noted by Denise Ross on her web site. Each student was impressed with that fact, and was given the tools to make the required experiments on his/her own.

My thanks to the students and the Formulary.

I was also able to show them a comparison with Azo paper and my Azo like emulsion done by our own Alex Hawley. His 'gift' to me arrived in enough time for me to drag it along and show the students. My thanks to Alex.

PE
 

Attachments

  • class 3 formulary.jpg
    class 3 formulary.jpg
    57.5 KB · Views: 322

User Removed

Member
Joined
Sep 29, 2004
Messages
1,296
Format
Plastic Cameras
That example looks really quite awful. I hope that is not what your saying looks anything like AZO! I think it's great that your creating these emutions, but it's really a shame they are such terribly quality. Hope that can get better with time and more experimenting.
 

David A. Goldfarb

Moderator
Moderator
Joined
Sep 7, 2002
Messages
19,974
Location
Honolulu, HI
Format
Large Format
The example isn't the Azo-type emulsion. It's a negative from film made in the workshop--which is somewhat more difficult--developed in Dektol.
 
OP
OP
Photo Engineer

Photo Engineer

Subscriber
Joined
Apr 19, 2005
Messages
29,018
Location
Rochester, NY
Format
Multi Format
Ryan;

Please look at Alex Hawley's independant review of the Azo emulsion with examples. They were coated by myself with 30+ years of lab experience doing this. Then compare that with one of my students (Denise Ross) at www.dwrphotos.com for the results from a good photographer with my course and some practice.

That example is the ISO 80 ortho emulsion. I have not edited anything in the scan of a coating made by a first time student. It has coating defects and reticulation in it.

This is a first attempt by a student to do something that requires acquisition of a skill somewhat similar to becoming a user of Pt, Pd, Carbon or Bromoil.

I hope I made it clear in my OP that this was an unedited example of a first attempt by a student.

PE
 

Alex Hawley

Member
Joined
Jul 17, 2003
Messages
2,892
Location
Kansas, USA
Format
Large Format
Ron, many warm thanks for the compliment. I hope the first-hand comparison served your purposes well.

Ryan, no one is ever going to be able to duplicate Azo unless they are able to start operating the original coating line in Rochester, and employee many of the key people that were familiar with the process. What Ron has done is to give everyone the option of making a usable silver chloride printing paper, of similar characteristics to Azo, in their own facility, tweeking it to their particular desires. The specific print that I did for Ron was actually easier to print on his paper because it was an honest grade 2. I had always had to print it on grade 3 Azo and waterbath the heck out of it to get the highlights down a bit.
 

Kirk Keyes

Member
Joined
Jun 17, 2004
Messages
3,234
Location
Portland, OR
Format
4x5 Format
While no one may duplicate Azo, I saw Alex's comparison prints on Azo and Ron's paper, and I much preferred the print on Ron's paper.

Ron was that one of the paper negs or film negs? Our coatings on both (I was lab assistant for this class) we're quite obviously not very even when we were coating them. Part technique, but also I had let the temp on the emulsion pot go from the target temp of 100F up to 115F for most of the coatings, which made them much too runny...

It was a great class and I highly recommend it!
 
OP
OP
Photo Engineer

Photo Engineer

Subscriber
Joined
Apr 19, 2005
Messages
29,018
Location
Rochester, NY
Format
Multi Format
Kirk, I have no paper negatives from the class but one sheet that was totally fogged. The students all took their own samples AFAIK, but some material is still in shipment back to me.

That particular example was a film negative. The actual image would be somewhat lighter, but I decided 'no manipulation' so it is darker than it should be.

I might add here that film support (subbed estar or acetate) is at a premium and therefore I had very little for the students to use for practice. I have very little for me to practice on as well.

I think that everyone who has tried a variety of supports will attest to the fact that plain paper is easier to coat, then Baryta, then RC paper and finally film is the hardest.

Kirk, thanks for a superb job. I hope you had a good time in Glacier Park.

PE
 

mikebarger

Member
Joined
Jan 16, 2005
Messages
1,937
Location
ottawa kansas
Format
Multi Format
Alex's work is outstanding, I'm fortunate to have seen it first hand.

While I don't use Azo, Alex's remarks concerning the self coated paper would be the only recommendation I'd need for Ron's process.

For those who do use Azo, it's great you have a quality replacement product available.

Now Ron, if you could if you could start on Kodak's other B&W papers :wink:

Mike
 
OP
OP
Photo Engineer

Photo Engineer

Subscriber
Joined
Apr 19, 2005
Messages
29,018
Location
Rochester, NY
Format
Multi Format
For those who are interested and want to see a comparison between the results obtained at 2 workshops, go here for the September workshop in NYC for a sample of a 40 ISO ortho film: (there was a url link here which no longer exists)

There is no reticulation, good sharpness and lots of grain. The image was reasonably low in fog and had low contrast. By comparison, the recent workshop gave an ISO of about 80 with more fog and lots of reticulation.

I want to point out that the earlier picture was adjusted in photoshop for contrast and brightness just as you would do when making a print. It looked like it could use a grade 4 or 5 paper, so I adjusted the scan accordingly. The current picture could have been adjusted as well but I chose not to due to the extreme reticulation.

Hey, this is art as well as science, and film is much harder to coat and to duplicate from run to run than paper coatings are. Results on film support vary more than on paper support. I'm showing you the situation without covering the warts or withholding information.

As Alex has attested and the students saw, paper coatings can be quite good, approaching production quality.

PE
 

dyetransfer

Member
Joined
Jun 18, 2007
Messages
67
Format
ULarge Format
The Ortho film was coated on both Estar and paper support. The coatings on film were low in quality due mainly to severe reticulation. This was most likely because we processed after only about 20 hours keeping and the hardener was not fully reacted. In any event, the film coatings were a good ISO 80 speed and the paper negatives were at least 200 speed. We experienced difficulties coating on the film support but not on the paper support. The emulsion appeared to be too low in viscosity. Addition of some gelatin boosted coating quality.


Hi Ron - this is my first posting to the APUG group. I've been lurking in this thread for some time now. Congratulations on your success with the emulsion making classes at PF.

As you know, I made test coatings on 30x40" sheet of my Dye Transfer matrix film in my lab. I used my large travelling slot coater to coat 36 x 50" pieces of Melenex film with a subbing layer on it. Generally, I got very good coatings, but occasionally I would get reticulation during emulsion drying. This was a totally unhardened emulsion, so it was probably more prone to this than your emulsions with have a hardener added. Also, the coatings were very thick (> 25 um dry).

I found that the reticulation was worse in the Winter (New Hampshire = very dry in winter). During the summer, the humidity can be very high, and it slows down the drying action. During the Winter, with my HEPA filter running continuously, I could get reticulation starting on the leading edge of the air flow. Generally is appears in a limited area on the leading edge. I found that I could minimize the problem by putting the HEPA filter motor on an interval timer, where I would run it for 30 seconds every 5 minutes initially, ramping up to full on continuous during the final stages of drying. I made no attempt to regulate temperature or humidity (other than the fact the humidity went up in the cabinent when the fan was off).

Regards - Jim Browning (www.dyetransfer.org)
 
OP
OP
Photo Engineer

Photo Engineer

Subscriber
Joined
Apr 19, 2005
Messages
29,018
Location
Rochester, NY
Format
Multi Format
Jim;

Welcome to APUG.

Thanks for the comments. It was very cold and dry at the PF. In fact, it snowed in the moutains several times while we were there, but it was too cloudy at those 9000 ft heights to see.

We could see the reticulation in the wet emulsion after processing, and watch it as it dried slowly. The glass plates took overnight to dry as they were the last ones to be run through. None of them were any good due to reticulation problems.

We got no reticulation in NYC or at home here, but have gotten it both years at the Formulary workshop. I used the same materials, only the water used for processing, and the climate were different. It only shows up on film coatings or plates. I had attributed it to the short drying time after coating the film or plate, but if that were so, the NYC materials should have had some problems, but they did not. So, I'm reconsidering that guess.

PE
 
Photrio.com contains affiliate links to products. We may receive a commission for purchases made through these links.
To read our full affiliate disclosure statement please click Here.

PHOTRIO PARTNERS EQUALLY FUNDING OUR COMMUNITY:


Ilford ADOX Freestyle Photographic Stearman Press Weldon Color Lab Blue Moon Camera & Machine
Top Bottom