Workflow for alt process negs

evancanoe.JPG

A
evancanoe.JPG

  • 4
  • 0
  • 52
Ilya

A
Ilya

  • 3
  • 1
  • 53
Caboose

A
Caboose

  • 4
  • 1
  • 66
Flowers

A
Flowers

  • 7
  • 1
  • 64

Recent Classifieds

Forum statistics

Threads
197,675
Messages
2,762,794
Members
99,437
Latest member
fabripav
Recent bookmarks
0

RowanBloemhof

Member
Joined
Mar 12, 2014
Messages
102
Location
Amersfoort,
Format
Multi Format
Hi there.

Been a while since i posted here. Anyway. Received a box of xray film a few weeks ago. And ive been trying to putting this to use in creating a workflow for my alt processes.

Namely what i try to do is enlarging 35mm or 6x6 onto a sheet of xray film. That way creating a positive. And then contact printing that onto another sheet of film to get my final negative. Upto the inter pos stage this goes well. However when doing the final contact printed neg contrast seems to grow out of control.

Im using Tetenal Eukobrom paper developer. And i understand that paper dev should render relative high contrast images. However then why is the inter pos relatively soft.

Below il show some picture. Sorry if they are somewhat vague.

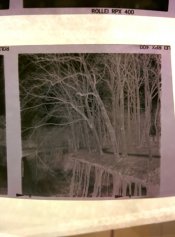
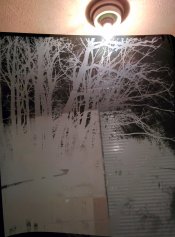
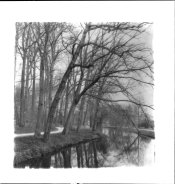
6x6 neg, contrasty but not that bad-> 18x24 sheet film positive, seems softer/ less contrasty then the negative->18x24 sheet film negative, contrast is out of control. No highlight details whatsoever(Yes bottom is less exposed, its a test strip incremental increase).

6x6 neg: https://www.flickr.com/photos/rowanbloemhof/16168665700/
Inter positive: https://www.flickr.com/photos/rowanbloemhof/16169821539/in/photostream/
Final negative: https://www.flickr.com/photos/rowanbloemhof/16354280151/in/photostream/

The same thing happens with other photo's. Contrast is all fine, until the last step and it all blows up^^
Has anyone got a clue what might be happening here?
 

Attachments

  • 6x6 neg.jpg
    6x6 neg.jpg
    489.3 KB · Views: 200
  • inter pos.jpg
    inter pos.jpg
    720.8 KB · Views: 187
  • final neg.jpg
    final neg.jpg
    587.4 KB · Views: 198

richard ide

Member
Joined
Nov 8, 2005
Messages
1,217
Location
Wellington C
Format
Multi Format
I think that it would help if you showed us one image in the three stages rather than three different images. There is no way to make a valid comparison in each stage of your process.
 

NedL

Subscriber
Joined
Aug 23, 2012
Messages
3,372
Location
Sonoma County, California
Format
Multi Format
my impression is that the interpositive is pretty contrasty, not very flat, and the final negative is underexposed with loss of detail in the shadows ( on the tree trunks. ) I've never worked with x-ray film, but I'd try pulling the positive from the developer sooner and exposing the negative longer until details appear in the shadows.....
 
Last edited by a moderator:

jeffreyg

Subscriber
Joined
Jun 12, 2008
Messages
2,599
Location
florida
Format
Medium Format
I have used x-ray duplicating film for enlarging negatives for many years. Since it is a reversal film it is only one step. I use it with an x-ray developer and fixer. The resultant enlarged negatives are generally have slightly more contrast which for my purpose is okay (pt/pd printing). Also since the duplicating film is a reversal you do the opposite meaning if you want the final print tho have a darker area you burn that area on the negative. I would think that a film developer might work better. Have you tried a stepped positive instead of the stepped negative? Perhaps printing that on to paper which might be easier to read and then adjust when going to the negative.

http://www.jeffreyglasser.com/
 
OP
OP

RowanBloemhof

Member
Joined
Mar 12, 2014
Messages
102
Location
Amersfoort,
Format
Multi Format
Ned, Jeffrey. Thanks for your sugestions. I really needed some perspective on this. As ive tried multiple possible solutions like more/less agitation etc. I think il first start with a stepped positive. And work out from there.

Thanks alot.

@Richard. Sadly its pretty much impossible to photograph all together at once. I dont have a lightbox or something like that. So its undoable to hold all 3 in front of a lamp and make a photo^^
 
OP
OP

RowanBloemhof

Member
Joined
Mar 12, 2014
Messages
102
Location
Amersfoort,
Format
Multi Format
Alright. I made quite some improvments today. I made a test sheet by stepping both the neg and pos exposure time. Also i switched to another DR timer which clearly is more accurate. Now i can time exposures to 0.1 sec. <br><br>Made a quick test print using the new negative. And it looks quite good so far. Actually a bit on the soft side i think. Either way its gotta be my most succeeded carbon print so far. Technicly speaking that is. Image below:

pic 1: Carbon print. Quick try


pic 2: Sadly dont got a picture of the final neg. But i choose an exposure somewhere in the middle. 0.5sec/0.6sec for pos/neg. L/R steps are inter positive. Up and down steps are the final negative.
 

Attachments

  • carbon2.jpg
    carbon2.jpg
    574 KB · Views: 181
  • test strip.jpg
    test strip.jpg
    1.1 MB · Views: 188

NedL

Subscriber
Joined
Aug 23, 2012
Messages
3,372
Location
Sonoma County, California
Format
Multi Format
Great! Thanks for posting this. I want to try the similar process with paper ( enlarged paper print, then paper neg ) for salt prints.

Jeffrey, is reversal x-ray film like direct positive paper, in that it uses normal developer/stop/fix? That could be incredibly useful for enlarged negatives for alt process. I know some people reverse process lith film, but so far I've stayed away from using the reversal chemicals...
 
Photrio.com contains affiliate links to products. We may receive a commission for purchases made through these links.
To read our full affiliate disclosure statement please click Here.

PHOTRIO PARTNERS EQUALLY FUNDING OUR COMMUNITY:


Ilford ADOX Freestyle Photographic Stearman Press Weldon Color Lab Blue Moon Camera & Machine
Top Bottom