I am tinkering with a Blue/Green LED enlarger head, thought I would share my progress as this has been discussed here a couple of times. I first started thinking about doing this after reading Huw Finney's article on his project, and other posts about using LEDs. What pushed me to start on this was getting a De Vere chassis without a head.
I have an array up and running enough to do a couple of quick tests to see if I am on the right track. The first results look pretty good.
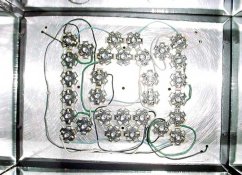
For blue - I am using 12 - 1 watt Luxeon Royal Blue LEDs.
For green - I am using 18 - 1 watt Luxeon Green LEDs.
I am using an LED driver that has a dimming feature built in (LuxDrive - BuckPuck). I am planning on full manual control with no computer chips, just switches with light level control by varying the resistance.
The test sheets are on Ilford MGRC 8x10 using a 2 1/4 negative step wedge and a 135mm lens. As the head still has a number of light leaks there was some fogging - on the left side of the test sheets. This was more noticeable with green than the blue tests.
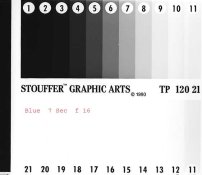
The Blue test was at f16 for 7 sec - I can see tones from zone 3 to 12.
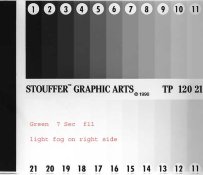
The Green test was at f11 for 7 sec - I can seen tones from zone 2 to 17
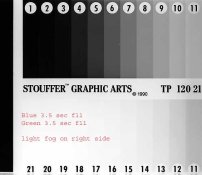
The split test was at f11 - 3.5 sec Blue and 3.5 sec Green - I can see tones from zone 2 to 17.
Some observations from what I have done so far -
The head is going to be bright - about 2 or 3 stops faster than my current cold head. The paper reacts faster to blue than green. Both blue and green together have a cool white look, I do not think I will add any red LEDs as the image is bright and easy to focus. A swing away red filter should be just fine for the few times I would need red light.
The head runs cool - the LEDs are mounted on an aluminum plate with no heat sinks for fans so far - after 10 minutes the temperature rise inside the head was from 72 to a constant 115 degrees.
The layout of the LEDs for an even light distribution took a number of tries - I finally settled on an arrangement very close to what Huw did in his head article. I am using an old piece of fused opal glass as a diffuser, it is about 3.5 inches below the LEDs. I used the lambertain LEDs which have a narrow focused beam, rather than the batwing design. My only reason was they were cheaper. Perhaps the batwing design would allow for a shorter distance between the LEDs and the opal glass. I lined the light box with mirror scraps - it is about 7" x 9" so there is good even coverage for a 4" x 5" negative.
I now need to finish up the switching controls - I will probably use a rotary switch and resistors for setting constant light levels at a number of different settings. Also, I need to close up the seams where there are light leaks.
I have an array up and running enough to do a couple of quick tests to see if I am on the right track. The first results look pretty good.
For blue - I am using 12 - 1 watt Luxeon Royal Blue LEDs.
For green - I am using 18 - 1 watt Luxeon Green LEDs.
I am using an LED driver that has a dimming feature built in (LuxDrive - BuckPuck). I am planning on full manual control with no computer chips, just switches with light level control by varying the resistance.
The test sheets are on Ilford MGRC 8x10 using a 2 1/4 negative step wedge and a 135mm lens. As the head still has a number of light leaks there was some fogging - on the left side of the test sheets. This was more noticeable with green than the blue tests.
The Blue test was at f16 for 7 sec - I can see tones from zone 3 to 12.
The Green test was at f11 for 7 sec - I can seen tones from zone 2 to 17
The split test was at f11 - 3.5 sec Blue and 3.5 sec Green - I can see tones from zone 2 to 17.
Some observations from what I have done so far -
The head is going to be bright - about 2 or 3 stops faster than my current cold head. The paper reacts faster to blue than green. Both blue and green together have a cool white look, I do not think I will add any red LEDs as the image is bright and easy to focus. A swing away red filter should be just fine for the few times I would need red light.
The head runs cool - the LEDs are mounted on an aluminum plate with no heat sinks for fans so far - after 10 minutes the temperature rise inside the head was from 72 to a constant 115 degrees.
The layout of the LEDs for an even light distribution took a number of tries - I finally settled on an arrangement very close to what Huw did in his head article. I am using an old piece of fused opal glass as a diffuser, it is about 3.5 inches below the LEDs. I used the lambertain LEDs which have a narrow focused beam, rather than the batwing design. My only reason was they were cheaper. Perhaps the batwing design would allow for a shorter distance between the LEDs and the opal glass. I lined the light box with mirror scraps - it is about 7" x 9" so there is good even coverage for a 4" x 5" negative.
I now need to finish up the switching controls - I will probably use a rotary switch and resistors for setting constant light levels at a number of different settings. Also, I need to close up the seams where there are light leaks.