Wollensak Betax 5 repair survivors?

Simply leaves

H
Simply leaves

  • 0
  • 0
  • 0
Self portrait.

A
Self portrait.

  • 3
  • 1
  • 68
There there

A
There there

  • 4
  • 0
  • 81

Recent Classifieds

Forum statistics

Threads
198,973
Messages
2,783,941
Members
99,760
Latest member
Sandcake
Recent bookmarks
0
Joined
Sep 24, 2003
Messages
1,041
Location
Holland, MI
Format
Pinhole
I just got a Gundlach Radar Anastigmat 8x10 lens in Wollensak Betax 5 shutter.

Two shutter blade screws came out and nicked up one of the blades.

I was hoping someone who has been inside one of these knows what to watch out for. I have pulled the 'wrong' part of a shutter apart before and had an even bigger mess than I started with.

Today I found the only 1912 Wollensak shutter patent and a 1911 iris diaphragm patent.

These may help me understand some of it, but not the practical stuff, like 'never remove the blah-blah screw'.

It doesn't help to have the thing screwed up to start with (no studying 'normal' for reference).

Thank you.
 

shutterfinger

Member
Joined
Feb 25, 2013
Messages
5,020
Location
San Jose, Ca.
Format
4x5 Format
Betax shutters are simple. Pay close attention to the position of everything as you disassemble it. A digital P&S with macro mode is a big aid.
attachment.php
attachment.php
attachment.php

A Betax #3 exposed.
 

Attachments

  • all the little parts.JPG
    all the little parts.JPG
    627.8 KB · Views: 411
  • aperture in case only.JPG
    aperture in case only.JPG
    626.3 KB · Views: 431
  • gear train exposed 2.JPG
    gear train exposed 2.JPG
    655.8 KB · Views: 507
OP
OP
Murray@uptowngallery
Joined
Sep 24, 2003
Messages
1,041
Location
Holland, MI
Format
Pinhole
From your photos It appears the iris diaphragm can be left alone 'underneath'.

I assume that means the top 'shell' is the side to remove screws from first then...to access the shutter without 'deranging' the rest...that's the language I found in the 1912 Wollensak patent today.

I did not want to pull the wrong side's screws out and have all the iris parts fall out.
 
OP
OP
Murray@uptowngallery
Joined
Sep 24, 2003
Messages
1,041
Location
Holland, MI
Format
Pinhole
Hey 19

Not sure why there was a link to a Bobby Hebb 'Sunny' video in your reply...

Anyway, I will try to post photos if I can...certain features/access here depend on subscription.
 
OP
OP
Murray@uptowngallery
Joined
Sep 24, 2003
Messages
1,041
Location
Holland, MI
Format
Pinhole
Maybe I need to put photos somewhere & link to them. I don't see an attachment icon. Could also be from using my phone...not all features with on portable devices too.

I'll be back
 

shutterfinger

Member
Joined
Feb 25, 2013
Messages
5,020
Location
San Jose, Ca.
Format
4x5 Format
You have to set your permissions on Flickr when you upload, free account is public as default, paid account is possibly private. You can set a guess pass rather than public then post the guess pass ulr here.

The smooth section of needle nose pliers works well for straightening shutter blades.
 
OP
OP
Murray@uptowngallery
Joined
Sep 24, 2003
Messages
1,041
Location
Holland, MI
Format
Pinhole
Inconsistency in copying photo links was due to me negotiating the process via my phone. Flickr is very quirky on my phone.

Those non-nick planar aberrations were the worst of it. One pic showed two missing screws and the other showed a larger view.

If I can get it apart intelligently without collateral damage I think the blade isn't too bad....I'm just afraid of anti-intuitive blunders going in from the wrong side, as I've done before.

I see one large external screw on the back and three small external ones at the front and it appears the small front ones allow the front cover to come off to access the blades & whatever else is 'in front' of them. I am assuming this entry point will leave the iris diaphragm alone.

Somehow I am really good at discharging spring ends from their proper locations before identifying where that was. I hope the out of place screws just allowed the blades to slide out a bit and not displace spring ends.

I may have to go one level in, take pics and question anything I thing looks displaced.

I suspect my anticipated understanding of what the mechanism will look like could be very wrong...I understand how newer ones like Vario & Compur have an actuator ring and springs to open & close. This being much older may make it very different, simpler too, but I never claim to be successful let alone expert with the more complex ones.

A number of people say this is large and simple so I'm hoping preparation will keep me from sabotaging myself. I'd like to avoid an immediate disaster necessitating sending it away as that will make the acquisition questionably economical.

Thank you.
 

Ian Grant

Subscriber
Joined
Aug 2, 2004
Messages
23,266
Location
West Midland
Format
Multi Format
I can sympathise Murray, I have a dead Betax #5. I need a couple of aperture blades, mine's also a Radar. Finding parts in the UK is just not possible.

The other week I fixed 2 Alphax #3 shutters still have one to go. The parts are common with the Betax, only the slow speed gear differs.

Ian
 
OP
OP
Murray@uptowngallery
Joined
Sep 24, 2003
Messages
1,041
Location
Holland, MI
Format
Pinhole
I have been looking at beyond-repair shutters and trying to figure out how they work while grunting and dragging my knuckles. I bought a few service manuals which largely deter me from venturing further. Old cameras with broken and missing pieces at least make me feel better that I alone am not blame for their demise.

Years ago I bought a box of lazy Susan bearings for kitchen cabinets. They have 6" apertures. I had one machined further as clise to the hearings as possible...nearly 9" opening now. I was thinking shutter for Aero-Ektar...how I had no idea.

Lately I've been thinking about learning how to create 3D printer .STL cad files from 2D JPEG scan of shutter blades (& maybe iris blades too). Also, enlarging them to scale desired.

I have a lot of concerns about strength, aerodynamics and opacity to full spectrum of light for unknown thickness needed of random plastic material used in 3D printing.

For the large bearing-based one, I feel better about other materials & I was thinking about rim-propelled drive anyway...TBD.

When I figure out how to get the Betax 5 open intelligently, I will scan the blades so I won't wish I had after reassembly.

I also noticed I lost one of the three short screws on the front plate and now have to measure & identify what one of the remaining ones is .

I see there is one larger screw on the back and so far only noticed one screw on the side/rim of the shutter housing.

The kind if advice I was hoping for was identifying what screws allow access to what parts do I don't tear down further than necessary.

I also recall photoetching being a possible method of making metal blades. Maybe EDM too, but none of that is probably economical unless you had your own company that did those things...
 
OP
OP
Murray@uptowngallery
Joined
Sep 24, 2003
Messages
1,041
Location
Holland, MI
Format
Pinhole
Progress, sort of.

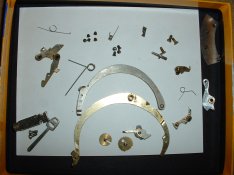
I removed the three top screws and the top plate with shutter speed and aperture dial.

I then removed the 4 long screws threaded only at the bottom. This allowed removing the top shutter cover with aperture lever.

All screws were loose so far!!

There is one side screw that appears to possibly keep the shutter plate from rotating inside the body. Leaving that alone for now as I don't yet know what I NEED to remove.

The single large screw on the back appears to hold the shutter cable socket in place. Tightened for now.

I uploaded more photos to Flickr as I haven't figured out options here yet.

Leading toward questions...

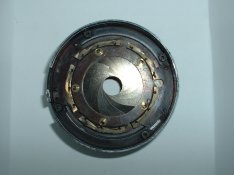
If I understand correctly, the iris diaphragm is retained in the lower half as an assembly. I can leave it there intact absent a need to get to it.

I also think, based on smaller Wollensak shutters, that the shutter assembly can be lifted out of the body.

I don't wish to tear the whole thing down at this point...only remove what I need to to get to the shutter blades.

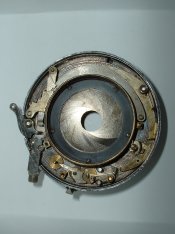
I am anticipating blades attached to a rotating ring in some manner. Obviously the single screw in each blade that unscrewed from two blades, and possible also one pin in a rectangular or arc-sectional slot that allow blades to pivot.

It is slowly becoming undeniable to me that de-energizing springs will be necessary. It would probably be stupid to attempt removing a shutter ass'y with springs in possibly pre-loaded positions.

I've always been nervous about removing too many parts no not being able to figure out where they came from due to inadequate pictures that seemed excessive earlier. I might try video.

So maybe I need to remove springs & levers for two purposes...

1) de-energize them so they stay where I put them instead of where they land, and

2) familiarize myself with placement and order of parts, even if I hate to cause more than the minimal disassembly necessary. I always worry about getting them all back correctly. There is the problem of wishing for but not having a service document, and the other of having one that shows nearly nothing...because of the basic knowledge that preceded the service manual (no user serviceable parts inside!).

Oh, yeah, where is the question?

Do I need to pull the shutter springs and levers out to get to the blades & actuator ring, or does the shutter 'clockwork', 'motor' or whatever the energy storage portion is called actually come out as an assembly that engages with pins on the rotating ring?

I have a Graphex service manual but hesitate to assume a Betax 5 shares enough to think that will guide me.

Thanks
 
OP
OP
Murray@uptowngallery
Joined
Sep 24, 2003
Messages
1,041
Location
Holland, MI
Format
Pinhole
The iris blades may be non-metallic...I wrecked a set on another shutter that were hard rubber or similar...dissolved instantly. I've seen others that looked like pressed paper.

On this Betax 5, the iris is dull, maybe non-metallic, but the shutter blades are definitely metal, look like blackened brass.

Anyway, I'm neither arguing nor intending to use chemicals...

I'll spend some time looking at this and try to understand it so I don't move too quickly.
 

Murrayatuptown

Subscriber
Joined
Jun 12, 2021
Messages
109
Location
Holland, MI, US
Format
Digital
I had William Wanderer repair & CLA it last year. Takes me a while to get to things, and I decided it was better to have it done right instead of learning on it.

Thanks for input.

Murray
 
Photrio.com contains affiliate links to products. We may receive a commission for purchases made through these links.
To read our full affiliate disclosure statement please click Here.

PHOTRIO PARTNERS EQUALLY FUNDING OUR COMMUNITY:


Ilford ADOX Freestyle Photographic Stearman Press Weldon Color Lab Blue Moon Camera & Machine
Top Bottom