• Welcome to Photrio!
    Registration is fast and free. Join today to unlock search, see fewer ads, and access all forum features.
    Click here to sign up

What piece am I missing? Cable Release Mount Too Far From Lens

Scan-01.jpg

A
Scan-01.jpg

  • 0
  • 0
  • 9
Came home

H
Came home

  • 6
  • 1
  • 85

Recent Classifieds

Forum statistics

Threads
202,207
Messages
2,837,239
Members
101,196
Latest member
Hans85
Recent bookmarks
0

Christopherjs

Subscriber
Allowing Ads
Joined
Aug 27, 2013
Messages
78
Location
Kingston, NY
Format
35mm
Hi All.

Newbie to LF.

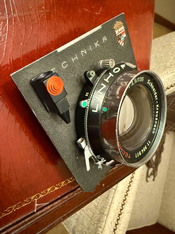
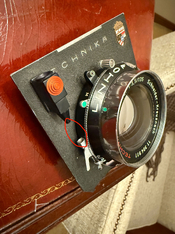
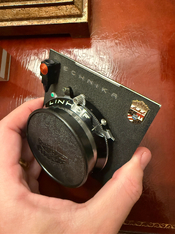
I have a Schneider Xenotar 135mm 3.5 that seems to have a cable release sleeve (not sure the right terminology). But it's so far from the shutter release mechanism that I'm thinking it's missing a piece. I found a blog that makes me think the missing pieces might be called a Transfer Bar and Shutter Trip Rod.

1. Looking for help identifying what the pieces I'm needing are called, and any advice as to how to avoid buying the wrong ones. Or rather, how to know if I'm buying pieces that will work for my lens and lensboard placement.

2. Secondly, I noticed a piece of debris floating around in the lens. And I'm pretty sure it's in the lens as it was against the leaf shutter. But that made me wonder about disassembling the lens from the lensboard, whether to mount to a new lensboard or really just to look at it out of curiosity. Is this something that should be done at a minimum? Does this allow a higher chance of mold to grow?

3. Thirdly, can anyone confirm I have to put this lens into T mode in lieu of a preview lever.

Thanks for your help!

_Christopher
 

Attachments

  • IMG_2444.jpg
    IMG_2444.jpg
    619.6 KB · Views: 87
  • IMG_2444-copy.jpg
    IMG_2444-copy.jpg
    619.1 KB · Views: 71
  • IMG_2449.JPG
    IMG_2449.JPG
    579.1 KB · Views: 83

abruzzi

Member
Joined
Mar 10, 2018
Messages
3,276
Location
New Mexico, USA
Format
Large Format
1. to use that black and red thing yes, there is supposed to be a short metal shaft that connects the two. I don't see any real reason to use one though. Instead just screw the shutter release cable into the shutter itself. Because the red and black thing is in the way, you can loosen the retaining ring and rotate the lens, or you can just replace the lensboard with one that doesn't have that thingy (if you do try to find a shaft, note that you will also need a special tiny thing that screws onto the end of your cable release because the cable release wont screw into the red and black thing. its supposed ot be a quick release--pull the red thing down and the release comes out without unscrewing--but they are more trouble than they are worth.)

2. the front and rear lens assembly unscrew from the shutter. Usually it unscrews easily, but sometime the threads are frozen and difficult to get started. If you remove a lens assembly be careful because in some cases there will be shims that space it out. You'll want to put them back in place to maintain the spacing.

3. Cock the shutter then press down the little rectangle with a wing on it (the last item clockwise in photo 3.) That will oven the shutter for focusing. To then close the shutter, press the release. You'll have to recock before firing.

EDIT: Assuming the shutter is a copal #0, something like this will be easier and cheaper than trying to find a matching shaft:


Also, if you're using a Linhof Technika, you probably want a board that has an offset hole--the one you have looks like it does, but I'm not certain. If you have most other cameras that work with Linhof boards (including some other Linhof cameras) you're better off with a centered hole. The link above is a centered hole, you can also find offset hole boards for a similar price. (the hole is lower which places the lens at a lowered position because Technicas have front rise but no fall. The offset board builds in a little bit of built in fall so you have to raise the front standard to center the lens, but you get the capability of going back down if needed. With a centered board on a Technica, you get no fall without resorting to indirect fall.
 
Last edited:
OP
OP
Christopherjs

Christopherjs

Subscriber
Allowing Ads
Joined
Aug 27, 2013
Messages
78
Location
Kingston, NY
Format
35mm
1. to use that black and red thing yes, there is supposed to be a short metal shaft that connects the two. I don't see any real reason to use one though. Instead just screw the shutter release cable into the shutter itself. Because the red and black thing is in the way, you can loosen the retaining ring and rotate the lens, or you can just replace the lensboard with one that doesn't have that thingy (if you do try to find a shaft, note that you will also need a special tiny thing that screws onto the end of your cable release because the cable release wont screw into the red and black thing. its supposed ot be a quick release--pull the red thing down and the release comes out without unscrewing--but they are more trouble than they are worth.)

2. the front and rear lens assembly unscrew from the shutter. Usually it unscrews easily, but sometime the threads are frozen and difficult to get started. If you remove a lens assembly be careful because in some cases there will be shims that space it out. You'll want to put them back in place to maintain the spacing.

3. Cock the shutter then press down the little rectangle with a wing on it (the last item clockwise in photo 3.) That will oven the shutter for focusing. To then close the shutter, press the release. You'll have to recock before firing.

EDIT: Assuming the shutter is a copal #0, something like this will be easier and cheaper than trying to find a matching shaft:


Also, if you're using a Linhof Technika, you probably want a board that has an offset hole--the one you have looks like it does, but I'm not certain. If you have most other cameras that work with Linhof boards (including some other Linhof cameras) you're better off with a centered hole. The link above is a centered hole, you can also find offset hole boards for a similar price. (the hole is lower which places the lens at a lowered position because Technicas have front rise but no fall. The offset board builds in a little bit of built in fall so you have to raise the front standard to center the lens, but you get the capability of going back down if needed. With a centered board on a Technica, you get no fall without resorting to indirect fall.

i just knew i'd get a quality response!

1. i think i will change the lens board, as you suggest. it sounds like a fun activity to make me feel like i'm engaged with this kit. plus i want a black one anyway.

and yes this one is offset, and i was aware as i had seen them when looking for lenses. but i didn't know why. so thank you for explaining. i'll be using a chamonix, so centered is good for me.

2. noted it could be stuck and have shims. i don't even have a lens wrench yet, so i'll wait until i have that and am changing out the lens board to do anything.

3. duh! i wondered what that last button was for, just couldn't figure out the sequence to make it work. thank you!

i'm pretty new to photrio, having been on FM for years (mostly just the Buy & Sell) as i shot digital 99% of the time. but as i move more into film, FM isn't not as interactive with the medium. so i expect i'll be here more often, and am already finding lots of old threads to help me understand the equipment.

but i'm glad to find such helpful people here as yourself on my first question.

thanks for helping abruzzi!
 

abruzzi

Member
Joined
Mar 10, 2018
Messages
3,276
Location
New Mexico, USA
Format
Large Format
you're welcome. LF is fun because nothing is abstracted away, you really have to engage with every part of the process. I've never used a Chamonix, but from the feedback of others here it should be a great camera.

In terms of removing the lens and moving it to another lens board you will probably need to remove the rear lens assembly to do that anyway. Some smaller lenses have a small enough rear assembly that it can stay in place while you remove the retaining ring, but for most lenses that is not the case. For a lens wrench to loosen the retaining ring, the flat metal type are nice, and can be very cheap:


You don't have to adjust them since they are sized for Copal 0, 1 and 3 the most common shutter sizes. You may also want to get something like this one:


For two reasons--if you get into older lenses thay may be mounted in a shutter that is sized differently. Most of the (really great) Kodak lenses are in Supermatic or Acme shutters that are not Copal/Compur sized. Second, sometimes you will buy a lens thatthe retaining ring is either seized or just too tight and the flat metal piece in the first link wont be strong enough to loosen and will bend when you try to loosen.

I was where you are now about 8 years ago, and its been really fun to learn large format. If you have any questions ask--there is a lot of knowledge here.
 

David Lindquist

Subscriber
Allowing Ads
Joined
Aug 18, 2006
Messages
304
Location
California foothills
Format
4x5 Format
You can take that black and red thing off. On the back of the board opposite it you'll see two screws. If you loosen them you should be able to slide the black and red thing off the little fitment that holds it to the board. It may slide off only one way. Then retighten the screws of course, you don't want to lose them or the little fitment leaving two holes in the board.

As for as opening the shutter for focussing, as abruzzi said, cock the shutter and push down that little rectangle. If this feature is working properly, lifting it back up by hooking that wing with your fingernail will close the shutter, leaving it cocked. On at least one of my No. 1 Compurs this doesn't quite work; tripping the shutter will close it. Simply re-cock for your exposure.

That little button next to the rectangle is, I think, part of the self timer. I don't remember how that works.

Looking at this board, I think it is Linhof's current version of the "QuickSocket" for a Copal shutter. The orientation of the cable release socket on your Compur is similar to that of the Copal. It might be possible to make this work with that Compur but I wouldn't count on it.

David
 
Last edited:

abruzzi

Member
Joined
Mar 10, 2018
Messages
3,276
Location
New Mexico, USA
Format
Large Format
Looking at this board, I think it is Linhof's current version of the "QuickSocket" for a Copal shutter. Might be possible to make it work with your No. 1 Compur but I sure wouldn't count on it.

Is it a 1 or a 0? I’m not certain. 135 are usually all #0, but a 3.5 is fast and might have need of a larger shutter. A quick Google suggested that they are in a 0 but I didn’t find anything definitive.
 

David Lindquist

Subscriber
Allowing Ads
Joined
Aug 18, 2006
Messages
304
Location
California foothills
Format
4x5 Format
My vintage Schneider literature shows the 135 mm f/3.5 Xenotar was mounted in the No. 1 Compur.

More info following on Ian's contribution: That same vintage literature, date code 1966, shows the 150 mm f//2.8 Xentar was mounted in the No. 2 Compur. This size was discontinued , as far as I can tell, by 1970. Then the No. 3 would have been used

David
 
Last edited:
OP
OP
Christopherjs

Christopherjs

Subscriber
Allowing Ads
Joined
Aug 27, 2013
Messages
78
Location
Kingston, NY
Format
35mm
It's a Linhof Compur #1, the 150mm f2.8 Xenotar is in a #3.

Ian

i understood it's a #1 also. i've got to look up again the terminology, because i've been using the term Copal #0 #1 or #3. but i think when it comes to dimensions, it means the same thing.
 
OP
OP
Christopherjs

Christopherjs

Subscriber
Allowing Ads
Joined
Aug 27, 2013
Messages
78
Location
Kingston, NY
Format
35mm
You can take that black and red thing off. On the back of the board opposite it you'll see two screws. If you loosen them you should be able to slide the black and red thing off the little fitment that holds it to the board. It may slide off only one way. Then retighten the screws of course, you don't want to lose them or the little fitment leaving two holes in the board.

As for as opening the shutter for focussing, as abruzzi said, cock the shutter and push down that little rectangle. If this feature is working properly, lifting it back up by hooking that wing with your fingernail will close the shutter, leaving it cocked. On at least one of my No. 1 Compurs this doesn't quite work; tripping the shutter will close it. Simply re-cock for your exposure.

That little button next to the rectangle is, I think, part of the self timer. I don't remember how that works.

Looking at this board, I think it is Linhof's current version of the "QuickSocket" for a Copal shutter. The orientation of the cable release socket on your Compur is similar to that of the Copal. It might be possible to make this work with that Compur but I wouldn't count on it.

David

that would explain the hooked shape of that button. mine does work, but when i pull the button out, the shutter leaves close rather slowly. as if i just released some tension and they're free to go back to center, but not forced to.

probably better for me to just fire the shutter

i do see the two screws. i'll attempt to take that thing off before repositioning the lens in the lens board. i was worried about leaving a hole in it, but if i can take off the bulky part on front but leave the mount in place and achieve the goal of removing the portion that's in the way, i'll be a happy camper.

thank you all for your replies!
 

Ian Grant

Subscriber
Allowing Ads
Joined
Aug 2, 2004
Messages
23,414
Location
West Midland
Format
Multi Format
i understood it's a #1 also. i've got to look up again the terminology, because i've been using the term Copal #0 #1 or #3. but i think when it comes to dimensions, it means the same thing.

I think it's a non standard Linhof Compur #1, the 135mm f3.5 Xenotar was only available through Linhof dealers and not listed in Schneider advertising and leaflets.

My vintage Schneider literature shows the 135 mm f/3.5 Xenotar was mounted in the No. 1 Compur.

More info following on Ian's contribution: That same vintage literature, date code 1966, shows the 150 mm f//2.8 Xentar was mounted in the No. 2 Compur. This size was discontinued , as far as I can tell, by 1970. Then the No. 3 would have been used

David

Surprisingly, Schneider were still using Dial-Set Compur #2 shutters in the mid 1950s, these were old 1930s stock. I have a mid 1950s Wray 180mm Lustrar in one, but have also seen similar age Schneider 180mm lenses in them.

When Schneider began using Rim-set Compur #2 they were soon pushing the Electronic version, and there was also a Prontor Press Electronic. Unsurprisingly there were similarities, same battery housing and controls, after all the two shutter divisions of the Zeiss Foundation had merged.

Ian
 

reddesert

Member
Allowing Ads
Joined
Jul 22, 2019
Messages
2,613
Location
SAZ
Format
Hybrid
i understood it's a #1 also. i've got to look up again the terminology, because i've been using the term Copal #0 #1 or #3. but i think when it comes to dimensions, it means the same thing.

The #0, #1, and #3 are shutter sizes, the thread sizes for mounting the cells to shutter and shutter to lensboard are larger for the larger numbers. Generally, Copal and Compur shutters of the same number have the same thread sizes, except when they don't. Copal #0 and Compur #0 are usually the same, Copal #1 and Compur #1 are also usually the same. skgrimes.com is a good place to find some more information about shutters.

Lenses can be moved from one lensboard to another (as long as it fits the hole size in the board). But it typically requires unscrewing the rear cell of the lens and the retaining ring of the shutter, so it's usually not something you want to do in the field.

If there is a little bit of junk inside the lens, you can try to get it out by unscrewing the front or rear cell (or both) from the shutter. You don't need to remove the shutter from the board, and you don't need a tool, just unscrew by hand. A rubberband wrapped around the edge of the cell helps if they are stuck on tight. Be careful not to touch the shutter or aperture blades.
 
OP
OP
Christopherjs

Christopherjs

Subscriber
Allowing Ads
Joined
Aug 27, 2013
Messages
78
Location
Kingston, NY
Format
35mm
thank you all for the help! it's encouraging as i enter an approach to photography that requires an entire new lexicon.
 
OP
OP
Christopherjs

Christopherjs

Subscriber
Allowing Ads
Joined
Aug 27, 2013
Messages
78
Location
Kingston, NY
Format
35mm
The #0, #1, and #3 are shutter sizes, the thread sizes for mounting the cells to shutter and shutter to lensboard are larger for the larger numbers. Generally, Copal and Compur shutters of the same number have the same thread sizes, except when they don't. Copal #0 and Compur #0 are usually the same, Copal #1 and Compur #1 are also usually the same. skgrimes.com is a good place to find some more information about shutters.

Lenses can be moved from one lensboard to another (as long as it fits the hole size in the board). But it typically requires unscrewing the rear cell of the lens and the retaining ring of the shutter, so it's usually not something you want to do in the field.

If there is a little bit of junk inside the lens, you can try to get it out by unscrewing the front or rear cell (or both) from the shutter. You don't need to remove the shutter from the board, and you don't need a tool, just unscrew by hand. A rubberband wrapped around the edge of the cell helps if they are stuck on tight. Be careful not to touch the shutter or aperture blades.

i unscrewed the rear cell and there laid the little thingamabob that i had spotted earlier. a gentle breath sent it flying out and i reattached the rear cell and it's good go to. felt good! thanks!
 
Photrio.com contains affiliate links to products. We may receive a commission for purchases made through these links.
To read our full affiliate disclosure statement please click Here.

PHOTRIO PARTNERS EQUALLY FUNDING OUR COMMUNITY:


Ilford ADOX Freestyle Photographic Stearman Press Weldon Color Lab Blue Moon Camera & Machine
Top Bottom