What in the heck am I doing wrong? Plustek 8200i

Roses

A
Roses

  • 6
  • 0
  • 97
Rebel

A
Rebel

  • 6
  • 3
  • 118
Watch That First Step

A
Watch That First Step

  • 2
  • 0
  • 80
Barn Curves

A
Barn Curves

  • 3
  • 1
  • 67
Columbus Architectural Detail

A
Columbus Architectural Detail

  • 5
  • 3
  • 77

Forum statistics

Threads
197,490
Messages
2,759,875
Members
99,517
Latest member
RichardWest
Recent bookmarks
0

millenial

Member
Joined
Sep 14, 2023
Messages
46
Location
California
Format
35mm
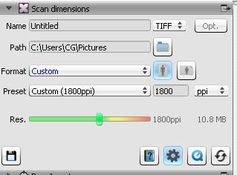
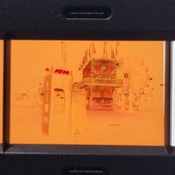
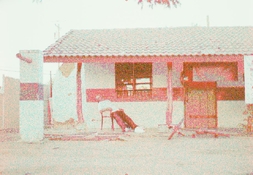
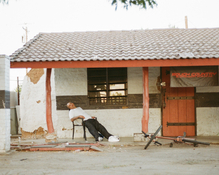
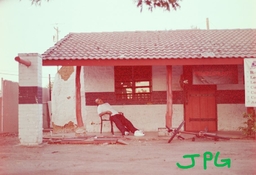
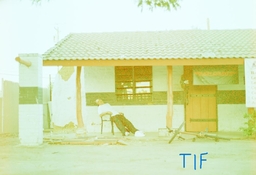
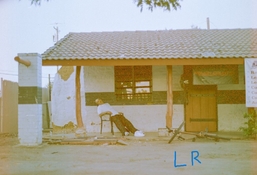
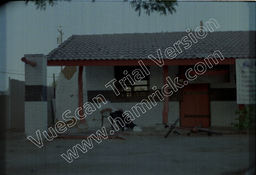
Plustek 8200i SE, Silverfast 8.8, Cinestill 800t, developed at local lab.

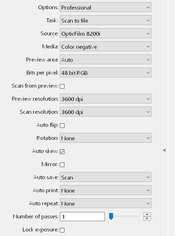
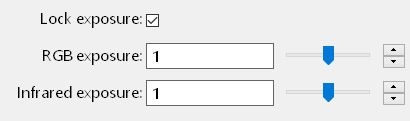
This is my first time using my brand new Plustek 8200i SE, I have the workflow pilot on. This is not the result I was expecting. No adequate search results have turned up to help with my (assuming) user error issue happening here. Can anyone point me in the right direction? Why does it look so...grainy, blotchy, weird?

P.S. I am very new to film (bambi status).
cinestill scan.JPG
 
  • millenial
  • Deleted
  • Reason: forgot to reply directly to commenter
OP
OP

millenial

Member
Joined
Sep 14, 2023
Messages
46
Location
California
Format
35mm

Attachments

  • pilot on settings.JPG
    pilot on settings.JPG
    23.1 KB · Views: 65

Radost

Member
Joined
Jan 21, 2021
Messages
1,619
Location
USA from Ukraine
Format
Multi Format
Use ѝSilver Fastѝ corrected Negafix
 
Last edited:

armadsen

Subscriber
Joined
Nov 16, 2022
Messages
269
Location
Salt Lake City
Format
Analog
Get Silver Fast

OP is already using Silverfast. “Workflow Pilot” is a Silverfast feature.

millenial, what do the negatives look like? I’m wondering if the underexposure of the film is giving the scanner trouble. Do you have any frames that were shot during the day or are otherwise denser/less dark?
 

Dennis S

Subscriber
Joined
Mar 16, 2008
Messages
1,760
Location
Vancouver B.C.
Format
Multi Format
Sorry but I am not familiar to SilverFast as I use Vuescan or CyberView X that I know can be a real challenge to set up. Just trying to set up my Prime Film XA plus and that I think was made by the same company as yours and really have to follow the owner's manual entirely. Good luck.
 
OP
OP

millenial

Member
Joined
Sep 14, 2023
Messages
46
Location
California
Format
35mm
OP is already using Silverfast. “Workflow Pilot” is a Silverfast feature.

millenial, what do the negatives look like? I’m wondering if the underexposure of the film is giving the scanner trouble. Do you have any frames that were shot during the day or are otherwise denser/less dark?

Here is what the negative looks like, also, jpg of what the same negative looks like when scanned at my local lab.

So I pulled out a daytime frame, i've attached the scan (fuji 200). I have also attached the scan from the local lab, and i've included a picture of the negative.

Same settings 1800ppi.
 

Attachments

  • 20231026_194355 (1).jpg
    20231026_194355 (1).jpg
    486.9 KB · Views: 125
  • 000034770006.jpg
    000034770006.jpg
    944.5 KB · Views: 138
  • 2.JPG
    2.JPG
    234.8 KB · Views: 136
  • 000028380008 (1).jpg
    000028380008 (1).jpg
    440.5 KB · Views: 106
  • 20231026_200621 (1).jpg
    20231026_200621 (1).jpg
    842.3 KB · Views: 112
OP
OP

millenial

Member
Joined
Sep 14, 2023
Messages
46
Location
California
Format
35mm
Also, I have flipped the negative every way possible. I have also confirmed now that the letters on the negative should be readable left to right, and upright, emulsion down (glossy side up); same results.
 

_T_

Member
Joined
Feb 21, 2017
Messages
406
Location
EP
Format
4x5 Format
The problem could be caused by the scanner or the software. It’s difficult to tell which at this point.

The first thing to do is to turn off the workflow pilot. Then you’re going to want to go through and turn off every setting you can possibly turn off. Close every panel and window you can close and set every setting you can’t close back to it’s default.

Then you need to very carefully draw a bounding box around the image. You want to include as much of the image as possible while including as little of the surrounding area as possible. The more of the surrounding area you include the worse your scan will look.

Make sure your resolution is set to a sufficient setting for your needs and press scan. If your scans still look like this with everything set properly as I described and the bounding box properly drawn then the next step would be to try a different scanning software.

If both pieces of software have the same problem then you probably have a hardware problem and might need to do a return.
 

MattKing

Moderator
Moderator
Joined
Apr 24, 2005
Messages
51,947
Location
Delta, BC Canada
Format
Medium Format
First, your negatives at least look workable - particularly the daytime shot - although the Cinestill "designed for ECN but go ahead and use them with C-41" films are likely to add a few extra complexities.
I would be suspicious of there being a Calibration issue - as if the scanner isn't gauging the exposure correctly.
What sort of results do you get if you try to scan to jpeg?
 

Radost

Member
Joined
Jan 21, 2021
Messages
1,619
Location
USA from Ukraine
Format
Multi Format
OP is already using Silverfast. “Workflow Pilot” is a Silverfast feature.

millenial, what do the negatives look like? I’m wondering if the underexposure of the film is giving the scanner trouble. Do you have any frames that were shot during the day or are otherwise denser/less dark?
I meant negafix. try everything. Also your resolution may be low.
I use DNG Raw maximum resolution “green to red slider” for scans
 
OP
OP

millenial

Member
Joined
Sep 14, 2023
Messages
46
Location
California
Format
35mm
The problem could be caused by the scanner or the software. It’s difficult to tell which at this point.

The first thing to do is to turn off the workflow pilot. Then you’re going to want to go through and turn off every setting you can possibly turn off. Close every panel and window you can close and set every setting you can’t close back to it’s default.

Then you need to very carefully draw a bounding box around the image. You want to include as much of the image as possible while including as little of the surrounding area as possible. The more of the surrounding area you include the worse your scan will look.

Make sure your resolution is set to a sufficient setting for your needs and press scan. If your scans still look like this with everything set properly as I described and the bounding box properly drawn then the next step would be to try a different scanning software.

If both pieces of software have the same problem then you probably have a hardware problem and might need to do a return.

First, your negatives at least look workable - particularly the daytime shot - although the Cinestill "designed for ECN but go ahead and use them with C-41" films are likely to add a few extra complexities.
I would be suspicious of there being a Calibration issue - as if the scanner isn't gauging the exposure correctly.
What sort of results do you get if you try to scan to jpeg?

Okay, so I closed out all the extra settings and reset all settings to default. Short answer: same(ish) result. Set the bounding box to a smaller area just to be safe, I've attached a screenshot of my settings and also of my scans in both jpeg and Tiff.

I also edited the jpg output in lightroom (basic edits) so you can see what that looks like.

My next step is to try a different software, I will do some research to see which one offers a free trial right now. I've got about two weeks before the return period runs out.

I meant negafix. try everything. Also your resolution may be low.
I use DNG Raw maximum resolution “green to red slider” for scans

I do not show a DNG option, I have TIFF, PSD, JPEG, JP2, & PDF. I tried all options in negafix as well, they improve slightly but nowhere near as expected.
 

Attachments

  • JPG.JPG
    JPG.JPG
    84.8 KB · Views: 69
  • TIF.JPG
    TIF.JPG
    115.9 KB · Views: 68
  • LR edit.JPG
    LR edit.JPG
    131.3 KB · Views: 70
  • settings.JPG
    settings.JPG
    28.2 KB · Views: 70

Radost

Member
Joined
Jan 21, 2021
Messages
1,619
Location
USA from Ukraine
Format
Multi Format
I do not show a DNG option, I have TIFF, PSD, JPEG, JP2, & PDF. I tried all options in negafix as well, they improve slightly but nowhere near as expected.

upgrade silver fast. scanning raw future proofs your negatives. you can experiment with negafix and other options after the fact.
 
OP
OP

millenial

Member
Joined
Sep 14, 2023
Messages
46
Location
California
Format
35mm
upgrade silver fast. scanning raw future proofs your negatives. you can experiment with negafix and other options after the fact.

I am on the latest version (8.8), is it possible you are using silverfast 9?

When you load the carrier, is the emulsion side facing the sensor?
Yes, the emulsion is down. I initially tried it up, so I thought that was my issue, but it wasn't.
 

madNbad

Member
Joined
Sep 25, 2020
Messages
1,402
Location
Portland, Oregon
Format
35mm RF
It's been a few years but when I owned a 7600i, the Pilot was always reliable. Maybe not the best results but it would produce a pretty good image. Did you try the quick scan button?
 
OP
OP

millenial

Member
Joined
Sep 14, 2023
Messages
46
Location
California
Format
35mm
It's been a few years but when I owned a 7600i, the Pilot was always reliable. Maybe not the best results but it would produce a pretty good image. Did you try the quick scan button?
I did try the quickscan button, and it did scan it; I'll be honest with you, I don't even know where the file went after it scanned, nothing happened.

So I tried Vuescan, it definitely looks different, but I would say there's still an issue. Take a look for yourselves and let me know what you think please. I really thank you all for your replies and patience.
 

Attachments

  • vuescan jpg.jpg
    vuescan jpg.jpg
    1.4 MB · Views: 96
  • vuescan settings.JPG
    vuescan settings.JPG
    47 KB · Views: 90

Radost

Member
Joined
Jan 21, 2021
Messages
1,619
Location
USA from Ukraine
Format
Multi Format
I am on the latest version (8.8), is it possible you are using silverfast 9?


Yes, the emulsion is down. I initially tried it up, so I thought that was my issue, but it wasn't.

You probably have the free SE version that comes with the scanner.
Upgrade to AI version with HDR imaging software.
Sometimes Silver Fast have great deals.
And honestly if you get a Pacific Image XAS scanner you will get the best home results from 35.
 

Anon Ymous

Member
Joined
Feb 7, 2008
Messages
3,661
Location
Greece
Format
35mm
I did try the quickscan button, and it did scan it; I'll be honest with you, I don't even know where the file went after it scanned, nothing happened.

So I tried Vuescan, it definitely looks different, but I would say there's still an issue. Take a look for yourselves and let me know what you think please. I really thank you all for your replies and patience.


You have probably set color balance to none at the color tab, so it's obviously off, but the banding seems to be an issue. Try the Scanner --> Calibrate option and it may help, but it seems too much to be honest.
 

brbo

Member
Joined
Dec 28, 2011
Messages
2,021
Location
EU
Format
Multi Format
Looks like very weak light source and then scanning software compensating for that, hence excessive noise.

This looks like a hardware issue.
 

brbo

Member
Joined
Dec 28, 2011
Messages
2,021
Location
EU
Format
Multi Format
In Vuescan, do a preview (set 'Preview resolution' to 'Auto' before that as there is no need to do a preview at full resolution) without any film in your holder and then check the 'Lock exposure' on your 'Input' tab. Now, this may depend on scanner and Vuescan edition, but I think that after checking 'Lock exposure' there should appear an addition 'RGB exposure' field beneath with some value displayed. This value tells you the relative optimal sensor 'gain' (not quite true, but lets leave that aside for a moment) that is used for scanning. Effectively, that means the highest exposure possible that will still not clip any data on the sensor. With no film in the holder that value should be at about 1 for most scanners. If this value is much higher, that means that even without the film the sensor is not getting enough light.
 
OP
OP

millenial

Member
Joined
Sep 14, 2023
Messages
46
Location
California
Format
35mm
In Vuescan, do a preview (set 'Preview resolution' to 'Auto' before that as there is no need to do a preview at full resolution) without any film in your holder and then check the 'Lock exposure' on your 'Input' tab. Now, this may depend on scanner and Vuescan edition, but I think that after checking 'Lock exposure' there should appear an addition 'RGB exposure' field beneath with some value displayed. This value tells you the relative optimal sensor 'gain' (not quite true, but lets leave that aside for a moment) that is used for scanning. Effectively, that means the highest exposure possible that will still not clip any data on the sensor. With no film in the holder that value should be at about 1 for most scanners. If this value is much higher, that means that even without the film the sensor is not getting enough light.

I will try this today and report back, thank you!
 
OP
OP

millenial

Member
Joined
Sep 14, 2023
Messages
46
Location
California
Format
35mm
In Vuescan, do a preview (set 'Preview resolution' to 'Auto' before that as there is no need to do a preview at full resolution) without any film in your holder and then check the 'Lock exposure' on your 'Input' tab. Now, this may depend on scanner and Vuescan edition, but I think that after checking 'Lock exposure' there should appear an addition 'RGB exposure' field beneath with some value displayed. This value tells you the relative optimal sensor 'gain' (not quite true, but lets leave that aside for a moment) that is used for scanning. Effectively, that means the highest exposure possible that will still not clip any data on the sensor. With no film in the holder that value should be at about 1 for most scanners. If this value is much higher, that means that even without the film the sensor is not getting enough light.

I am seeing "1" after doing the steps. I was kind of hoping it would be higher, only because I wanted a solution to this. However, the fact that I tried Vuescan and Silverfast with the same results or results with issues makes me believe the theory of this being a hardware issue. Especially after defaulting all settings, I would expect something better. I have decided to return the unit through Amazon and wait for a new one.

I really appreciate everyone's help, y'all helped me troubleshoot and it helped me to not get discouraged. Experiencing the world of film photography has been more eventful than when I first started digital 😆
 

Attachments

  • vuescanlockexpo.JPG
    vuescanlockexpo.JPG
    13.9 KB · Views: 43
Photrio.com contains affiliate links to products. We may receive a commission for purchases made through these links.
To read our full affiliate disclosure statement please click Here.

PHOTRIO PARTNERS EQUALLY FUNDING OUR COMMUNITY:


Ilford ADOX Freestyle Photographic Stearman Press Weldon Color Lab Blue Moon Camera & Machine
Top Bottom