Very strange results with Yashica-D

Roses

A
Roses

  • 2
  • 0
  • 72
Rebel

A
Rebel

  • 4
  • 2
  • 90
Watch That First Step

A
Watch That First Step

  • 1
  • 0
  • 64
Barn Curves

A
Barn Curves

  • 2
  • 1
  • 58
Columbus Architectural Detail

A
Columbus Architectural Detail

  • 4
  • 2
  • 63

Forum statistics

Threads
197,488
Messages
2,759,841
Members
99,515
Latest member
falc
Recent bookmarks
1

ipitytheblue

Member
Joined
Jun 24, 2023
Messages
15
Location
MD
Format
Medium Format
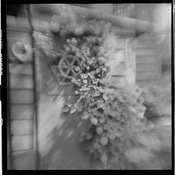
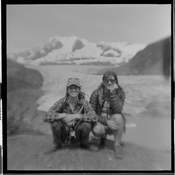
Just bought a Yashica-D in the usual untested condition to complement my Rolleiflex for more rough-and-tumble activities. Glass looks good, speed and aperture dials work smoothly and seem accurate. Same with focus; front mechanism moves smoothly and infinity looks acceptable in the viewer. Let's take it on a trip! But then... the negatives. What on earth is going on?

Again, no obvious flaws in the glass (no haze, fungus, etc., just a few light scratches on the front of first element). It almost looks like it's missing a lens element but everything appears to be clean and present. Could this be a problem with the pressure plate failing to maintain the film plane? I'm at a loss. Any ideas?
 

Attachments

  • DSC_7718.jpg
    DSC_7718.jpg
    180.5 KB · Views: 193
  • DSC_7721.jpg
    DSC_7721.jpg
    203 KB · Views: 177
  • DSC_7723.jpg
    DSC_7723.jpg
    202.7 KB · Views: 180
  • DSC_7728.jpg
    DSC_7728.jpg
    205.2 KB · Views: 197

Axelwik

Member
Joined
Apr 6, 2023
Messages
299
Location
Albuquerque
Format
Large Format
Could be that someone fooled with it and put a lens element in backwards. Center seems to be kind of in focus, but not the rest. Can you tell us more about the aperture and shutter speed used?

Me - I wouldn't fool with it and ask for a refund.
 
OP
OP

ipitytheblue

Member
Joined
Jun 24, 2023
Messages
15
Location
MD
Format
Medium Format
Could be that someone fooled with it and put a lens element in backwards. Center seems to be kind of in focus, but not the rest. Can you tell us more about the aperture and shutter speed used?

I wouldn't fool with it and ask for a refund.

Aperture and shutter varied for each phot.

Yeah, that's what made me wonder if it was missing an element. It's almost like it's missing correction from the center to the edges.

I removed the front element set today and it looked good. Didn't disassemble it but I've done it before on a 50's folder. Didn't remove the back as my (admittedly cheap) spanner wrench couldn't reach the rear element through the housing. Figured there was little chance that had been messed with anyway.
 

JPD

Member
Joined
Mar 24, 2007
Messages
2,135
Location
Sweden
Format
Medium Format
If the lens was missing an element it wouldn't have formed images at all on the film. My guess is that the front element is backwards. Someone might have removed the retaining ring, cleaned the glass and put it back the wrong way.
 

Dan Daniel

Subscriber
Joined
Jul 4, 2009
Messages
2,832
Location
upstate New York
Format
Medium Format
Not sure which lens you have- Yashikor or Yashinon. If the rear element appears right- convex to the outside- it could be that the rear element in the front group was flipped. Most lenses, especially what appears to be an almost symmetrical design based on the link above, will have a bevel or such ground into one edge to differentiate the two sides. I'd open the front group and flip the back element if the rear element (behind shutter) lens (or cemented pair if Yashinon) appears correct.

Thankfully your images at present are so distinctive that you'll be able to see if things are better with a piece of tape or ground glass in the film plane.
 
OP
OP

ipitytheblue

Member
Joined
Jun 24, 2023
Messages
15
Location
MD
Format
Medium Format
Yep, it's the Yashikor triplet. Experimenting with these things (old analog cameras in general) is a blast; never would have expected to run into an issue like this. Plus, my friends actually love the photos from this trip! But, I'd prefer to get everything straightened out, haha.
 

mshchem

Subscriber
Joined
Nov 26, 2007
Messages
14,236
Location
Iowa City, Iowa USA
Format
Medium Format
Yep, it's the Yashikor triplet. Experimenting with these things (old analog cameras in general) is a blast; never would have expected to run into an issue like this. Plus, my friends actually love the photos from this trip! But, I'd prefer to get everything straightened out, haha.

The photos you've shown are beautiful 😊 Still would be great to have correct. Those are great cameras. Maybe someone made a soft focus adjustment?
 
OP
OP

ipitytheblue

Member
Joined
Jun 24, 2023
Messages
15
Location
MD
Format
Medium Format
The photos you've shown are beautiful 😊 Still would be great to have correct. Those are great cameras. Maybe someone made a soft focus adjustment?

Right? It was just a test roll to begin with (although I was optimistic considering the condition of the rest of the unit) and I had an Eos Elan II with me for regular snaps as well. I also have 2/3 of a roll of Gold from that camera that I haven't developed yet so there will be more surprises to come!
 
OP
OP

ipitytheblue

Member
Joined
Jun 24, 2023
Messages
15
Location
MD
Format
Medium Format
For everyone's benefit, adding a detailed response from Bob from a reddit thread that I posted on the same subject.

...

This is Bob Sara, Yashica Company Trained TLR Technician, still servicing these cameras after 40 years.

The rear taking lens us a grouped element. There is flat side and a Convex side. The flat side should always be facing the backside of the shutter aperture and the convex side should be facing you when you open the film bay. To verify whether it is installed correctly, simply wrap a thin layer of lens tissue around your middle finger and run it slowly over the lens side to side. If you can feel the curvature of the lens, then it is installed correctly. Since the grouped element sits within a millimeter or so from the back of the shutter aperture, should the lens be installed in reverse, the convex side would have interfered with the easy movement of aperture blades and would have also consequently scratched up the convex side of the lens. This is what had happened to a recent Yashica Mat-EM I received for service when the owner had tried to clean and re-install their own rear element.

However, if the lens is installed correctly, you still want to verify the clear condition of all taking elements by looking thru the entire taking lens set from the back of the film bay. Simply reset shutter and hold-in the release (release cable with a lock would make it easier) and look at the entire lens set while refracting (at an angle) a bright light while looking for anomalies like haze/fog (looks like heavy dust or fone lube splatters), or lens fungus(looks like patchy cobwebs). or lens separation (looks like either little bubble and/or areas of discolored or cloudy glass). Lens fungus and balsam separation are common for these old cameras.

Once you verified the correct orientation of the rear grouped element and verified that your entire taking lens set is Crystal Clear, now by process of elimination you can move forward to checking the other possible causes.

Other causes could include: A- A mismatch of taking lens elements if someone swapped just one affected element without changing the entire lens set or if they swapped an element with one from an incompatible model. In All TLRs, Including in Rollei, you must change all taking or all viewing lenses together at once! This is because No two front or rear elements were manufactured identically and the factory had to match all elements and calibrate them together on each camera in order to achieve the 75mm or 80mm focal length.
B- If camera focus mechanism were not re-calibrated after swapping any lenses. C- If the camera experienced an impact and if that caused any deflections in the position of the lens plate or focusing arms

To Solve the issue you have to test one thing at a time and by "process of elimination".

If you find this post informative, please let me know by giving it your Up Vote, below. Thank you.

Visit my facebook page(link below) to see how these cameras are serviced and maintained.

https://www.facebook.com/yashicarepaircenter

For questions or service inquiries, please email to: CLAStudios@Msn.com
 

ic-racer

Member
Joined
Feb 25, 2007
Messages
16,484
Location
USA
Format
Multi Format
Just bought a Yashica-D i
Try to get your money back, though you might like the effect.

I did something similar by shooting wide open and using a Yashica "viewing lens" wide angle adapter on the "taking lens." It gave a similar effect.
 

Andrew O'Neill

Moderator
Moderator
Joined
Jan 16, 2004
Messages
11,763
Location
Coquitlam,BC Canada
Format
Multi Format
I love the look of those images! I've flipped lenses around in my Hawkeye and get similar effect but not as strong as yours. Have you looked to see if it's an easy task getting in the lens to check to see if that is the issue?
 

Sirius Glass

Subscriber
Joined
Jan 18, 2007
Messages
50,135
Location
Southern California
Format
Multi Format
Someone messed with the elements of the lens. It needs to be looked at someone who can work on the optics.


Welcome to APUG Photrio!!
 
OP
OP

ipitytheblue

Member
Joined
Jun 24, 2023
Messages
15
Location
MD
Format
Medium Format
I love the look of those images! I've flipped lenses around in my Hawkeye and get similar effect but not as strong as yours. Have you looked to see if it's an easy task getting in the lens to check to see if that is the issue?

It looks the exact same as my MF Mamiya folder, i.e just a spanner wrench. I removed the front element the other day to give it a look and a quick clean. Only issue is that, unlike the folder, the rear element is permanently recessed in the housing, making it more difficult to get to. But it should just screw in and out. When I get a minute today, I'm going to compare the feel of the rear element to a junker Yashi-A that I have sitting around to see how they compare. If they're the same, I'm not going to bother with the rear and see what I can do with the front.
 

Dan Daniel

Subscriber
Joined
Jul 4, 2009
Messages
2,832
Location
upstate New York
Format
Medium Format
If you are going to be messing with things like this on a regular basis, you can take a cheap pair of needle nose pliers and grind small tips to fit the slots. They'll fit inside a TLR. Of course it is a very dangerous thing if the pliers slips, etc.
 
OP
OP

ipitytheblue

Member
Joined
Jun 24, 2023
Messages
15
Location
MD
Format
Medium Format
For real.

I probed the -A and compared with the -D, it's easy to feel the convex surface of the rear element. SO, making progress.

My spanner wrench is cheapo Amazon so I'm extra careful. I was having trouble getting any grip through the back so, on a whim, I stuck the protective rubber footies back on the wrench tips and applied a little pressure to the retaining ring. It came right off! (With much coaxing via the rubber feet.) Rear lens element was definitely in backwards. I'll get her cleaned up a little and put back together... though I may need to be creative regarding how to lower the element back into its home.

I appreciate the critical thinking assistance of this community!
 

Dan Daniel

Subscriber
Joined
Jul 4, 2009
Messages
2,832
Location
upstate New York
Format
Medium Format
Well, you can basically drop it in gently and finesse it around with a stick or two. Chopsticks from chinese take can make nice tools, safer for poking and prodding at times. Whittle as needed.

And seriously, some low-tack masking tape on the end of a dowel or such can be used in a case like this to start the threads. I wouldn't do this on a Planar in a Rolleiflex but be gentle and get it started and you'll have none or little tape residue that cleans off. Also turning backwards and feeling the thread starts drop into place usually works well.
 
OP
OP

ipitytheblue

Member
Joined
Jun 24, 2023
Messages
15
Location
MD
Format
Medium Format
Well, you can basically drop it in gently and finesse it around with a stick or two. Chopsticks from chinese take can make nice tools, safer for poking and prodding at times. Whittle as needed.

And seriously, some low-tack masking tape on the end of a dowel or such can be used in a case like this to start the threads. I wouldn't do this on a Planar in a Rolleiflex but be gentle and get it started and you'll have none or little tape residue that cleans off. Also turning backwards and feeling the thread starts drop into place usually works well.

Awesome, will definitely try this.
 

MattKing

Moderator
Moderator
Joined
Apr 24, 2005
Messages
51,947
Location
Delta, BC Canada
Format
Medium Format
Bamboo skewers used for testing the "doneness" of cakes can also serve to replace the chopsticks.
 

Andrew O'Neill

Moderator
Moderator
Joined
Jan 16, 2004
Messages
11,763
Location
Coquitlam,BC Canada
Format
Multi Format
Go to the kids section in your local dollar store. Look for toy dart gun with suction cup tips. If too large, trip it down to fit over lens. If no such thing exists at your dollar store, chopstick with chewing gum 🤭
 
OP
OP

ipitytheblue

Member
Joined
Jun 24, 2023
Messages
15
Location
MD
Format
Medium Format
Got it lowered down in there hanging off a strip of masking tape with a little prodding via a chopstick. I have ground glass from my Rollei floating around somewhere but didn't see it yesterday so I went ahead and loaded up a test roll of expired TMax. Definitely going to be doing a few critical focus tests but otherwise just curious as to how things shook out!
 
Photrio.com contains affiliate links to products. We may receive a commission for purchases made through these links.
To read our full affiliate disclosure statement please click Here.

PHOTRIO PARTNERS EQUALLY FUNDING OUR COMMUNITY:


Ilford ADOX Freestyle Photographic Stearman Press Weldon Color Lab Blue Moon Camera & Machine
Top Bottom