Folks more expert than I (especially Simon Galley) - I would love some feedback on this as to the possible cause. I'm posting this for a colleague who does not get online much. She has students at a local high school who are doing wet darkroom printing (YAY!), and two of them have had the same problem with their prints. One is printing on Ilford MG Fiber glossy, the other on Ilford RC pearl, but both are having the same problem. The prints LOOK like they've been pre-sprayed with fixer or something else wet that damaged the emulsion or otherwise inhibited the development of the image.
-
Welcome to Photrio!Registration is fast and free. Join today to unlock search, see fewer ads, and access all forum features.Click here to sign up
You are using an out of date browser. It may not display this or other websites correctly.
You should upgrade or use an alternative browser.
You should upgrade or use an alternative browser.
VERY odd paper behavior - Ilford MG Fiber Glossy strange issue (attn Simon Galley)
-
A
- Thread starter TheFlyingCamera
- Start date


Recent Classifieds
-
Want to Buy 12x20 Film and Film holder
- Started by stray227
-
Free NuArc Vacuum Frame
- Started by Roger Thoms
-
For Sale Copal Press no.1 shutter (CLA'd)
- Started by OAPOli
-
For Sale Bronica ETR 2.8/50 lens cells
- Started by OAPOli
-
For Sale Polaroid SX-70 bargain
- Started by darinwc
Forum statistics
I have seen results somewhat similar to this made by students who have (unknowingly due to inexperience) placed their paper face down (to protect it from light) on a less-than-clean counter while they nervously check their notes and handouts before committing their paper to the enlarger's light.
I'm not saying that's what this is, but I have seen similar results traced back to fixer contamination in shared darkrooms where fixer sits on the counter long enough to dry. As you know, dried fixer can be somewhat difficult to remove. (to some too, it seems, gentle agitation manifests as tsunami-like waves in the tray...)
I'm not saying that's what this is, but I have seen similar results traced back to fixer contamination in shared darkrooms where fixer sits on the counter long enough to dry. As you know, dried fixer can be somewhat difficult to remove. (to some too, it seems, gentle agitation manifests as tsunami-like waves in the tray...)
Art
It looks like Avant Garde art to me. Some photo artistes would charge Big Money for something like this.
However, I do wonder if the idea about the messy darkroom tabletop area might be the factual reason that created it.
It looks like Avant Garde art to me. Some photo artistes would charge Big Money for something like this.
However, I do wonder if the idea about the messy darkroom tabletop area might be the factual reason that created it.
I'd go with the exposed print being put on the wet table with fixer contamination.
- Joined
- Dec 5, 2008
- Messages
- 335
- Format
- 35mm RF
"One is printing on Ilford MG Fiber glossy, the other on Ilford RC pearl, but both are having the same problem"
The same problem on two different boxes with diff. characteristics? Statistics would say "the problem is on your side, Sir!". Careless students?
The same problem on two different boxes with diff. characteristics? Statistics would say "the problem is on your side, Sir!". Careless students?

Sloppy dark room practices. Have your friend watch the students to see what they are doing so she can correct the problem. They should probably clean the DR from top to bottom and never place the paper on anything other than the easel and in a tray until it is finished..
darkosaric
Member
Take one paper and develop it at your place - if you have darkroom. I am sure it is not a paper problem.
Let's play Sherlock here.
We can eliminate a particular paper as the cause since the problem occurs with two different papers. Chances on two papers having the same problem is extremely small. we can eliminate the developer as the cause since other students do not experience the problem. This leaves contamination of the print before it is developed. Most likely by fixer.
Time for a darkroom cleanup party. The floor and all surfaces need to be thoroughly cleaned. In the future spilled chemicals need to be cleaned up immediately and not allowed to dry as this will produce dust which can settle on paper and film. Mixing of chemicals should always be done outside of the darkroom.
Last edited by a moderator:
- Joined
- Oct 9, 2010
- Messages
- 7,881
- Format
- 35mm RF
This is almost certainly fixer contamination before development. It is not finger prints and looks like contamination from a flat surface. It could also be that the student after exposing the print put it in the fix first by mistake, but then realising this instantly transferred it to the dev and didnt admit this fact to the teacher.
- Joined
- May 19, 2014
- Messages
- 3
- Format
- Medium Format
Still Not sure
It is my student's that are having this issue. I watched one of the students take her fiber paper out of her new box of paper, put it on the easel, expose the image, put it in the developer, stop, than fix. (The darkroom definitely needs to be cleaned, but I'm not sure how she could have gotten fixer splashed all over her paper when it was taken directly from the box.) Even if for some reason the easel had fixer on it, the paper was never emulsion side down. As well, sometimes the results would happen immediately and other times the image would look just fine and she would return the next day to one which looks like it was sprayed with chemicals. Any other ideas???
Thanks
Where are the prints being dried? Is it only the ones that are dried there that get the pattern? Is there a chance that someone is coming in between classes and spraying something on the prints deliberately or accidentally? Yes, cynical, but I've seen all types. How well are the trays cleaned?
I'd really suggest a thorough cleanup of everything before the next printing session just to eliminate possibilities. Trays, easels, tongs, the whole lot.
This is just something that's extremely atypical for Ilford paper, so another cause is really more likely.
Dennis S
Subscriber
How secure is the paper when YOUR students are away from the darkroom? Too may students from other classes may NOT know how valuable paper really is and are doing different tests etc on other students paper. Eliminate the possibilities until you arrive at a solution to the problem. Of all the years doing drk/rm I have never ran into a problem with Ilford paper. A few things on the budget priced paper but that is to be expected. Sometimes you need to cut your losses and continue on your quest for a "perfect" print.
Agree it looks like contamination, regardless of the source. I suggest getting the students to make a print from another source of paper (say, a known-good box you have at home) and also taking the students' boxes to make a print in a different darkroom. At least that way you can at least decide that the two boxes of paper need to be chucked.
- Joined
- May 19, 2014
- Messages
- 3
- Format
- Medium Format
Thank you for all of the responses! The RC prints are dried in a drier and the Fiber prints are dried on typical mesh drying racks. Print face up. It was occurring on both wet and dry prints. I actually teach at a University and the semester is over, the student with the paper is gone, so I can't do any more tests with her paper, but will be more vigilant next semester. We did a darkroom clean up - the trays were only washed with soap. I tried photofinish multi-purpose non-toxic darkroom cleaner from freestyle and it was terrible. It left a white powdery film on everything. Any suggestions as to what to clean the trays with? I have another unrelated question. The safe lights in the darkroom are a mixture of 0a, 1a, and a dark red filter the maintenance department supplies for a few over head lights. (some are more read and others more orange). Does that make a difference? Thanks!
[h=1][/h]from freestyle, but it was terrible - it left a powdery film on everything.
[h=1][/h]from freestyle, but it was terrible - it left a powdery film on everything.
OP
OP
Sora - This is Scott Davis. The cleaner I was talking about when we originally discussed this at Glen Echo is called Sulfamic Acid - you can get it at Home Depot as "tile cleaner". It comes in a quart-sized plastic tub (probably the size you want - I think you can also get it in gallon buckets but that would be several lifetimes worth). Follow the directions on the container for mixing. It should get all your trays back to original white, along with removing any residue in your sink and on your countertops and even on your floors.
Occasional safelight tests are always a good idea.
I put a light exposure (enough to get a light grey when developed) on a couple pieces of paper -- then cut the paper into ~3" squares and label them with a sharpy 30sec, 1min, 1.5min, etc, to 5 minutes or so. I then lay them on a counter with a key or coin one them for the length of time written on the pieces of paper. I usually pick the place that seems to have the most light falling on it from the safelights.
Once the last one has been exposed to the safelights for the time written on it, I develop them all at once. If you can see the shadow caused by the key/coin, then that is past the limit that one can have paper out under the safelights safely. For example if one can barely see the outline of the key at 3.5 minutes, then the students should not have any paper laying around under the safelights for longer than 3 minutes.
Of course in a perfect world, one's safelights would be safe for any length of time -- but who is perfect?!
I stick all the washed/dried test pieces of paper on the bullentin board in the daylight portion of the photo lab so that the student can see what is going on in the dark.
Attention OP get rid of any safe light filter marked "OA" these are definitly NOT safe for use with modern printing paper, they were for use with slow emulsion contact paper such as Kodak Azo. Number 1a red filter is only for SLOW ortho products. You need either #2 red or "OC" filters. Do not mix safe light filter types stick to one color only.
Last edited by a moderator:
if budgsts are real tight, you can change the bulbs in the safe lights with the RED bulbs sold as safe-lights like http://www.freestylephoto.biz/12622-Halco-11-Watt-S14-Red-Safelight-Bulb but still using the Safe-light filter. The combination should give you only light that the paper does not "see".
Ideally you should replace the filters every few years with new OC or Ilford 902 filters. (Does Ilford still make filters?)
Ideally you should replace the filters every few years with new OC or Ilford 902 filters. (Does Ilford still make filters?)
I've never seen this with any paper but,to me, it looks lke it's in the negative not he print.
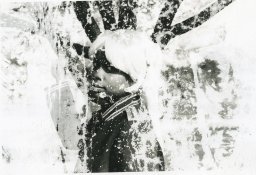
From the picture of the photograph which we have seen, the print damage appears to consist of blank areas on the print.
Therefore either those areas . . .
a) are not developed,
b) or they received massively less exposure,
c) or there is no sensitive emulsion on parts of the paper (caused either before, or during or after the processing??),
d) or some combination of the above,
e) or ??? Any other possible causes anyone can think of ???
Do a "Sherlock Holmes" to confirm or deny each possibility and you will have the result.
At least some of the red, low-wattage, decorative LED bulbs are paper-safe (I have a couple myself). They are also cheap enough to try a couple and test them on their own, in a corner of your darkroom with the other lights off - if they work adequately, then you have a useful and long-lived alternative safelight bulb. Note that not all papers are actually safe under an amber safelight so for a group darkroom, with almost any possible choice of material used from day to day, it will be better to choose a red light or filter - even though the illumination is a bit less "bright".
take some of that paper, and expose and develop elsewhere. Check a piece or two in daylight no developed. look for paper contamination or even mildew? Perhaps someone dropped a pack on the floor in the dark, picked it all back up, shuffled it all back together and put it back in the bag and box.
Oh -- Best safe light bar none for b/w is a thomas duplex. rebuild the filters with Rosco #19 fire, and some diffusion, and the outer filters with #27 red. Add some diffusion ( tissue paper is fine, Rosco diffusion is best. ) Been using them since the 70's and it just does not get better for b/w than this. You can read with these things. You can get em pretty cheap. New lamps are only about $35, and last a very long time.
Oh -- Best safe light bar none for b/w is a thomas duplex. rebuild the filters with Rosco #19 fire, and some diffusion, and the outer filters with #27 red. Add some diffusion ( tissue paper is fine, Rosco diffusion is best. ) Been using them since the 70's and it just does not get better for b/w than this. You can read with these things. You can get em pretty cheap. New lamps are only about $35, and last a very long time.
Last edited by a moderator:
| Photrio.com contains affiliate links to products. We may receive a commission for purchases made through these links. To read our full affiliate disclosure statement please click Here. |
PHOTRIO PARTNERS EQUALLY FUNDING OUR COMMUNITY:  |