Vandyke Brown problems

Dog Opposites

A
Dog Opposites

  • 2
  • 3
  • 110
Acrobatics in the Vondelpark

A
Acrobatics in the Vondelpark

  • 6
  • 4
  • 190
Finn Slough Fishing Net

A
Finn Slough Fishing Net

  • 1
  • 0
  • 107
Dried roses

A
Dried roses

  • 13
  • 7
  • 196
Hot Rod

A
Hot Rod

  • 5
  • 0
  • 117

Recent Classifieds

Forum statistics

Threads
197,468
Messages
2,759,533
Members
99,512
Latest member
vincent83
Recent bookmarks
0

awty

Subscriber
Joined
Jul 24, 2016
Messages
3,643
Location
Australia
Format
Multi Format
I keep losing my browns!!
They come out fine after I wash, nice rich brown, but as they dry they go dull grey.
Seem to be fine if I tone them in gold, but no brown at all.
I follow the Sandy King tutorial and have tried others. with no change.http://sandykingphotography.com/resources/technical-writing/vandyke
Any suggestions? Im using new fixer and hypo every session (just a few prints) all chemistry has been mixed by myself and is fresh.
Last time I washed for 30 minutes after hypo bath still went grey.
Im using Hahnemuhle 300 Platinum Rag. dont think there is any problem with the paper

First is vandyke brown with no tint (scan is more pink than print, but no brown), second is exact same process and development but with 1 minute in gold tone bath and is fine.
25 8 17 straight vandyke brown 678 b compressed.jpg 24 8 17 third gold toned 677 2 toned compressed.jpg
 

Herzeleid

Member
Joined
Oct 31, 2008
Messages
381
Location
Ankara/Turkey
Format
Multi Format
Clerc's thiourea toner gives neutral to purplish-blue tones depending on the toning duration. The color change is expected.
The second print looks bleached, do you use plain fixer or an alkaline fixer?
 
OP
OP
awty

awty

Subscriber
Joined
Jul 24, 2016
Messages
3,643
Location
Australia
Format
Multi Format
Clerc's thiourea toner gives neutral to purplish-blue tones depending on the toning duration. The color change is expected.
The second print looks bleached, do you use plain fixer or an alkaline fixer?
Thanks for your reply.
The first image is NO toner, just straight vandyke brown. The scanner made it look pinkish, I dont know how to digitally colour correct, but the print is a dull grey, no brown or pink. The second is the same process with 1 minute of gold tone, processed exactly the same as per sandy kings formula, NO bleach.
I use 50 grams of sodium thiosulfate per 1000ml for 3 minute bath and then 1 percent of hypo using sodium sulfite for 1 minute, then a 30 minute wash. I have used a few variations for no difference.
The problem Im having is the print is maintaining the brown of the print with out tinting. After the wash it is rich brown, then slowly turns grey as it dries. The gold tinted versions have no major difference after drying.
 

Herzeleid

Member
Joined
Oct 31, 2008
Messages
381
Location
Ankara/Turkey
Format
Multi Format
By bleach I meant the difference in the highlight details of each print. Second print lost some highlight detail, if you processed the prints in the same way.
Vandykes, argyrotpes, kallitypes and salt prints have quite delicate silver, images bleach in plain or acidic fixers. Alkalizing the fixer solves the problem.
Adding 2 grams of sodium carbonate per liter of your fixer will stop image bleaching. The duration, strength and the ph of fixing has an effect on brown tones.

%1 Sodium sulfite as hypo clear, also gives colder brown tones, but nowhere near dull grey. May be alkaline fixer would help with your problems.

Regards
Serdar
 
OP
OP
awty

awty

Subscriber
Joined
Jul 24, 2016
Messages
3,643
Location
Australia
Format
Multi Format
By bleach I meant the difference in the highlight details of each print. Second print lost some highlight detail, if you processed the prints in the same way.
Vandykes, argyrotpes, kallitypes and salt prints have quite delicate silver, images bleach in plain or acidic fixers. Alkalizing the fixer solves the problem.
Adding 2 grams of sodium carbonate per liter of your fixer will stop image bleaching. The duration, strength and the ph of fixing has an effect on brown tones.

%1 Sodium sulfite as hypo clear, also gives colder brown tones, but nowhere near dull grey. May be alkaline fixer would help with your problems.

Regards
Serdar
OK thanks I will try that......need to find or make some sodium carbonate.
 

cliveh

Subscriber
Joined
Oct 9, 2010
Messages
7,487
Format
35mm RF
Wash for about 5 minutes in a borax solution (about 2 tablespoonfulls in 20 litres of water). You may also try adding a 10% ammonia solution to your fixer bath.
 

jim10219

Member
Joined
Jun 15, 2017
Messages
1,634
Location
Oklahoma
Format
4x5 Format
OK thanks I will try that......need to find or make some sodium carbonate.
Check the local grocery stores for "washing soda". It's in the laundry detergent section. If you don't find it at your local grocery store, try one in an area with older or working class people.

Also, do you know the pH of your water? You might try a pet store or some place that sells fish food and pick up some pH test strips. If your pH is off, you can get all kinds of strange problems. I imagine having a bunch of iron in your water could effect it to, which is a common problem around here, especially for people on well water.
 
OP
OP
awty

awty

Subscriber
Joined
Jul 24, 2016
Messages
3,643
Location
Australia
Format
Multi Format
Hi Thanks for the suggestions.
I got some sodium carbonate from the pool shop, 2 kilograms should last a life time. In creased the fixing times to 5 minutes, long wash times and a few combinations. Still the prints are going from rusty red to dull grey over night. There isnt any bleaching.
Tried some Stonehenge paper (pre acidified bath), no difference, in fact it was worse.
Water should be pretty close to neutral as its town water (from a dam) and going through a sediment filter at home. Im a plumber
Only other thing I can think of is there might be something wrong with the emulsion, I mixed it myself and the scales werent the best. Ill try another batch.

Wash for about 5 minutes in a borax solution (about 2 tablespoonfulls in 20 litres of water). You may also try adding a 10% ammonia solution to your fixer bath.

Where do I use the borax solution?, before or after fixer.
 

Herzeleid

Member
Joined
Oct 31, 2008
Messages
381
Location
Ankara/Turkey
Format
Multi Format
May be there is something in the well water, that interacts with the chemistry. That is worth considering.
How old is your VDB sensitizer? How did you mix it?
 

cliveh

Subscriber
Joined
Oct 9, 2010
Messages
7,487
Format
35mm RF
Hi Thanks for the suggestions.
I got some sodium carbonate from the pool shop, 2 kilograms should last a life time. In creased the fixing times to 5 minutes, long wash times and a few combinations. Still the prints are going from rusty red to dull grey over night. There isnt any bleaching.
Tried some Stonehenge paper (pre acidified bath), no difference, in fact it was worse.
Water should be pretty close to neutral as its town water (from a dam) and going through a sediment filter at home. Im a plumber
Only other thing I can think of is there might be something wrong with the emulsion, I mixed it myself and the scales werent the best. Ill try another batch.


Where do I use the borax solution?, before or after fixer.

Before.
 

Dan Pavel

Member
Joined
Sep 11, 2017
Messages
219
Location
Constanta, Romania
Format
Multi Format
I have the same problem with the color of the latest VDB emulsions. I am very interested in what difference the borax will make.
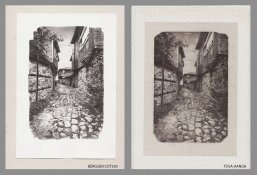
I've noticed that the paper makes a difference. You can see in the attached photo the same negative/emulsion/exposure on 2 different papers. One came out dull grey and one brownish, as expected.
The drying temperature could be another factor. Sometimes I dry-mount my VDBs made on very thin papers on other papers (as in the Sumi-e paintings dry mounting). This involves ironing them and they always become darker and more desaturated. I have to wet them after mounting and let them dry normally to recover. This was the case with the Tosa Hanga print in the attached photo, too.
Tosa Hanga - Bergger.jpg
 
Last edited:

MattKing

Moderator
Moderator
Joined
Apr 24, 2005
Messages
51,936
Location
Delta, BC Canada
Format
Medium Format
Welcome to APUG/PHOTRIO
Your VDB examples are both really nice!
 

nmp

Member
Joined
Jan 20, 2005
Messages
1,995
Location
Maryland USA
Format
35mm
Welcome to APUG/PHOTRIO
Your VDB examples are both really nice!
+1.

I notice a couple of things. The Cot320, in addition to being more neutral, is also sharper and more importantly having a brighter Dmin, i.e. there is no stain/fog as you can see in the Tosa paper. All the rest being equal, if so, I am guessing that the latter is buffered or rendered alkaline otherwise in manufacturing unlike Cot320 which is supposed to be un-buffered. If that is true, pre-acidifying the Tosa paper will reduce the stain. Or by perhaps increasing the tartaric acid content in the sensitzer? (Of course, that is not the problem you are asking about.) A good question would be what happens to the tint if you do that. Conversely, if you increase the alkalinity in Cot320 by using less tartaric acid or none, I wonder if it would become more brown (at the cost of possibility of introducing some fogging.)

Just thinking out loud...making some assumptions on the way.
 
Last edited:

jim10219

Member
Joined
Jun 15, 2017
Messages
1,634
Location
Oklahoma
Format
4x5 Format
You know, I didn't think about this before, but are you sizing the paper? I routinely size all of my papers with PVA size, usually a 50/50 mix (with water). Just one coat. I've done a few without size and never had the staining issue either way, but I find the sizing helps to keep things consistent. Plus the PVA size is pretty easy to use. It might be worth considering.

If that doesn't do it, then I'd definitely try a run with distilled water. Use it for mixing your chemicals and developing. The best way to solve a problem is to define it first, and it might be wise to try a different water source to see if that's the culprit. Plus, distilled water is easy to find and not terribly expensive (though would be a bit of a hassle to use, but wouldn't be too bad for a one time test).
 

Dan Pavel

Member
Joined
Sep 11, 2017
Messages
219
Location
Constanta, Romania
Format
Multi Format
Welcome to APUG/PHOTRIO
Your VDB examples are both really nice!
Thank you.

The Tosa paper should be neutral, it's advertised as PH7, it was pre-washed and dried and I added some Citric Acid in the developing (demineralizated) water of both papers...

I don't think is much stain in the Tosa print. The paper itself is not completely white, but it has its natural color. This could be misleading. The white paper around the print is the Kadi paper on which I mounted the Tosa. The sensitiser was only brush-applied where the image was formed (and a bit of-sides but with un-sensitized corners) and the stain should only appear within the image or a bit of-sides compared with the color of the paper.

Sizing the paper sound interesting. I use to size some of the thin Japanese papers with 2 layers of a diluted Gelatine+Alaun size to reduce their absorbance but the Tosa paper in my example is un-sized (only pre-washed). As it is excedently absorbant I intend to size it for the next prints.
However, I have never used the PVA size for VDB prints. I'll give it a try.
Does it substantially reduce the paper absorbance? Is it completely transparent?
The gelatine size usually increases the exposure time (with my UV source from 2-2,5 min. to 5-7 min). Does the PVA size need longer exposures, too?
 
Last edited:
OP
OP
awty

awty

Subscriber
Joined
Jul 24, 2016
Messages
3,643
Location
Australia
Format
Multi Format
Thank you.

The Tosa paper should be neutral, it's advertised as PH7, it was pre-washed and dried and I added some Citric Acid in the developing (demineralizated) water of both papers...

I don't think is much stain in the Tosa print. The paper itself is not completely white, but it has its natural color. This could be misleading. The white paper around the print is the Kadi paper on which I mounted the Tosa. The sensitiser was only brush-applied where the image was formed (and a bit of-sides but with un-sensitized corners) and the stain should only appear within the image or a bit of-sides compared with the color of the paper.

Sizing the paper sound interesting. I use to size some of the thin Japanese papers with 2 layers of a diluted Gelatine+Alaun size to reduce their absorbance but the Tosa paper in my example is un-sized (only pre-washed). As it is excedently absorbant I intend to size it for the next prints.
However, I have never used the PVA size for VDB prints. I'll give it a try.
Does it substantially reduce the paper absorbance? Is it completely transparent?
The gelatine size usually increases the exposure time (with my UV source from 2-2,5 min. to 5-7 min). Does the PVA size need longer exposures, too?

They are great pictures Dan. VDB works really well if you have the content for it.
Im going to try some new chemicals to to see what that does, an expert has told me chemistry is not always created equal and they were saying the tartaric acid can be problematic.
Also make sure your doing long wash times, the fixer takes a lot to get rid of.
Someone also gave me a formula of using 1 or 2 drops of 1% gold in the sensitiser,4 or more 5% citric acidic baths after a initial demineralised bath , then 10% thiosulphate fixer then hypo then a long wash of 60mins. you need to increase exposure to not bleach to much, but it does have a sharper image with more depth.
If I manage to sort my problem I will let you know.
 

Dan Pavel

Member
Joined
Sep 11, 2017
Messages
219
Location
Constanta, Romania
Format
Multi Format
Thank you Paul.
I am very curious of the result you'll get by adding Gold/Thiourea in the sensitizer. Thanks for sharing your findings.

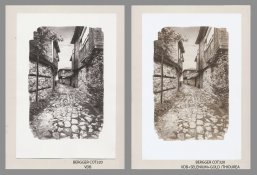
In the meantime I've managed to get back some color in my COT320 print by toning it in a very diluted Selenium toner followed by a 20 min. wash and a second ~1,5min. toning in an 1/2 diluted Gold/Thiourea toner with a final wash.
It is not the usual VDB color but it's not bad either.
COT320 VDB-Toner.jpg
 

nmp

Member
Joined
Jan 20, 2005
Messages
1,995
Location
Maryland USA
Format
35mm
Thank you Paul.
I am very curious of the result you'll get by adding Gold/Thiourea in the sensitizer. Thanks for sharing your findings.

In the meantime I've managed to get back some color in my COT320 print by toning it in a very diluted Selenium toner followed by a 20 min. wash and a second ~1,5min. toning in an 1/2 diluted Gold/Thiourea toner with a final wash.
It is not the usual VDB color but it's not bad either.
View attachment 186659

Dan:

It came out real nice! Weird though...if you asked me which one is toned and which one is not without the labels, I would have picked the reverse.

The toned print has lower contrast with highlights down a bit, but the border came out whiter. Is this scanning artifact or something else?

:Niranjan,
 

Dan Pavel

Member
Joined
Sep 11, 2017
Messages
219
Location
Constanta, Romania
Format
Multi Format
Thanks Niranjan!
The border came out whiter because in the second scan I've checked my icc calibration profile (Vuescan) and in the first I forgot to do it. Sorry for that.

Probably the white highlights never are in fact pure white and the diluted gold toner acted stronger upon them first.
The COT320 paper is sensitized on the rough side and not on the front, sized side and this could count, too. I am not sure what happens...

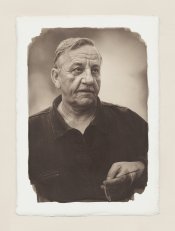
But it's not the first time it happens with this type of double-toning. Look at the attached, older VDB print on Fabriano Artistico which was toned exactly in the same way - there is hardly any white in it after toning.
I've toned the "Old Street View" in the way I did having it in mind.
Papy.jpg
 
Last edited:

nmp

Member
Joined
Jan 20, 2005
Messages
1,995
Location
Maryland USA
Format
35mm
Another great print! I love what you do with the edges of the image. How do you do that, by the way? (If you don't mind sharing.)

My earlier question was more to do with the area immediately outside the image. Why did that area become whiter while the highlights in the image itself became darker. Was there any sensitizer there? Then outside margin which remains the same off-white color is a board that you put over the print while scanning, is that it?

:Niranjan.
 

Dan Pavel

Member
Joined
Sep 11, 2017
Messages
219
Location
Constanta, Romania
Format
Multi Format
Thanks Niranjan!
I use a soft brush to sensitize the paper and I usually pass the brush 3-4 times in the middle of the image but on the edges and in the corners I try not to come back and not to apply much pressure. I first draw the rectangle of the picture on the paper and only carefully sensitize inside it. After I make the exposure I wipe with a rubber this rectangle. If you try to wipe it after processing the image it's much harder and marks may remain..

No, there is no sensitizer on the white border and yes, the of-white outside border is a board for scanning. But in the second picture I didn't used it and I just copy-pasted the second picture on a copy of the board already saved on my HD. That's why it doesn't leave shadows.
Now I can't re-scan the first image with the icc profile applied, but the whites in it, including the white area outside the image, should have been whiter, just like the white margin in the second picture. The COT320 paper is quite white.
 
Last edited:

NedL

Subscriber
Joined
Aug 23, 2012
Messages
3,368
Location
Sonoma County, California
Format
Multi Format
...
I first draw the rectangle of the picture on the paper and only carefully sensitize inside it. After I make the exposure I wipe with a rubber this rectangle. If you try to wipe it after processing the image it's much harder and marks may remain...

Not to take your thread off on too much of a tangent, but I'd love to find a better way to do this. I only use a tiny pencil dot at each corner, and often I can't remove them without damaging the surface of the paper. Probably worth it's own thread... I'll make one.

Edit: Here it is:
https://www.photrio.com/forum/index.php?threads/temporary-markings-on-prints.153851/
 
Last edited:
Photrio.com contains affiliate links to products. We may receive a commission for purchases made through these links.
To read our full affiliate disclosure statement please click Here.

PHOTRIO PARTNERS EQUALLY FUNDING OUR COMMUNITY:


Ilford ADOX Freestyle Photographic Stearman Press Weldon Color Lab Blue Moon Camera & Machine
Top Bottom