Van Dyke Prints - white marks on paper

Recent Classifieds

Forum statistics

Threads
199,072
Messages
2,785,838
Members
99,795
Latest member
VikingVision
Recent bookmarks
0

lostfocus

Member
Joined
Mar 30, 2009
Messages
5
Format
Pinhole
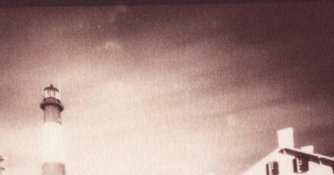
I've just started doing Van Dyke prints and have been progressing steadily with one exception. I keep getting these white marks on my prints - see attached photo. I've tried extending the wash times and it hasn't helped. I've tried extending the clearing time and it hasn't helped. I've tried switching out the clearing bath (acetic acid and it hasn't helped). I don't always get the marks - maybe 60% of the time.

Perhaps someone who knows more than me can give me a clue??

Here's my process as it stands right now:

Double coated Stonehenge rising - 20 drops sensetizer plus one drop Potassium dichromate for each layer. 3 hours drying (approx) inbetween coats and before printing.

Exposed under UV for 12 to 25 minutes.

3 clearing baths - 2 liters of water plus 4 teaspoons (approx) acetic acid in each. 1st bath thrown away and replaced every 2nd print. It now becomes
3rd bath.

Wash in running water for 10 minutes

Fix - 750 ml water plus 50gm sodium thiosulphate - 2 minutes - at this point I can already see the marks.

Wash for 5 minutes

Tone Rapid selenium toner 500ml water plus 2ml toner - for 2 minutes

Wash for 30 minutes in running water.


Thanks for your help
 

Attachments

  • VDB2.jpg
    VDB2.jpg
    64.4 KB · Views: 222

Loris Medici

Member
Joined
Sep 13, 2005
Messages
1,154
Location
Istanbul, Tu
Format
Multi Format
Seems like uneven sensitizing to me. How do you apply the second coat? (Hint: Are the marks show up exactly where you pour the second coating mix?)
a. Try to include a non-ionic surfactant in the coating mix (tween or... ilfosol maybe) for better absorption.
BTW, 3h between coatings seems excessively long:
b. (And/or) Try to apply the second coating right after the paper surface looses shine and become matte. (The paper should be wet but with no sensitizer pooling.)
c. Change paper.

Try a and/or b and/or c and see what happens.

Hope this helps,
Loris.

P.S.1. 50g in 750ml fixer is a little bit on the strong side: 2 minutes in 2% is enough.
P.S.2. Selenium is not the best toner for Vandyke -> try gold or platinum or palladium before fixing; those are much much better...
 

Don12x20

Member
Joined
Jan 18, 2006
Messages
249
Location
Pacific North
Format
Multi Format
Looks like "finger tips" to me -- is it possible that are you something from your hands onto the prints before development? Are you wearing gloves all the time and cross contaminating surface before development?

or paper problems or variance in coating?
 
Joined
Aug 20, 2006
Messages
211
Format
Medium Format
Seems like uneven sensitizing to me.
i think so too.
even though i don't have much experience with vandyke, i think i've noticed that the (slight) bleaching action of the fixing bath accentuates these imperfections. i've had marks and blotches appear in the fix too.
i think this is because of an increase in contrast.

maybe toning, a weaker fix or some more generous coating could be of help.
 

snallan

Member
Joined
Sep 28, 2007
Messages
518
Location
Cambridge, U
Format
Multi Format
Also agree with the above.

If you are handling and preparing the paper with bare hands, any contact may leave traces of oils from your skin on the paper. These oily spots preventing the sensitizer from properly penetrating the paper fibres in that area, leading to loss of image metal during processing.

Or the paper just needs a little help to ensure the sensitizer gets absorbed, so adding a drop of dilute surfactant helps the coating process.

So. If you do not wear gloves, get some and wear them during all handling of the paper prior to and during sensitisation. Then if that does not work (or you already wear gloves), try adding some non-ionic surfactant to the prepared sensitiser you are about to apply.

If neither of those work, then it is time for another paper.
 

Loris Medici

Member
Joined
Sep 13, 2005
Messages
1,154
Location
Istanbul, Tu
Format
Multi Format
Yes, fingerprints and/or contamination also could be the cause of the problem.

Just wanted to mention that not always you get image loss; for instance, with Masa paper and traditional cyanotype I get stronger image where I touch the paper! Puzzling... Anyway, you somehow get image loss or insensification (therefore uneven sensitizing) when you touch the image area while handling the paper. So, avoid it.

Stonehenge as I know it should be a good paper for Kallitypes and Vandykes, but I have quite old stock on hands (> 5 years). Maybe the paper have changed since I last purchased it???

I think you'll definitely find the remedy. We have all supplied good hints/suggestions. I never ever got such marks in my practice. Please return back to us if you manage to sort out the problem.

Regards,
Loris.

P.S. Change "ilfosol" to "ilfotol" in my first message. That was a typo...


If you are handling and preparing the paper with bare hands, any contact may leave traces of oils from your skin on the paper. These oily spots preventing the sensitizer from properly penetrating the paper fibres in that area, leading to loss of image metal during processing.
...
 
OP
OP

lostfocus

Member
Joined
Mar 30, 2009
Messages
5
Format
Pinhole
Thank you everyone for your help. I think you are onto something here. When I bought the paper I purchased large sheets and chopped it up by hand with no gloves on.

I'll buy some more (in a pad) and wear gloves while handling it. Then if that doesn't work I'll try a drop of tween.
Gold toner - yes, I have some waiting to be used and I'll cut down on the sodium thiosulphate in the fixing bath.

But I'll start with the paper. I want to be sure of the results before I start messing with the rest.

Thanks again
 

Loris Medici

Member
Joined
Sep 13, 2005
Messages
1,154
Location
Istanbul, Tu
Format
Multi Format
Good luck!

BTW, I must insist that your waiting time (approx. 3h) is too much for double coating. Just do it as I described; you'll gain a lot of time + the second coating will go very smoothly thanks to the paper's very relaxed fibers. (OTOH, be gentle: the surface is much more delicate when moist/wet!)

A last note: As a rule of thumb start with using 0.2ml sensitizer per 10 sq in. Work out the correct amnt. of sensitizer for your coating method/style/speed ect. from there. You need a sensitizer amnt. that is plenty enough to coat the given area (without hurry!), but also not too much to cause pooling and force you to overbrush...
 
OP
OP

lostfocus

Member
Joined
Mar 30, 2009
Messages
5
Format
Pinhole
Thanks Loris,

I'm going to try your suggestion too. This means that I won't have to wait 6 hours before I can start printing!
I always assumed that it would have to be completely dry before the 2nd coat went on.
 

Loris Medici

Member
Joined
Sep 13, 2005
Messages
1,154
Location
Istanbul, Tu
Format
Multi Format
Actually Vandyke (as all other iron processes) is pretty sensitive to humidity level in the paper; if your environment is not too humid odds are that you'll notice an increase in the speed of the emulsion too. (I mean if you don't wait that much. All iron processes except for pure platinum printing more humidity gives you more speed. It's the other way around with pure platinum printing.) My usual practice was double coating within 5-10 minutes, wait until the paper is surface dry (not completely dry!) and print that way. IIRC, the whole operation (coating + exposure, not processing!) was taking no more than 30-35 minutes... (I don't do Vandykes since maybe 4-5 years; I almost exclusively do gums or gumover cyanotypes - and pd, occasionally - now.)
 

Jim Noel

Member
Joined
Mar 6, 2005
Messages
2,261
Format
Large Format
I never double coat VDB when using Stonehenge. My paper is from the old mill and I understand the newer stuff is different and many do not like it.
I agree the streaks have to do with fingerprints.
Your exposure times seem excessive. Are your negatives that dense or is your printing frame too far from the UV source? Tests as spelled out in the Post Factory Journal indicate that with UV fluorescent tubes essentially no separation between the frame and the tubes is necessary. Mine are approximately 1/2" and do not produce banding.
 
OP
OP

lostfocus

Member
Joined
Mar 30, 2009
Messages
5
Format
Pinhole
Exposure times are usually along the lines of 13 minutes. The drop of 2%Potassium Dichromate makes the exposure longer than it would be without it but gives it a nice contrast boost.

Exposure is by BLB flourescent spirals - 60 w equivalent. I have six of them. They are about 3 inches from the paper, set close together. The exposure is even and consistant.

I started double coating because I wasn't getting good density in the shadows. One coat for me looks washed out but I understand that everyone's process is slightly different - depending on, well, every other variable.
 

Loris Medici

Member
Joined
Sep 13, 2005
Messages
1,154
Location
Istanbul, Tu
Format
Multi Format
Lostfocus, just drop the practice of adding dichromate into the coating solution; see this for an effective method of contrast control:

Dead Link Removed
(Thanks much to Liam Lawless and Sandy King for researching/testing and making this information available.)

BTW, I would try to find ways to increase the negative DR instead of fiddling with the emulsion formulation; Vandyke works best unaltered.

Regards,
Loris.
 
OP
OP

lostfocus

Member
Joined
Mar 30, 2009
Messages
5
Format
Pinhole
Thanks,

I'll have to try that. Right now I'm using premixed solution from Bostick and Sullivan.
 
Photrio.com contains affiliate links to products. We may receive a commission for purchases made through these links.
To read our full affiliate disclosure statement please click Here.

PHOTRIO PARTNERS EQUALLY FUNDING OUR COMMUNITY:


Ilford ADOX Freestyle Photographic Stearman Press Weldon Color Lab Blue Moon Camera & Machine
Top Bottom