• Welcome to Photrio!
    Registration is fast and free. Join today to unlock search, see fewer ads, and access all forum features.
    Click here to sign up

Vacuum print easel for RC paper

Recent Classifieds

Forum statistics

Threads
201,724
Messages
2,829,141
Members
100,916
Latest member
mikenickmann99
Recent bookmarks
0

Robin Guymer

Member
Allowing Ads
Joined
Mar 27, 2017
Messages
204
Location
Melbourne Australia
Format
35mm
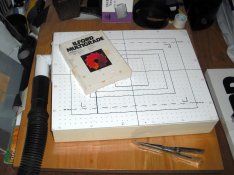
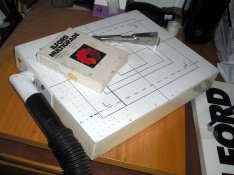
I have not been happy with the easels I have for using multigrade RC paper. I don't like the white border and prefer the print to cover all the paper when possible. This base board is the best thing I have made for my darkroom. Using 42x19mm (2x1) pine I made a frame the size of my current base board with a centre support. Under this I fixed a sheet of thin ply and on top fixed a sheet of composite white laminate. An old battery vacuum cleaner is used (its usually on the floor) and these already have a hole to attach a pipe to. It's a bit noisy to use but the 10x8 print sits perfectly flat and the end result is a print with no borders. The smooth surface of the laminate is perfect for keeping the smaller size paper flat just by wiping it damp under the paper first and flattening down. Unfortunately it does not hold down FB paper - I'd need a Dyson for that!

vacuum board.jpeg
 

Steve Roberts

Member
Allowing Ads
Joined
Oct 12, 2004
Messages
1,302
Location
Near Tavisto
Format
35mm
A very neat job, Robin. I made something similar a few years ago. My version also has a wooden frame, but the top surface is of 1/8th in. thick aluminium with a central support, then sprayed white with automotive paint. My frame takes prints up to 12" x 10". Over the years I've gradually added markings for the various sizes I print. The strange slightly portrait format is for stereo prints for a Holmes viewer. As you can see, I went to town with the holes! I made a steel flange and welded a piece of pipe to it to give the right angle vacuum connection. The flexi pipe runs under the darkroom bench and up into the loft, where the vacuum cleaner lives and is controlled by a mains switch in the darkroom. As you say, one of the most useful pieces of darkroom kit I've ever made.
Best wishes,
Steve
 

Attachments

  • Easel2.jpg
    Easel2.jpg
    1.7 MB · Views: 539
  • Easel3-002.jpg
    Easel3-002.jpg
    705.6 KB · Views: 664
OP
OP
Robin Guymer

Robin Guymer

Member
Allowing Ads
Joined
Mar 27, 2017
Messages
204
Location
Melbourne Australia
Format
35mm
A very neat job, Robin. I made something similar a few years ago. My version also has a wooden frame, but the top surface is of 1/8th in. thick aluminium with a central support, then sprayed white with automotive paint. My frame takes prints up to 12" x 10". Over the years I've gradually added markings for the various sizes I print. The strange slightly portrait format is for stereo prints for a Holmes viewer. As you can see, I went to town with the holes! I made a steel flange and welded a piece of pipe to it to give the right angle vacuum connection. The flexi pipe runs under the darkroom bench and up into the loft, where the vacuum cleaner lives and is controlled by a mains switch in the darkroom. As you say, one of the most useful pieces of darkroom kit I've ever made.
Best wishes,
Steve

That is awesome Steve. Great idea to move the vacuum out of the room. Using this system makes it so easy to line up the negative enlarged to the print size. I'll be expanding my range of holes and sizes too.
Cheers.
 

Paul Howell

Subscriber
Allowing Ads
Joined
Dec 23, 2004
Messages
10,088
Location
Scottsdale Az
Format
Multi Format
Good thinking, I have a vacuum easel, well 2, a 11X14 and 16X20, I dont have much trouble with RC in a standard easel, but do use it when I print color, single wt FB paper, my motor is not strong enough to hold double wt paper down.
 

DREW WILEY

Member
Allowing Ads
Joined
Jul 14, 2011
Messages
14,854
Format
8x10 Format
I've made numerous vac easels, both small and clear up to 30X40 inch. I recommend somewhat smaller holes, about 3/32" in diameter, and more of them. And you don't need too much vacuum draw; even a basic handheld cordless vacuum will do it. Looks like you're on the right track; but it's best to connect the easel to the vac via a long hose to a spot more remote to avoid stirring up dust and isolating the noise too.
 

Jim Jones

Member
Allowing Ads
Joined
Jan 16, 2006
Messages
3,740
Location
Chillicothe MO
Format
Multi Format
I drilled and beveled small holes on a 1/2 inch grid in thin laminated plywood for a 11x14 vacuum easel. Raised ledges on two adjacent sides provided quick repeat positioning of paper. Internal bracing prevented focus shift from the vacuum. Remotely controlling the ancient vacuum cleaner in another room was planned, but the darkroom burned down first.
 

Mick Fagan

Subscriber
Allowing Ads
Joined
Sep 13, 2005
Messages
4,434
Location
Melbourne Au
Format
Multi Format
I too have used quite a few vacuum easels, mainly for exposing film, but also for fibre based paper, really keeps things dead flat.

Masonite makes a good base material as it is pressed flat, fine sanding after drilling will flatten the imperfections.

I agree with Drew, much smaller holes and lots more of them, very much like Steve Roberts posted. I would suggest you entertain the thought of using 2mm or 2.5mm sized holes. You could try 2mm first then if not right, enlarge them to 2.5mm.

A series of masks to close off the unused holes will also greatly help, or use removable painters tape tape to block the unused holes.

Mick.
 
OP
OP
Robin Guymer

Robin Guymer

Member
Allowing Ads
Joined
Mar 27, 2017
Messages
204
Location
Melbourne Australia
Format
35mm
So I have implemented your suggestions and my vacuum board is working very well. No need to mask the other holes when doing smaller prints as that little old battery vacuum has plenty of suction and it works better if there is some extra airflow to it.

However as "every day is for learning" I have found that Ilford Cooltone RC paper does not like a white vacuum board. I was getting yellow stained edges which has not happened with other Ilford Pearl or Gloss papers. Developer and Fix were fresh but not the Stop so I replaced it. But still same problem. Searched Photrio and found someone had a similar problem and one of the suggestions was to paint the board yellow. So I placed yellow painters masking tape around the outside edges for the next print and that worked a treat. Looks like the vacuum board will be getting a yellow paint job.
 

mklw1954

Member
Allowing Ads
Joined
Dec 2, 2009
Messages
397
Location
Monroe, NY
Format
Medium Format
I admire your efforts on the homemade vacuum easel. I also do not like print borders but use 8x10 and 11x14 Beseler and Saunders borderless easels; they work great. I only use RC paper and do not have a problem with flatness as I bend the paper against its curvature a little before placing it in the easel.
 
Photrio.com contains affiliate links to products. We may receive a commission for purchases made through these links.
To read our full affiliate disclosure statement please click Here.

PHOTRIO PARTNERS EQUALLY FUNDING OUR COMMUNITY:


Ilford ADOX Freestyle Photographic Stearman Press Weldon Color Lab Blue Moon Camera & Machine
Top Bottom