

Here is a tutorial on how to make a pattern for camera bellows. I'm using a Konica Pearl III as an example which I'm in the process of restoring.
You'll need a few measurements from your camera and from the previous bellows if you have them.
1. Rear frame inside opening. 59X45mm.
2. Front frame inside opening. 34x34mm. I used the diameter of the lens hole and made it a bit bigger.

3. Fold pattern. This can be tricky to measure on the old bellows. The pattern in the Konica is variable in order to a) reduce the number of folds while preserving extension length; b) change the bellows taper angle to help insertion when folded; c) obtain a specific attachment width at the mounting points. You check the length of the fold pairs ("in" fold + "out" fold). I went with 8 folds with alternating widths: 1x10mm + 4x12mm + 3x10mm = 88mm. This dimension corresponds to the common corner of the four sides of the bellows. You could also use a 2-3-3 pattern at 86mm. You should also check the distance between mounting frames (when erected) and use a bellows factor of ~40%. Here this distance is 61mm, and times 1.4 is 85.4mm which is close to the above values. If you don't have the original bellows use this measurement to guide your fold pattern. On cameras with fewer constraints a constant pattern should work.
4. Space for bellows. Distance between mounting frames when the camera is folded. About 8mm here. With 8 folds this gives a maximum bellows material thickness of 8mm/(2x8)=0.5mm. Better to use something a bit thinner especially if your replacement material is stiffer than the original.
The bellows pattern consists of three parts.
1. The fold “zigzag”. Draw right isosceles triangles with a base equal to the fold length, height half that, right angle on top. Repeat to match the design.
2 and 3. The bellows sides. Isosceles trapezoids with bases equal to the frame openings and sides equal to the common corner.

To assemble the pattern.
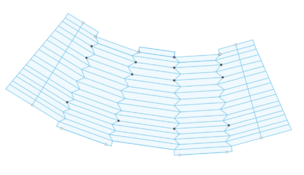
1. Bring the trapezoids on each side of the zigzag as shown below. There is a specific L/R arrangement to match the original bellows but I don't think that it makes a difference. Align with the smaller peaks of the zigzag (on the right).

3. That's it for the most part! Add a flap on the top left section and complete the bottom of the right section. Now mirror the pattern based on the centreline of the right section, then mirror the result via the centreline of the left section. Add all the fold lines. You should also add centrelines on both ends for alignment when joining.

Here are my bellows. Added arched flaps on top and one of the centreline should be extended to aid alignment. Tested it using paper and it works fine. But finding the correct material has been very difficult and I'm not sure what works. I have no room for a liner. You first bond both ends making a cone, then start folding from the top or bottom. The first folds are the trickiest to make. Follow all the lines closely or the bellows will be crooked.

You'll need a few measurements from your camera and from the previous bellows if you have them.
1. Rear frame inside opening. 59X45mm.
2. Front frame inside opening. 34x34mm. I used the diameter of the lens hole and made it a bit bigger.
3. Fold pattern. This can be tricky to measure on the old bellows. The pattern in the Konica is variable in order to a) reduce the number of folds while preserving extension length; b) change the bellows taper angle to help insertion when folded; c) obtain a specific attachment width at the mounting points. You check the length of the fold pairs ("in" fold + "out" fold). I went with 8 folds with alternating widths: 1x10mm + 4x12mm + 3x10mm = 88mm. This dimension corresponds to the common corner of the four sides of the bellows. You could also use a 2-3-3 pattern at 86mm. You should also check the distance between mounting frames (when erected) and use a bellows factor of ~40%. Here this distance is 61mm, and times 1.4 is 85.4mm which is close to the above values. If you don't have the original bellows use this measurement to guide your fold pattern. On cameras with fewer constraints a constant pattern should work.
4. Space for bellows. Distance between mounting frames when the camera is folded. About 8mm here. With 8 folds this gives a maximum bellows material thickness of 8mm/(2x8)=0.5mm. Better to use something a bit thinner especially if your replacement material is stiffer than the original.
The bellows pattern consists of three parts.
1. The fold “zigzag”. Draw right isosceles triangles with a base equal to the fold length, height half that, right angle on top. Repeat to match the design.
2 and 3. The bellows sides. Isosceles trapezoids with bases equal to the frame openings and sides equal to the common corner.
To assemble the pattern.
1. Bring the trapezoids on each side of the zigzag as shown below. There is a specific L/R arrangement to match the original bellows but I don't think that it makes a difference. Align with the smaller peaks of the zigzag (on the right).
3. That's it for the most part! Add a flap on the top left section and complete the bottom of the right section. Now mirror the pattern based on the centreline of the right section, then mirror the result via the centreline of the left section. Add all the fold lines. You should also add centrelines on both ends for alignment when joining.
Here are my bellows. Added arched flaps on top and one of the centreline should be extended to aid alignment. Tested it using paper and it works fine. But finding the correct material has been very difficult and I'm not sure what works. I have no room for a liner. You first bond both ends making a cone, then start folding from the top or bottom. The first folds are the trickiest to make. Follow all the lines closely or the bellows will be crooked.
Attachments
Last edited:
