Turning Slices into new separate TIFF documents in Photoshop

Takatoriyama

D
Takatoriyama

  • 4
  • 1
  • 61
Tree and reflection

H
Tree and reflection

  • 2
  • 0
  • 59
CK341

A
CK341

  • 3
  • 0
  • 68
Plum, Sun, Shade.jpeg

A
Plum, Sun, Shade.jpeg

  • sly
  • May 8, 2025
  • 3
  • 0
  • 96
Windfall 1.jpeg

A
Windfall 1.jpeg

  • sly
  • May 8, 2025
  • 7
  • 0
  • 78

Recent Classifieds

Forum statistics

Threads
197,622
Messages
2,762,067
Members
99,423
Latest member
southbaybrian
Recent bookmarks
0

fabulousrice

Member
Joined
Mar 19, 2020
Messages
449
Location
Los Angeles
Format
35mm
Sometimes when I scan photographic film, I scan the whole strip especially if the distinction between each frame isn't clear.

fzyhvh96.png


Or there is a contact sheet situation where several photos were scanned together.

MdDQU5pB.jpg


I want to be able to create slices around each image but I want to have them open in a new document and edit them before I save them to file.
It seems that exporting to file through Export for Web would only allow PNG but I'd rather keep Tiff. It's also extremely cumbersome/long.

Is it possible to:
-select several areas in an image and have each area open into new documents?
or
-select several areas in an image and have the selected areas be saved as a lossless TIFF quickly?
 

koraks

Moderator
Moderator
Joined
Nov 29, 2018
Messages
20,978
Location
Europe
Format
Multi Format
Following this with interest. I thought about this recently and I'm considering writing a Python script to do it. However, I've not tried it, yet. There's no function in GIMP AFAIK that'll do this. Maybe it can be scripted though. Maybe someone already has...
 

dokko

Member
Joined
Oct 4, 2023
Messages
326
Location
Berlin
Format
Medium Format
there are several ways how to do this, photoshop is probably not the most elegant/fastest program to do it, but if you're committed to that, here are two ideas:

copy paste method:
- set the selection tool to a fixed size so it fits one frame with the resolution of your scan.
- click on the strip (it will create a selection rectangle with your chosen size)
- move it to surround the first image
- copy the selection (using keyboard shortcut command-C or windows equivalent)
- create a new image (command-N)
- paste (command-V)
- merge layers if necessary (command-E)
- save new image (command-S)
- close image (command-W)
- repeat with the next frame

duplicate and crop method:
- duplicate the source strip as many times as there are frames in it before hand
- open the first strip in photoshop
- set the crop tool to a fixed size so it fits one frame with the resolution of your scan.
- click on the strip (it will create a selection rectangle with your chosen size)
- move it to surround the first image
- confirm crop (hit enter)
- save the cropped image (command-S)
- close image (command-W)
- repeat with the next duplicated strip.

you could probably automate this partly in a photoshop action.
 
OP
OP
fabulousrice

fabulousrice

Member
Joined
Mar 19, 2020
Messages
449
Location
Los Angeles
Format
35mm
Got Vuescan?

I am not trying to scan my photos one by one with a scanning app, as this would take incommensurably more time and effort (hence why I scan the whole strip as an uncompressed TIFF).
Besides, Epson Scan is far superior in user experience when defining several scanning areas on the scanner's table and launching successive scanning than VueScan, in my experience (as of today, I still do not think there exists a process for VueScan users on a Mac to select several areas and then have vuescan scan them all one after another successively). Happy to be proven wrong if your workflow patches my gaps!
 
OP
OP
fabulousrice

fabulousrice

Member
Joined
Mar 19, 2020
Messages
449
Location
Los Angeles
Format
35mm
there are several ways how to do this, photoshop is probably not the most elegant/fastest program to do it, but if you're committed to that, here are two ideas:

copy paste method:
- set the selection tool to a fixed size so it fits one frame with the resolution of your scan.
- click on the strip (it will create a selection rectangle with your chosen size)
- move it to surround the first image
- copy the selection (using keyboard shortcut command-C or windows equivalent)
- create a new image (command-N)
- paste (command-V)
- merge layers if necessary (command-E)
- save new image (command-S)
- close image (command-W)
- repeat with the next frame

duplicate and crop method:
- duplicate the source strip as many times as there are frames in it before hand
- open the first strip in photoshop
- set the crop tool to a fixed size so it fits one frame with the resolution of your scan.
- click on the strip (it will create a selection rectangle with your chosen size)
- move it to surround the first image
- confirm crop (hit enter)
- save the cropped image (command-S)
- close image (command-W)
- repeat with the next duplicated strip.

you could probably automate this partly in a photoshop action.

I take your answer into consideration, your first suggestion is to be the most obvious way to do this and is painstakingly time taking. It's how I've been doing it for now and what I am trying to automate using the Slices tool (or any other method if anyone has an idea).

Right now I am either creating slices and going into Export for Web > PNG Save > All Slices but this is very long, there is a "Image exceeds the size Save for web was designed for" dialog I need to bypass each time, and usually results in the computer spinning beach balling, and creates a few more image slices than I asked for.

Your second solution is smart, but I am afraid it would take the same amount of steps, especially taking into consideration the fact that it would lead to more errors and be risky if after you are done with photoshop you realize you have a duplicate image and therefore one image is now gone and needs to be rescanned.
It's 2024, so I am hoping we can find a way to automate this in either a popular program like photoshop or in an open source program like gimp or blender...
 

dokko

Member
Joined
Oct 4, 2023
Messages
326
Location
Berlin
Format
Medium Format
It's 2024, so I am hoping we can find a way to automate this in either a popular program like photoshop or in an open source program like gimp or blender...

actually a good video compositing app will be your best choice if you're willing to put in the time to learn them.

Blender will likely be able to do it elegantly considering its power (I only have very little experience with it).
If it were me I would use Fusion or After Effects (since I already know my way around there), which would allow to set up a much faster workflow.
 
OP
OP
fabulousrice

fabulousrice

Member
Joined
Mar 19, 2020
Messages
449
Location
Los Angeles
Format
35mm
actually a good video compositing app will be your best choice if you're willing to put in the time to learn them.

Blender will likely be able to do it elegantly considering its power (I only have very little experience with it).
If it were me I would use Fusion or After Effects (since I already know my way around there), which would allow to set up a much faster workflow.

I hadn't thought of that! I'm an expert After Effects user but I'm not sure how I would streamline the export of a selection - would you elaborate? I might go with your solution until I find a better one...
 

dokko

Member
Joined
Oct 4, 2023
Messages
326
Location
Berlin
Format
Medium Format
I hadn't thought of that! I'm an expert After Effects user but I'm not sure how I would streamline the export of a selection - would you elaborate? I might go with your solution until I find a better one...

the first approach I would take is to set up a main comp (main_comp) with your full strip, then put that as a pre-comp into 6 separate comps (image_1 to image_6) with the size of one image each (size of what we called the selection so far), and position the main_comp in each of those so that each has one of the images selected.
add image_1 to image_6 in the render queue with your desired render settings, save it as a template project.

then each time you simply just open the project, drop a new strip into the main_comp, align the strip in the main_comp for the first image, and hit render.

if all the strips have exactly the same borders and I would have a lot of strips, I would probably further automate this with some scripting. but I find after effects a bit clunky in this area (or I don't know the elegant ways) and Blender and Fusion have probably a deeper scripting integration.
 
Joined
Jul 31, 2012
Messages
3,298
Format
35mm RF
Vuescan-
Check scan from preview, import the file (or just preview it), draw the appropriate sized crop box, hit enter (save), move box from the center of the box to the next image, hit enter (save). Etc. The saves happen instantly. Only takes a couple minutes to do a whole roll.

In the naming dialog end the file name with a number and a + and Vuescan will automatically sequence the file names.

Super simple. That is how I scan my Minox and 16mm frames.
 
Joined
Aug 29, 2017
Messages
9,283
Location
New Jersey formerly NYC
Format
Multi Format
Irfanview (free) app allows you to select and save portions of an image. You can save the cropped portion as a secondary tiff file and edit it at your convenience.
 
Joined
Aug 29, 2017
Messages
9,283
Location
New Jersey formerly NYC
Format
Multi Format
I wouldn't use Irfanview for sophisticated editing other than for the purpose of cropping the images. IrfanView is a handy app though for viewing and reducing image sizes, changing file names easily, etc. Irfanview also allows you to append images with Paint.
 

loccdor

Subscriber
Joined
Jan 12, 2024
Messages
1,453
Location
USA
Format
Multi Format
Following this with interest. I thought about this recently and I'm considering writing a Python script to do it. However, I've not tried it, yet. There's no function in GIMP AFAIK that'll do this. Maybe it can be scripted though. Maybe someone already has...

I may be misunderstanding the problem, but in Gimp, wouldn't it be Rectangle Select -> Copy -> Paste As New Image?

If the problem is with having to do this over and over again on a contact sheet, you can also customize the grid to be on the frame boundaries and snap to grid, then your selects would be quick.
 

koraks

Moderator
Moderator
Joined
Nov 29, 2018
Messages
20,978
Location
Europe
Format
Multi Format
I may be misunderstanding the problem, but in Gimp, wouldn't it be Rectangle Select -> Copy -> Paste As New Image?

Yeah, but like most suggestions offered above, yours involves manually moving around the selection marquee for every image. It seems that most people miss the point about limiting manual intervention and automating all this for a scan of e.g. 24 frames.

customize the grid to be on the frame boundaries and snap to grid

Necessitating a custom grid.
Assuming that the scans are all aligned neatly on a grid.
Have a look at the example contact sheet shown above.
 

loccdor

Subscriber
Joined
Jan 12, 2024
Messages
1,453
Location
USA
Format
Multi Format
Yeah, but like most suggestions offered above, yours involves manually moving around the selection marquee for every image. It seems that most people miss the point about limiting manual intervention and automating all this for a scan of e.g. 24 frames.


Necessitating a custom grid.
Assuming that the scans are all aligned neatly on a grid.
Have a look at the example contact sheet shown above.

I see. Taking a closer look at the contact sheet the frames aren't precisely aligned so just using a grid on it wouldn't really work.

You can write a script in Python, or I'd use C++ with the CImg library, to detect rectangles around a certain size and above a certain brightness threshold. It will fail on some images with too much black, or with black verticals, just as scanner software does. The algorithm might involve moving a slightly larger than 35mm rectangle around the image, then getting a "match" if the edges of the rectangle are below a certain brightness threshold and the average of the rectangle is above a certain brightness threshold. It wouldn't take long to write, maybe a weekend's worth of work.
 

koraks

Moderator
Moderator
Joined
Nov 29, 2018
Messages
20,978
Location
Europe
Format
Multi Format
Thanks; I was thinking along those lines, indeed. But my experience with c++ is limited to fairly simple embedded applications, so I'm afraid it would cost me more than a weekend to become familiar with more high-level libraries! I might have to bite the bullet at some point though.
 
OP
OP
fabulousrice

fabulousrice

Member
Joined
Mar 19, 2020
Messages
449
Location
Los Angeles
Format
35mm
the first approach I would take is to set up a main comp (main_comp) with your full strip, then put that as a pre-comp into 6 separate comps (image_1 to image_6) with the size of one image each (size of what we called the selection so far), and position the main_comp in each of those so that each has one of the images selected.
add image_1 to image_6 in the render queue with your desired render settings, save it as a template project.

then each time you simply just open the project, drop a new strip into the main_comp, align the strip in the main_comp for the first image, and hit render.

if all the strips have exactly the same borders and I would have a lot of strips, I would probably further automate this with some scripting. but I find after effects a bit clunky in this area (or I don't know the elegant ways) and Blender and Fusion have probably a deeper scripting integration.
But what is you scan half frame then full frame then 110....
 
OP
OP
fabulousrice

fabulousrice

Member
Joined
Mar 19, 2020
Messages
449
Location
Los Angeles
Format
35mm
I see. Taking a closer look at the contact sheet the frames aren't precisely aligned so just using a grid on it wouldn't really work.

You can write a script in Python, or I'd use C++ with the CImg library, to detect rectangles around a certain size and above a certain brightness threshold. It will fail on some images with too much black, or with black verticals, just as scanner software does. The algorithm might involve moving a slightly larger than 35mm rectangle around the image, then getting a "match" if the edges of the rectangle are below a certain brightness threshold and the average of the rectangle is above a certain brightness threshold. It wouldn't take long to write, maybe a weekend's worth of work.

I don't mind making the selections manually to tell the program what I want saved. It's what comes afterwards that is incredibly repetitive and bothersome
 

loccdor

Subscriber
Joined
Jan 12, 2024
Messages
1,453
Location
USA
Format
Multi Format
I deal with this by only splitting out images from strips that I care about and want to make a bunch of manual edits to get them perfect, and leaving the rest as part of the group to possibly review later.

If you have a strip too dark for images to be reviewable, you can set the white and black points on it to get it into a better brightness range ("normalize" it), as long as you are careful not to truncate highlights or shadows, then save it and you don't have to worry about original data being lost.

Gimp's Copy -> Paste as New Image -> Export as TIF is a 5-10 second operation after the selection. I haven't used Photoshop in a long while.

I understand if that isn't going to work for what you are doing, just sharing in case it helps.
 

dokko

Member
Joined
Oct 4, 2023
Messages
326
Location
Berlin
Format
Medium Format
But what is you scan half frame then full frame then 110....

than I'd simply make a separate template project for each format (or am I missing the point?).

as long as you keep your scan resolution constant for each film format it still is basically a drag in -> align first frame -> hit render operation.
 

FotoD

Member
Joined
Dec 15, 2020
Messages
368
Location
EU
Format
Analog
Vuescan-
Check scan from preview, import the file (or just preview it), draw the appropriate sized crop box, hit enter (save), move box from the center of the box to the next image, hit enter (save). Etc. The saves happen instantly. Only takes a couple minutes to do a whole roll.

In the naming dialog end the file name with a number and a + and Vuescan will automatically sequence the file names.

Super simple. That is how I scan my Minox and 16mm frames.

That's works very well. I hadn't noticed the "ScanFile" command in Vuescan before. It's faster to name the files than in Photoshop. Thanks.

Only problem I get is that the crop files come out brighter than the original, even if I set color corrections to None. Do you know what that is about?
 

loccdor

Subscriber
Joined
Jan 12, 2024
Messages
1,453
Location
USA
Format
Multi Format
Thanks; I was thinking along those lines, indeed. But my experience with c++ is limited to fairly simple embedded applications, so I'm afraid it would cost me more than a weekend to become familiar with more high-level libraries! I might have to bite the bullet at some point though.

I might make a TIF->many TIF program with a user interface in this vein for the popular film formats at some point, to thank these forums for the invaluable information they've given me. It would probably be a winter project. If you like, Koraks, send me your requirements in a message.

What I have now is:

Ability to handle a single strip or a multi-grid without good alignment
User-selectable film format as well as custom entry of mm dimensions of the rectangle
User entry of the dpi of the image so it knows how to size the rectangle
Or also enter rectangle dimensions by pixels instead of by dpi & mm.
I would add in value normalization for the black and white and R,G,B normalization for the color as an option so you could stretch your output to cover the full range on each result without truncation
User-selectable edge brightness threshold and user-selectable total picture brightness threshold
Option to use it in either positive mode or negative mode with inversion of the output
Option to select what percentage of the off-frame image border you want to keep in the output files
Ability to select output file naming scheme (prefix, suffix - numeric, numeric with offset, alphabetic)
You hit a button and it shows you the selections it's going to make before it saves anything. You can adjust parameters if anything looks off
I'd program it with Windows in mind but use a library/language that allows easily porting to Mac and Linux and release the source code and Windows executable
 

shijan

Member
Joined
May 6, 2023
Messages
37
Location
Ukraine
Format
35mm
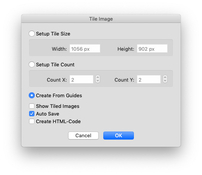
Instead of Photoshop this could be done in PhotoLine:
PhotoLine can read guides from PSD format, so open PSD file if you already draw guides there earlier.
Menu dialog Web->Tile Image->Create From Guides. "Auto Save" checkbox should be enabled, "Create HTML-Code" disabled.
Then just save to 16-bit PNG files.
 

Attachments

  • Screen Shot 2024-05-22 at 9.28.58 AM.jpg
    Screen Shot 2024-05-22 at 9.28.58 AM.jpg
    30.7 KB · Views: 23
Photrio.com contains affiliate links to products. We may receive a commission for purchases made through these links.
To read our full affiliate disclosure statement please click Here.

PHOTRIO PARTNERS EQUALLY FUNDING OUR COMMUNITY:


Ilford ADOX Freestyle Photographic Stearman Press Weldon Color Lab Blue Moon Camera & Machine
Top Bottom