Okay, Ansel Adams says to tray develop with the emulsion up, but Steve Simmons says to tray develop with the emulsion down. Which method do you use and why?
-
Welcome to Photrio!Registration is fast and free. Join today to unlock search, see fewer ads, and access all forum features.Click here to sign up
You are using an out of date browser. It may not display this or other websites correctly.
You should upgrade or use an alternative browser.
You should upgrade or use an alternative browser.
Tray developing LF - emulsion up or down?
-
A
- Thread starter Kevin Caulfield
- Start date


Recent Classifieds
-
For Sale Pentax SMC 135mm f3.5 lens
- Started by logan2z
-
For Sale Jobo Expert Drum 3006 4x5 or 5x7inch
- Started by mcnash
Forum statistics
Third option, and only one piece of film at a time. Scratched film is not cool.
OP
OP
Good tip, phaedrus. This is all still pretty new to me, so I'm interested to learn what works for others.
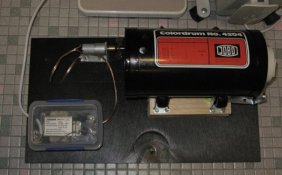
avoiding scratches and uneven development by using a jobo reel (holds 6 sheets) in an old paper drum. The "robot" is so (in)expertly engineered that it is slightly uneven, and sloshes the developer around the tank nicely. The motor is a very highly geared dc motor, running off 12VDC from the snackbox power supply... All mounted on a piece of recycled plastic "timber"...
Marc!
Marc!
Attachments
- Joined
- Sep 10, 2002
- Messages
- 710
I place the emulsion down, and rarely if ever get any scratch. I think either way will work, as long as you develop a good system. I wrote up my system for someone recently so will post it herejust what I learned and what works for me.
Sheet Tray Processing
1. Arrange trays with chemicals at temp. Place bottles of chemicals in a water bath bucket ahead of time to get them to proper temperature, while you are preparing your film for processing.
You will need four trays:
pre-soak traytray close to size of film 5x7 for 4x5 or 5x7
developing tray8x10
stop tray
fixing tray
The pre-soak tray can be used for final washing and photo flo.
2. Lights off, and arrange sheets to be developed:
Emulsion up, first sheet into pre-soaking tray is first into developer.
Fan out sheets like a hand of cards, with bottom sheet towards you. Pull first sheet off the bottom and place emulsion up in pre-soak tray. Push down in the middle to soak and avoid air bells, then turn sheet emulsion down.
Even if you do not pre-soak your roll film, I dont, do presoak your sheet film.
Continue adding sheets one by one. Keep the sheets fanned, with bottom sheets leading edge towards you, with fan tilting down so that any water drops do not migrate into fan, or sheets will stick together. To avoid this, you can dry your fingers after adding each sheet to the soak tray.
3. Keep pre-soaking sheets corralled in traythis tray is just bigger than the film so that the film will stay in a deck. After 2 minutes, take the first stack of sheets that will get most development, off the bottom of the stackcount from the corner of the deck like pulling cards off the bottom of the deck with one hand, and keeping the deck together and pulling the deck up and away with the other. Emulsion is down, and stays down. Grab the sheets to be developed along the long edges, with your middle finger one one long edge and your thumb on the other.
3. Place this stack emulsion down in developer. Keep the stack always corralled in the bottom left corner (7:30), using the corner of the tray and your fingers of your left hand on the opposite corners of the film (or reverse if you are left handed.) Pull up this outer corner of film deck (1:30) with left hand, and with righ hand pull away bottom sheet (note: with 8x10 film I pull up on the long edge and give it a wiggle to free the bottom sheet. Pulling from the middle of the bigger film prevents sagging.) Pulling up on whole stack of film, hinge to the tray on the left edge, angling it up out of the water so that you can pull out bottom sheet, to the right. Push down stack gently but firmly back into the developerin the middle with your left thumb, keeping stack corralled with your left fingers. Place/plop the moving sheet with your right hand right on top of stack (which is under developer), and push it down with thumb in the middle of the sheet down to the stack.
4. Cycle through stack in 30 seconds. Start with 4-6 sheets. With practice you can easily do 12, or more.
5. For second 30 seconds of shuffle, pull out the bottom sheet away from you, at a right angle to the first movement. Push down stack in the middle with your left thumb as usual, keeping stack corralledno free ranging allowedkeeping the deck together is how you keep film corners from doing harm. Place/plop moving sheet with your right hand right on top of stack (which is under developer), and push it down with thumb in the middle of the sheet down to the stack.
6. Next shuffle to the right.
7. Next shuffle, spin the shuffiling sheet 180 degrees before placing it on top of stack. Work through stack.
8. If you add additional sheets to the developer from the soaking tray, keep your developing sheets corralled. You can prop up the outer right hand corner of the developing tray if you need to for this step. Always pull sheets from the bottom, and add them to the top of the stack. So, if adding three sheets from the soaking tray to sheets already being developed, pull the three sheets as a group and add the whole stack to the top of the developing pack.
9. Agitation come from moving each sheet directionally every 30 seconds, and also from pushing down the sheets into the developer.
10. When developing time is up, move the whole stack, gripped along edges as above, into the stop bath. Shuffle through once or twice.
11. Move stack to fixer. Shuffle through stack for fixing time.
Notes:
1. If you just have a few sheets, proceed as above. If you are shuffling through the stack faster than in 30 seconds, keep the stack still and corralled in the corner (7:30) until the next interval.
2. Wash with several changes of water in the pre-soak tray, finishing with a bath of photo-flo.
3. This basic method works for 4x5 to 8x10.
Or if you're disinclined to implement DIY gear, the HP CombiPlan tank isn't a bad option. Maybe not the best thing for sheet film, but it does a good job, is relatively inexpensive, and widely available.
My experience is that when shuffling sheets of film manually, it is easier to control how the sheets touch and scratch each other if the sheets are processed face down. However, any time sheets come in contact with each other, there is a risk of scratching.
I use a slosher in an open tray. With a slosher, film is ALWAYS face up, and because the emulsion touches only chemicals, sheets are never scratched.
I use a slosher in an open tray. With a slosher, film is ALWAYS face up, and because the emulsion touches only chemicals, sheets are never scratched.
Doremus Scudder
Member
I develop in trays and up to 8 sheets at a time, but usually 6. I learned emulsion-side-up processing to begin with. I tried emulsion-side-down processing for a few batches a couple of years ago, but abandoned it very quickly due to uneven development. I was getting high-density areas that corresponded with the ridges and grooves on the tray bottom. Emulsion-side-up eliminates any possibility of increased flow around the tray ridges causing stripes on the negatives.
Perhaps flat-bottomed trays or trying to keep the bottom of the film stack from resting on the tray bottom would prevent the surge artifacts, but switching back to emulsion-side-up was easiest for me.
I did get the feeling that film handling was slightly more secure emulsion-side-down. The unevenness problem was simply an overriding factor for me.
Best,
Doremus Scudder
www.DoremusScudder.com
- Greg Davis
- Deleted
OP
OP
Thanks all so far. I'm appreciating the comments very much. 
I have not developed any 4x5 yet. But am learning from reading this. I have film hangers and will use those first but also have some 8x10 film (=make big pinhole camera....) so at best I will only be developing one or two sheets at a time initially. I just hope that doesn't hook me into wanting an 8x10 camera with all the associated GAS....  I have to say, I'm having fun reading everyone's input though.
I have to say, I'm having fun reading everyone's input though.- Joined
- Jun 21, 2003
- Messages
- 29,810
- Format
- Hybrid
i put my film one sheet at a time in a tray of water to make sure they are separated.
then take the whole stack ( between 8 and 40 sheets ) and put it all in the tray of developer.
i don't know if the emulsion is up or down, but i take the bottom sheet pull it up
and put it upside down on the stack. eventually it is down side up again ... so
it makes no difference to me one way or another.
i've been tray processing like this since the early 1990s, and maybe scratched 1 sheet of film
out of thousands ...
sometimes when one worries too much about "stuff" it lets "stuff" happen ....
don't forget to have fun
john
Up, unless more than 1 sheet, the back to back, belly to belly
All my films 8x10 and 8x20 are emulsion up, I've never had any scratches so far.
- Greg Davis
- Deleted
Face up and one at a time, shooting with Adox/EFKE it's just to risky with a soft emulsion fim to shuffle sheets or risk scratching on the bottom if face down.
Ian
Ian
Thomas Bertilsson
Member
I used sheets and a slosher tray, and for some reason couldn't get it to work.
So now I process using a Unicolor drum, which holds four 4x5, two 5x7, or one 8x10 sheets. It works pretty well, but I have no control agitation control, and I really don't shoot enough sheets to consider myself competent. But that's how I do it. The developer I use for rotary processing is either Xtol or HC-110.
Thanks,
- Thomas
Third option, and only one piece of film at a time. Scratched film is not cool.
Totally agree for 8x10. For 4x5..the combi plan (3 of) anyday...K
Dan Dozer
Subscriber
- Joined
- Dec 10, 2004
- Messages
- 414
- Format
- Large Format
I develop in PMK Pyro developer one 8 x 10 sheet at a time in trays with the emulsion side up. I made the mistake of having the emulsion side down one time and it ruined the neg. The tray I was using wasn't really enough larger than the neg, it was a Patterson tray (with the grooves down), and with the higher amount of aggitation that the Pyro needs, the film ended up getting a different amount of aggitation at the grooves (where more developer was) than on the rest of the film. The result was that the density of the negative ended up different where the grooves were from the rest of the neg.
Now I use larger trays (11 x 14 trays for 8 x 10 film) and always have the emulsion side up.
Now I use larger trays (11 x 14 trays for 8 x 10 film) and always have the emulsion side up.
Hi, Dan
Emulsion up and with lots of chemistry. I use a tray that is about 7x10/11 and 4ins tall on the sides. Chemistry is no less than 1/2gal for a short run and 3/4s to 1gal for a big run. I am careful about exhaustion rates for the developer, chemistry is cheap. I also like a tray that had square corners is helps in keeping the film from creeping up the sides. I also have a fifth tray at the end for water.
Jan Pietrzak
- Joined
- Mar 6, 2005
- Messages
- 2,261
- Format
- Large Format
It depends on size. For 7x17 I develop 2 sheets back to back in 2 liters od chemistry. The trays are 10x20" so the chemistry is fairly deep.
A lot of this film is Efke and scratches on it are rare. But to be honest, they do occur. I don't remember any scratches on FP4+.
For everything smaller I use Jobo Expert drums and don't have scrtatches.
A lot of this film is Efke and scratches on it are rare. But to be honest, they do occur. I don't remember any scratches on FP4+.
For everything smaller I use Jobo Expert drums and don't have scrtatches.
I am emulsion side up, shuffling between 6-8 sheets of 4x5, and typically 4 sheets of 8x10. When processing emulsion side down, I got scratches.
Note be sure to check the trays for plastic sprues, as they will scratch film.
Note be sure to check the trays for plastic sprues, as they will scratch film.
Oh yes, of course. I was only thinking of 8x10s. I develop my 4x5s in a Jobo 2551 drum. Would get mad tray developing them.Totally agree for 8x10. For 4x5..the combi plan (3 of) anyday...K
4x5 Combiplan.
5x7 emulsion up, one sheet at a time.
Sheets of film become quite slippery after presoak and development--an unexpected surprise my first time--but less so after the stop bath.
Some (most?) developers will eventually give you skin problems if you don't use gloves, and using them adds to the handling complications of tray processing.
I use one glove for single sheet 5x7 tray processing as I need the other hand dry to operate the timer. I agitate the tray by tilting it, rather than moving the film around directly.
My only scratching resulted from my first attempt to shuffle 5x7 negs, which method I used to employ with 4x5. Now it's sheet by sheet, which also allows you to see how your timing is working, too.
I hope there's something useful here.
Regards - Ross
OP
OP
All very useful. Thanks for the input so far, everybody.
- Joined
- Dec 31, 2006
- Messages
- 2,704
- Format
- Medium Format
************Okay, Ansel Adams says to tray develop with the emulsion up, but Steve Simmons says to tray develop with the emulsion down. Which method do you use and why?
Yes.
you say toe-matto, I say tomato... Really, this has been a good discussion for me. I have film hangers for 4x5 and 8x10 though I don't develop any 8x10...yet... if the bug doesn't bite me; and I have not developed any 4x5 yet but am getting ready to do that. I am sure I will start with one neg at a time until I am comfortable with that, then try to manage more to a point. I have heard some discussion about film hangers having problems too and that is part of why I am looking into tray development at the same time.
Has anyone ever just put a clip on the edge of the film and dip it in tanks? I am supposing that will work just as well but without the possible 'flow' problems some people run into when using ss film hangers for sheet film. At the same time, it would avoid the possible uneven development due to tray ribs. I don't know if that is a reasonable way to approach it or not.
Chances are good that if I have a few sheets that need the same development, I will use the hangers but initially, I will be developing one sheet at a time.
| Photrio.com contains affiliate links to products. We may receive a commission for purchases made through these links. To read our full affiliate disclosure statement please click Here. |
PHOTRIO PARTNERS EQUALLY FUNDING OUR COMMUNITY:  |