Toning a gelatin silver print to look like platinum

Sparrow.jpg

A
Sparrow.jpg

  • 0
  • 0
  • 34
Orlovka river valley

A
Orlovka river valley

  • 3
  • 0
  • 83
Norfolk coast - 2

A
Norfolk coast - 2

  • 5
  • 1
  • 78
In the Vondelpark

A
In the Vondelpark

  • 4
  • 2
  • 155
Cascade

A
Cascade

  • sly
  • May 22, 2025
  • 9
  • 6
  • 131

Recent Classifieds

Forum statistics

Threads
197,839
Messages
2,765,385
Members
99,485
Latest member
zwh166288
Recent bookmarks
0

Nikonic

Member
Joined
May 6, 2007
Messages
53
Location
NYC
Format
Multi Format
I'm wondering if anyone is willing to share their experiences, or best guesses, at toning a gelatin silver print to contain the colors and zone/color split of a slightly warm platinum print using commonly available toners, papers, and paper developer workflows. Not trying to reproduce the curves (thought that would be nice), just the colors.

What do I mean by "slightly warm platinum print"?

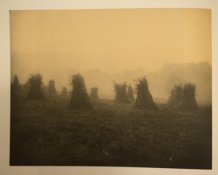
Well, I don't think I have the proper vocabulary to technically describe the look I'm after, so i'll begin by showing instead of telling. Here are two plates from a book I have on the Allen Sisters, turn of the century pair of deaf sisters who took photographs in Massachusetts and printed mostly in platinum.

attachment.php

attachment.php


The highlights, especially upper highlights, zone 6 and above are an antique gold yellow, while the shadows seem to me to be range from neutral, to a barely perceptible chestnut shift of the yellow gold highlights, to possibly an olive green—but the shadows are much closer to neutral black than the highlights are to neutral upper greys/white.

These are the variables I have to play with.

  • Glossy Ilford Classic vs Warmtone paper
  • Any paper developer (I'm using dektol, but have almost all raw chemicals required to make any developer, incl Amidol)
  • Temperature
  • Thiocarbamide sepia toner (bleach dilutions vs times vs alkali concentrations)
  • TPF Polysulfide sepia toner
  • Kodak selenium toner
  • (I could mix up any toner except the precious metal ones)

Thanks for any hints!

-S
 

Attachments

  • children.jpg
    children.jpg
    129.6 KB · Views: 603
  • fields.jpg
    fields.jpg
    57.9 KB · Views: 552

Peter Schrager

Subscriber
Joined
Jul 19, 2004
Messages
4,088
Location
fairfield co
Format
Large Format
Just learn to do platinum..it's not hard you just need a proper negative. ..do a workshop with Tillman crane...sorry but your question seems a little weird

Sent from my SAMSUNG-SM-G900A using Tapatalk
 

pdeeh

Member
Joined
Jun 8, 2012
Messages
4,765
Location
UK
Format
Multi Format
Doing platinum is expensive and time consuming.
It's not weird to ask how to tone an ordinary print to give a particular tonal effect
 

Bob Carnie

Subscriber
Joined
Apr 18, 2004
Messages
7,731
Location
toronto
Format
Med. Format RF
I have used Ilford Art 300 and slightly sepia , then selenium and they surprisingly do look a lot like pt pd prints.

the texture of the paper and warmth is just about right.
 
OP
OP
Nikonic

Nikonic

Member
Joined
May 6, 2007
Messages
53
Location
NYC
Format
Multi Format
I have used Ilford Art 300 and slightly sepia , then selenium and they surprisingly do look a lot like pt pd prints.

the texture of the paper and warmth is just about right.

Thank you, Bob!

What kind of sepia toner are you using?

If thiocarbamide what brand, or if mixed by yourself what bleach times and alkali concentrations?

And yes, making platinum prints would be great but I'm a busy working professional with a small darkroom, and I would probably need to invest $2-3K just to get going, then the unbelievably high high cost of platinum salt expendables.

Maybe someday.
 

Bob Carnie

Subscriber
Joined
Apr 18, 2004
Messages
7,731
Location
toronto
Format
Med. Format RF
I mix my own from scratch - I have never tried thiocarbamide route. My formula comes directly out of many books on toning.

I use different bleach times, for different looks.

very subjective and one needs to just make a bunch of test prints and play a bit to find the right balance for your darkroom

I think any of the matt papers will work, I also really like Ilford MG4matte - its been changed but basically the normal matt paper they offer.

Thank you, Bob!

What kind of sepia toner are you using?

If thiocarbamide what brand, or if mixed by yourself what bleach times and alkali concentrations?

And yes, making platinum prints would be great but I'm a busy working professional with a small darkroom, and I would probably need to invest $2-3K just to get going, then the unbelievably high high cost of platinum salt expendables.

Maybe someday.
 

jeffreyg

Subscriber
Joined
Jun 12, 2008
Messages
2,604
Location
florida
Format
Medium Format
I don't have a recommendation for toning but I do both silver prints and pt/pd. Don't compare the two, each can be beautiful. Pt/pd prints have (IMOP) a three dimensional look. Check out Bostick & Sullivan they have starter kits (much less then $2-3K) and you can actually expose with sunlight. That's how I started with pt/pd and now find it to be one of my favorite mediums.

http://www.jeffreyglasser.com/
 

M Stat

Member
Joined
Oct 29, 2010
Messages
110
Location
Columbia Riv
Format
8x10 Format
What you perceive as tone is actually the color of the paper that was used to print the photographs on. Platinum prints are neutral in color, palladium prints are much warmer in tone. Maybe you could try an overall toner which would color the paper base to the shade of color you are looking for.
 

MattKing

Moderator
Moderator
Joined
Apr 24, 2005
Messages
52,181
Location
Delta, BC Canada
Format
Medium Format
Try partial selenium toning followed by full Berg Brown toner.
 

pschwart

Subscriber
Joined
Jul 15, 2005
Messages
1,143
Location
San Francisco, CA
Format
Multi Format
Thank you, Bob!
And yes, making platinum prints would be great but I'm a busy working professional with a small darkroom, and I would probably need to invest $2-3K just to get going, then the unbelievably high high cost of platinum salt expendables.

Or try kallitypes for a fraction of the cost of platinum. Sure, tone your gelatin silver prints, but they won't really pass for platinum or palladium prints.
 
OP
OP
Nikonic

Nikonic

Member
Joined
May 6, 2007
Messages
53
Location
NYC
Format
Multi Format
Thanks for the responses all! I think I should be able to figure this out thanks to them and a PM.

A note: I should clarify the title. I am trying to tone gelatin silver to get the colors and color split to approximate the colors of a fine warm platinum print. I'm not trying to make a gelatin silver print that looks exactly like a platinum print.

I would love to be able to do kallitypes and platinum, but for those you need a large negative. I don't shoot anything above 4X5, and don't have a scanner or inkjet printer or UV exposure box. I live in a cramped NYC apartment so there is no consistent sunlight to be had, and very little room to put things like a huge inkjet printer, exposure box, and scanner—were I able to justify their expenses at this time, which I'm not.

Thank you!

-S
 

cliveh

Subscriber
Joined
Oct 9, 2010
Messages
7,498
Format
35mm RF
I mix my own from scratch - I have never tried thiocarbamide route. My formula comes directly out of many books on toning.

I use different bleach times, for different looks.

very subjective and one needs to just make a bunch of test prints and play a bit to find the right balance for your darkroom

I think any of the matt papers will work, I also really like Ilford MG4matte - its been changed but basically the normal matt paper they offer.

Bob, you could be a little more informative here. Why not give the OP your own formulations and times? We are not a secret society.
 
OP
OP
Nikonic

Nikonic

Member
Joined
May 6, 2007
Messages
53
Location
NYC
Format
Multi Format
Bob, you could be a little more informative here. Why not give the OP your own formulations and times? We are not a secret society.

I won't hound Bob for his exact recipe and times if he doesn't want to give them out. I think if someone's discovered a "look" that they want no one else to know that's taken them a long time to achieve, well, that's up to them.

But Bob I would reallyappreciate what you mean by "slightly sepia , then selenium," if it is not a secret to you. As in, what formula you're using, at what concentration, temps, and if bleach time in bleach at what concentration.

I mix all my toners from scratch too!

If you've got a formula I've got the chemicals.
 

MattKing

Moderator
Moderator
Joined
Apr 24, 2005
Messages
52,181
Location
Delta, BC Canada
Format
Medium Format
Again, I'm not Bob ....

But "slightly sepia, then selenium" is something I do regularly.

Using dilute bleach, I bleach slightly, and then follow that with a full cycle in the sepia toner.

That gives you a bit of lightening of the highlights, along with some warming of the tone there.

That is followed by full selenium toning, which tends to cool and darken the shadows.

I then follow that with a full fix, just in case.

The bleach and sepia toner come from the fairly classic Kodak Sepia II toner packages - I still have quite a few.

And the selenium toner is either the Harman version, or the Kodak version - whichever I have in hand.

To adjust the ratio between the sepia and selenium toning, one adjusts how much bleaching one does.
 

Bob Carnie

Subscriber
Joined
Apr 18, 2004
Messages
7,731
Location
toronto
Format
Med. Format RF
I am Bob- I should point out there are no secrets in photography, and I am always willing to blather on - ask anyone here.

When it comes to chemicals I am a bit hesitant as I do not know your situation , darkroom, and habits so for me giving exact formulas may or may not work
in your darkroom - also I hope that in all stages you are taking proper precautions when handling, storing and using these chemicals.

The following works in MY darkroom - others need to experiment a bit for their situation.

Part A- Bleach Step
32 grams Potassium Bromide
32 grams Potassium Ferricynide
10 liters of water

the more you bleach the more effect you will get, - total bleach out will give you a overall sepia in all tones.
At this mixture I am about 20 seconds in the bleach to just affect the upper highlight region.

Part B- tone step
32 grams Sodium Sulfide.
10 liters of water
**This stuff is really stinky, do not bring a date over after toning and be careful you neighbors do not petition to get you out of the building**

I leave in this bath for about a minute- then see if I like the tone, If I like the tone I wash and move to Selenium step, if very partial tone I may refix the print at this stage.

If I do not like the tone I will go back into the A bleach and give it more then redo B tone step.

For the selenium I have found Kodak and Harman to be very close.

Selenium Stage-

I use a 1:5 mixture and I tone Ilford Warmtone for 40 seconds. Basically I tone every print with this Selenium dilution.

Too much and the print takes on a reddish tone I do not like.

Wash for one hour and put to bed.


for fun you can add Gold right behind the sepia step this will impart a great peachy colour to the highlights, and if I really want to torture myself I will add Iron Blue as a last bath, basically
I do not recommend this last step unless you have lots of patience, willingness to lose a lot of work at the last step. But when it works its magnificent.

Tim Rudmans book on Toning- and Eddie Ephram's two books are excellent resources.
Also I must add Ian Grant here on APUG has been a great source of reassuring advice and formulas over the last 10 years.
 
Last edited by a moderator:

Ian Grant

Subscriber
Joined
Aug 2, 2004
Messages
23,241
Location
West Midland
Format
Multi Format
I don't tone my prints these days except for Selenium to shift slight the green colour off warmtone papers and archival permanence. Back in the 70's and 80's I did a lot of commercial work on toners.

However I'd recommend a variety, two different bleaches one like Bob suggests above and another with Sodium Chloride instead of Bromide which gives much warmer results(similar weight is fine) and then the Sulphide toner and also the variable Thiourea (thiocarbamide) toner this gives you a wide variety of possible sepia brown tones.

(there was a url link here which no longer exists) which gives amazing olive brown tones unlike any other toner. It's the only one I occasionally use :D

IT8toner.jpg


Someone thought this might be a good choice to emulate Platinum prints.

Ian
 

Rich Ullsmith

Member
Joined
Jan 26, 2007
Messages
1,159
Format
Medium Format
I don't practice platinum printing, but I buy a couple a year from a local printer, so I always have 6 on the walls. They all have different tone, very subtle. Nothing as pronounced as sepia and/or selenium.
 

cliveh

Subscriber
Joined
Oct 9, 2010
Messages
7,498
Format
35mm RF
OP
OP
Nikonic

Nikonic

Member
Joined
May 6, 2007
Messages
53
Location
NYC
Format
Multi Format
Thank you Bob, Matt, et al.

Two nights ago through much trial and error I was able to arrive at something much closer than I had gotten before. Which involved recipes taken from Tim Rudmans book for the thiocarbamide toner and bleach. Ilford FB MG IV (Which I guess has been replaced?) 1:10 bleach for 10-20 secs @ room temp. Wash. Toner/redeveloper with 25ml alkali for 1.5 minutes. Wash, then ten minutes in Kodak selenium 1-10.

attachment.php


Just an iPhone snap but, not bad reproduction. Right after the thiocarbamide the image was very yellow and sickly looking. The selenium shifted the tones closer to brownish red, but it is still lacking the colors I'm after.

I'm sure with the methods given here I'll be able to get where I want to be.

Even though I said I'm not trying to make a silver print that looks exactly like a platinum print, I can't help thinking that (this image in particular) has great rendering of the highlights, but not much shadow and lower mid tone values, and that makes look much more like a contemporary silver print than platinum.

Another observation is that before toning, the highlights had dried down to a duller grey than I wanted. After toning they seem bright and correct, and I don't think it is just because of the bleach lightening the highlights. The detail returned after silver sulfide developed in highlights post bleach. I think the color itself gives the impression of additional luminance, even if you were to measure it the values would be similar or the same.

-S
 

Attachments

  • IMG_7980.jpg
    IMG_7980.jpg
    497.9 KB · Views: 142
  • toned.jpg
    toned.jpg
    587.9 KB · Views: 314

MattKing

Moderator
Moderator
Joined
Apr 24, 2005
Messages
52,181
Location
Delta, BC Canada
Format
Medium Format
Looks promising.

You might try increasing your print time, to counteract the effect of the bleach.

Try both 1/6 and 1/3 of a stop, to see if one of those two adjustments suits your taste.
 

Ian Grant

Subscriber
Joined
Aug 2, 2004
Messages
23,241
Location
West Midland
Format
Multi Format
Aside from IT-8 which is an intensifying toner other toners result in lower densities than the original print which is which the highlights look brighter. If you measured the densities you's see they've lightened.

Ian
 

Mark Fisher

Member
Joined
Dec 13, 2003
Messages
1,691
Location
Chicago
Format
Medium Format
Everything Bob and Ian said is spot on (as you'd expect). The only thing I'd add is that the MGIV is easier to get a subtle highlight warmth and it has a reasonably warm base. The images you show have a pretty warm paper base so you may want to try tea toning (start with a quart of hot water and 6-8 teabags that steep a long time) also as it will essentially tone the paper rather than the silver.
The Pt/Pd prints I've done (not all that many) don't look all that much like the ones you showed. Google Irving Penn Platinum and look at the images. That is what I think of as a typical range of colors from platinum/paladium. Honestly, I don't think that platinum/paladium printing costs any more than silver when you do digital negs (sorry for the transgression) since you can get a good print the first time after the process is dialed in. When I do silver prints, I feel pretty good if I get a presentation quality print using 3-4 pieces of paper......I prefer silver but not for cost reasons!
 
OP
OP
Nikonic

Nikonic

Member
Joined
May 6, 2007
Messages
53
Location
NYC
Format
Multi Format
Honestly, I don't think that platinum/paladium printing costs any more than silver when you do digital negs (sorry for the transgression) since you can get a good print the first time after the process is dialed in. When I do silver prints, I feel pretty good if I get a presentation quality print using 3-4 pieces of paper......I prefer silver but not for cost reasons!

Mark, that's a bold claim, and runs counter to what I've heard elsewhere. I'm not saying you're wrong, but, have you done the numbers?

I would love it if it were true! but there are a lot of disposables and external devices required that might not have gone into the calculation.

For example, I, and anyone else starting a digital neg platinum workflow needs at a minimum a high quality scanner, high quality ($1K+ (tell me if there are printers that can do digital negs for less!)), and possibly a UV bed.

Then you add up contact printing frames (my enlarger beseler 45 XL was $150 with all the trappings and both incandescent and diffusion heads), sheets of fine watercolor paper (surely no less than $0.50 per 8X10 sheet), maybe some red graphic masking film, and of course, those platinum salts! For which I don't know the # of print capacity per gram. But if you knew the per sheet cost of something like FB MG IV, and then also knew the per sheet cost of a fully prepared, sensitized piece of platinum paper, you'd arrive at a pretty good idea.

Oh, and time.

The most valuable thing of all.

A shoot>develop>scan>photoshop>print digital neg>contact print digital neg sounds like much more time involved than a shoot>develop>print workflow!

-S
 

calebarchie

Subscriber
Joined
Jul 25, 2014
Messages
673
Location
Australia 2680
Format
Hybrid
Mark, that's a bold claim, and runs counter to what I've heard elsewhere. I'm not saying you're wrong, but, have you done the numbers?

I would love it if it were true! but there are a lot of disposables and external devices required that might not have gone into the calculation.

For example, I, and anyone else starting a digital neg platinum workflow needs at a minimum a high quality scanner, high quality ($1K+ (tell me if there are printers that can do digital negs for less!)), and possibly a UV bed.

Then you add up contact printing frames (my enlarger beseler 45 XL was $150 with all the trappings and both incandescent and diffusion heads), sheets of fine watercolor paper (surely no less than $0.50 per 8X10 sheet), maybe some red graphic masking film, and of course, those platinum salts! For which I don't know the # of print capacity per gram. But if you knew the per sheet cost of something like FB MG IV, and then also knew the per sheet cost of a fully prepared, sensitized piece of platinum paper, you'd arrive at a pretty good idea.

Oh, and time.

The most valuable thing of all.

A shoot>develop>scan>photoshop>print digital neg>contact print digital neg sounds like much more time involved than a shoot>develop>print workflow!

-S

My old epson r800 and r1800 do negatives just fine, even better than larger 3.5pl models and I got them both for next to nothing.

My drum scanner cost less than those silly coolscans and just use a thick, heavy sheet of glass.

Most of the time is in the learning, initial set up and calibration. After that you can bang out prints effortlessly just a matter of your scanning/editing process time-wise.

But isn't this treading in dangerous territory?
 
Photrio.com contains affiliate links to products. We may receive a commission for purchases made through these links.
To read our full affiliate disclosure statement please click Here.

PHOTRIO PARTNERS EQUALLY FUNDING OUR COMMUNITY:


Ilford ADOX Freestyle Photographic Stearman Press Weldon Color Lab Blue Moon Camera & Machine
Top Bottom