Thornward Dandy #4

Today's Specials.

A
Today's Specials.

  • 0
  • 0
  • 0
Street portrait

A
Street portrait

  • 0
  • 0
  • 0
Flow of thoughts

D
Flow of thoughts

  • 4
  • 2
  • 56
Rouse st

A
Rouse st

  • 5
  • 3
  • 79

Recent Classifieds

Forum statistics

Threads
199,164
Messages
2,787,357
Members
99,830
Latest member
Photoemulator
Recent bookmarks
0

mightyomega

Member
Joined
Jan 18, 2009
Messages
30
Location
New York
Format
Medium Format
So I bought a Thornward Dandy #4 from That Auction Site.
Here's a link to a picture of the camera. http://www.flickr.com/photos/themightyomega/3877683161/

The thing has a standard box camera rotary wedge shutter with the usual "Instant" and "Time" trips. However, on this guy there is a lever with three positions. McKeown's Guide and the seller said that the lever is a focus device.
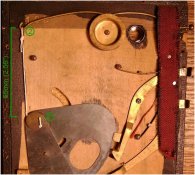
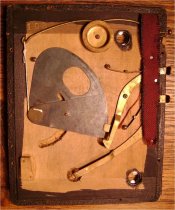
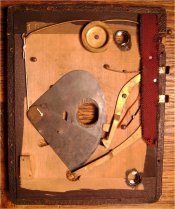
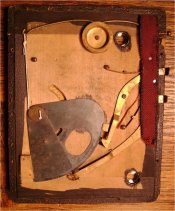
I opened up the camera to clean, and discovered that the lens is fixed into a solid block of wood behind the stop wheel http://www.flickr.com/photos/themightyomega/3878595558/.

The lever is connected to the shutter mechanism, as can be seen in this picture: http://www.flickr.com/photos/themightyomega/3877797457/.

Can anybody provide information about what the purpose of the lever was? It doesn't really seem to do anything right now.

Thanks!
 

ntenny

Subscriber
Joined
Mar 5, 2008
Messages
2,485
Location
Portland, OR, USA
Format
Multi Format
Wow, that's quite an artifact there.

In the picture I can't quite tell what the mystery lever is; is it the thing on top with a hook connected to a piece of wire?

-NT
 

DannL

Member
Joined
Jan 11, 2006
Messages
586
Location
Oklahoma
Format
Multi Format
I have this camera. The lever adjust is a multi-position tensioner for the shutter spring. It is actually a two position lever from my experience, and if you go too far (the third position) then it's "off it's rocker". :D

It took me months to determine that mine was a Thornward Dandy, beings it was unlabeled. If your camera is the 4x5, you can configure them to use the standard 4x5 film holders.

If you like I can show you how to set up that shutter with a proper string. That wire thing between the spring and shutter is most unoriginal I suspect. I would be very surpised if it works with a wire.
 
Last edited by a moderator:
OP
OP
mightyomega

mightyomega

Member
Joined
Jan 18, 2009
Messages
30
Location
New York
Format
Medium Format
Yes, there's a wire between the hook and the shutter.
I would love to find out how to to string it. The shutter fires now, but the lever doesn't do anything. I need to repair some some separation at the joints of the box, and then it will be good to go.
I like musty old hulks of ancient machinery:smile:
 

DannL

Member
Joined
Jan 11, 2006
Messages
586
Location
Oklahoma
Format
Multi Format
I will put together a couple photos and exact measurements so you can do this easily. But meanwhile you will need to acquire some "White Waxed Linen Cord" as depicted in the picture at this link . . .

Dead Link Removed

I found this cord in the jewelry/craft section of my local Walmart. Apparently it is also used to make necklaces, etc. It's a small spool about the size of a half-dollar. The linen cord is about 4 times thicker that normal sewing thread. I made a comparision with the original cord (broken and petrified) that was still attached in the shutter on mine, and the two cords looked exactly the same.
 

DannL

Member
Joined
Jan 11, 2006
Messages
586
Location
Oklahoma
Format
Multi Format
Here's the pictures you ordered. :wink:

Note: I noticed the brass spring on your shutter is bent differently. The 65mm distance I mention is a measurement what works with mine. I'm not going to tell your spring might need reshaping, but "it may" in order to work properly. Of course, you will know through experimentation.

The picture named Shutter1 shows the string in place when the shutter is in the fired (released) position. I first pushed the string through the hole in the hub at position 1 using a pointy toothpick, and then pull about 10 inches through so that you have plenty to work with. Tie a double knot at position 1 and pull the knot up tight to the shutter hub insuring the it will not pull through the hole. Insue the shutter is in the fired (released) position. Pull the string around the hub in a cw direction directly up to position 2 to meet up with the brass spring. You may have to pull the spring down to achieve the 65mm distance between the two points depicted. Tie it off securely on the brass spring at position 2. I made a loop there, and you may choose another method.

Other pictures:

Shutter2: shutter cocked
Shutter3: fired with "T" lever only (timed)
Shutter4: completely closed by using the "I" lever (Instantaneous)

(I think this post is now up-to-date.)
 

Attachments

  • Shutter1.jpg
    Shutter1.jpg
    130.2 KB · Views: 170
  • Shutter2.jpg
    Shutter2.jpg
    111 KB · Views: 160
  • Shutter3.jpg
    Shutter3.jpg
    114 KB · Views: 155
  • Shutter4.jpg
    Shutter4.jpg
    109.3 KB · Views: 170
Last edited by a moderator:
OP
OP
mightyomega

mightyomega

Member
Joined
Jan 18, 2009
Messages
30
Location
New York
Format
Medium Format
DannL, thanks for the comprehensive information. I'll hunt down some linen cord and see if I can get my shutter working right!
 
OP
OP
mightyomega

mightyomega

Member
Joined
Jan 18, 2009
Messages
30
Location
New York
Format
Medium Format
Well, I replaced the wire with linen thread, and I think it's working right. There appears to be a small difference in speed depending on the position of the lever. 65mm seemed to be about the right length, any shorter and the shutter was too hard to cock, and any longer, and it was too slow.
Thanks again for all the information.
 

DannL

Member
Joined
Jan 11, 2006
Messages
586
Location
Oklahoma
Format
Multi Format
I would really be interested in seeing some samples exposures from your Dandy. If your camera is the 4x5 version, and you are impelled to use a standard 4x5 film holder in your camera, I found a simple non-destructive modification that worked with mine. Sticky-backed Velcro comes in narrow lengths. There are two parts to Velcro, the fuzzy side and the side that has the microhooks. Using the fuzzy side only, I lined the inside of the camera where the film holder would meet the wood. A modern film holder is somewhat narrow as compared to the original plate holders, and the fuzzy side of the velcro strip works great to fill the gaps as a very durable light seal. I also applied two layers in the bottom of the camera to fill that void, and then I applied a narrow strip on both sides of the top of the holder itself, acting as a light seal where the holder meets the top of the camera.
 
Last edited by a moderator:
Photrio.com contains affiliate links to products. We may receive a commission for purchases made through these links.
To read our full affiliate disclosure statement please click Here.

PHOTRIO PARTNERS EQUALLY FUNDING OUR COMMUNITY:


Ilford ADOX Freestyle Photographic Stearman Press Weldon Color Lab Blue Moon Camera & Machine
Top Bottom