jamespierce
Member
For those not familiar with the technique, pencil masking is where a matte but translucent sheet (mylar or tracing paper typically) is used above the negative and used to locally control exposure. I've been aware of the technique for a while, but have only just received my contact printing and pin registration setup from Alistair Inglis to be able to do this both in my little darkroom for proofing and contact printing - as well as the bigger darkroom I use which has an Durst 8x10 enlarger. After some messing around to tune the clamping pressure I wanted to share my first result to encourage more folks to give this amazing darkroom technique a look.
I always make a straight contact print from my 8x10 originals to a standard exposure as my starting point on the Foma 111 paper I normally use for everything. This print gets filed as a reference with the neg, and I write printing notes on the back for both contact prints and enlargements. For this image I went a little heavier and a grade harder as my starting point for a work print.

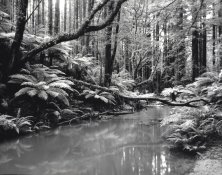
Straight contact print, selenium toned, grade 3.
Not bad overall, but I wanted more detail in the shadows under the ferns on the left, up the trees and so-on. So after determining a new exposure with clean mylar (50% longer), and then with just two tests I ended up creating this mylar mask on my lightbox.

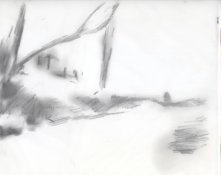
Mylar mask - 2B and 6B pencil, softened with a blending stump and mostly my finger
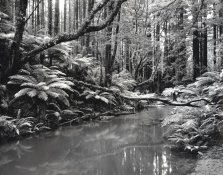
We end up with a subtle difference, but much improved print. This dodging which would be all but impossible by conventional means with wands etc. To really see it I suggest you download the two images and compare them side by side, or better yet in a program where you can flip between the two. Perhaps the biggest advantage of this technique is it's absolute repeatability - you can make small changes and then print, and print again to get the same precise results. You can move from contact printing to enlarging and maintain all the effort in getting the exposure control of the print just so etc.

My final print, grade 3, using the mask and with a small burn across the top full width and bottom right corner. Selenium toned
I always make a straight contact print from my 8x10 originals to a standard exposure as my starting point on the Foma 111 paper I normally use for everything. This print gets filed as a reference with the neg, and I write printing notes on the back for both contact prints and enlargements. For this image I went a little heavier and a grade harder as my starting point for a work print.

Straight contact print, selenium toned, grade 3.
Not bad overall, but I wanted more detail in the shadows under the ferns on the left, up the trees and so-on. So after determining a new exposure with clean mylar (50% longer), and then with just two tests I ended up creating this mylar mask on my lightbox.

Mylar mask - 2B and 6B pencil, softened with a blending stump and mostly my finger
We end up with a subtle difference, but much improved print. This dodging which would be all but impossible by conventional means with wands etc. To really see it I suggest you download the two images and compare them side by side, or better yet in a program where you can flip between the two. Perhaps the biggest advantage of this technique is it's absolute repeatability - you can make small changes and then print, and print again to get the same precise results. You can move from contact printing to enlarging and maintain all the effort in getting the exposure control of the print just so etc.

My final print, grade 3, using the mask and with a small burn across the top full width and bottom right corner. Selenium toned
Last edited by a moderator:


