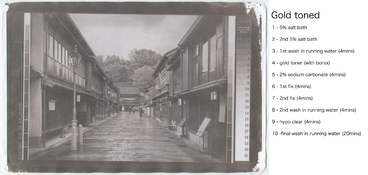
This is what I use:
| Final volume: |
1000 | ml |
| Gold chloride 1% |
50 | ml |
| Thiourea 1% |
50 | ml |
| Tartaric acid |
0.5 | g |
| Sodium chloride |
20 | g |
I generally make a somewhat more concentrated solution of the thiourea, tartaric acid and sodium chloride. Then, immediately before use, I add water to this and the required amount of gold chloride solution. I do this to ensure my gold chloride solution stays unaffected until it's time to use it.
I use this mostly with salt prints. I get the best results when I tone after fixing. When using this before fixing, there tends to be a small amount of staining, which can be entirely prevented if toning is done after fixing.
For a very brief time, I tried my hand at YouTube videos; I ended up making only a handful, but one happens to be about salt prints:
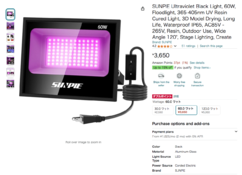
Also, is it possible to use a UV light for this?
The light you link to will likely work, but the big question is what its actual power rating is. It says 60W on the faceplate, but my experience with these LED units is that the power rating is often overstated by a huge margin. I wouldn't be surprised if the "60W" unit ends up being only around 15W RMS. This would result in very, very long exposure times.
Get the most powerful unit you can afford. LED is fine; the ones rated at "300W" (which in reality is closer to 75W RMS or so) are fairly affordable. You can gang up a couple in an array to boost power; I'm using 4 units in a rectangular setup. For salt prints, a wavelength of 395nm is fine and turns out to give good performance at low cost. Here's what I used not so long ago:
https://tinker.koraks.nl/photography/beam-me-down-scotty-a-new-ultra-simple-uv-light-source/
I've since switched to similar lights which combine 395nm and 365nm LEDs because I'm doing a lot of DAS carbon transfer and DAS specifically requires 365nm. Salted paper/silver chloride works just fine with the cheaper and more efficient 395nm LEDs, though.
The size of the negative is 5x7, and I expect the print size to be around 8x10 inches.
Contact print, right? Paper size doesn't really matter. When using LED floodlights, I like to make the light source roughly the same size as the negative. This allows to keep the distance between the print and the light source small, which makes * a lot * of difference in printing times. The 30cm you're planning for is just fine with floodlights.
The main problem I see with salt prints is that people are trying to print from negatives with too short a tonal scale. As a result, they keep exposures short because otherwise their highlights get too dark. But this comes at the cost of very low dmax, resulting in lifeless prints. When you get your light source, do some tests to see how much exposure you need to get a convincing black (on the entirely processed, dried print; you'll see quite dramatic density changes during wet processing; ignore this, what matters is how it comes out in the end once it's dry). Then make your negatives so that you can use this exposure time. Trying to use too thin negatives results in disappointment.


.jpg")
.jpg")

