Testing AristaPan 100 (aka Woflen NP100) vs a few B&W Developers

On The Mound

A
On The Mound

  • 2
  • 0
  • 10
Sinclair Lewis

A
Sinclair Lewis

  • 4
  • 1
  • 20
Street Art

A
Street Art

  • 2
  • 4
  • 72
Time a Traveler

A
Time a Traveler

  • 6
  • 2
  • 83
Flowering Chives

H
Flowering Chives

  • 4
  • 0
  • 82

Recent Classifieds

Forum statistics

Threads
198,221
Messages
2,771,229
Members
99,578
Latest member
williechandor
Recent bookmarks
0

dcy

Member
Joined
May 9, 2025
Messages
156
Location
New Mexico, USA
Format
35mm
A while ago I took 5 rolls of film and shot a few scenes over and over so I could cut the rolls into pieces and run tests. This is the first roll.

I chose AristaPan 100 because it's very cheap. I figure this is where I'll make the most mistakes, so I picked a film that doesn't hurt the wallet as much. --- Indeed, I struggled opening the can, cutting the film, keeping it clean, etc. But I know what I'll do differently next time. Anyway, I cut 4 pieces and developed in 4 developers:

(1) D-76 1+1 at 20°C for 8:45 min with Ilford agitation.
(2) D-23 1+1 at 20°C for 10:00 min with Ilford agitation.
(3) PC-TEA 1+50 at 20°C for 8:45 min with Ilford agitation.
(4) Barry Thornton's Two Bath at 20°C. Bath A for 4min with Ilford agitation. Bath B for 4min with 5s initial agitation and 5s every in.

Before anyone tells me to pick just one developer ---- Yes, I know. I picked D-23. I am not trying to pick a developer. I am not asking for a developer recommendation.

However, I would appreciate any thoughts you might have on these results. I have 4 other rolls that I've shot but have not developed. So next time I could vary something else, like the development time.

Some quick notes:

(1) You'll see some blotchiness. I do not see when I look at the negatives. I think it's an issue with my scanning process.
(2) You'll see dust specks and similar. I should not have left the negatives to dry in my closet for 5 days. I should have put them in sleeves and then taken them out later.
(3) The scans make the negatives look thinner than they really are. I had set my DSLR to +2 EV from a previous scan and I didn't realize it'd make the negatives look thin. I don't have the energy to start over and redo all the scans. 🙁
(4) I did not do any color corrections on post. Normally I'd improve the contrast.

Aside from those flaws (live and learn), here's my take-away:

(1)
Honestly, they all look the same to me, and I'm happy with all of them. The third frame shows a slightly denser sky with BTTB. I'm not sure how visible it is on the scan. Developer differences are below my detection threshold.
(2) The grain looks great. I can see it on the sky when I zoom in, and I'm sure I'll notice it in a print, but overall it's great. All the people on Reddit that were dissing on half-frame need to get a life.


(1) D-76 1+1
summary-D76.png

summary-D76.png


(2) D-23 1+1
summary-D23.png

summary-D23.png


(3) PC-TEA 1+50
summary-PC-TEA.png

summary-PC-TEA.png


(4) Barry Thornton's Two Bath
summary-BTTB.png

summary-BTTB.png
 

MattKing

Moderator
Moderator
Joined
Apr 24, 2005
Messages
52,454
Location
Delta, BC Canada
Format
Medium Format
They all need more exposure.
And I would say that they all could use more development.
That is based on the negatives themselves, not the positives.
 

Steve York

Member
Joined
Feb 27, 2011
Messages
94
Format
35mm RF
I've had good experience with this film using Rodinal, semi-stand. Once, however, I underdeveloped two rolls of this film using 1:50 concentration but timed it for 1:25 concentration, and the negs looked very thin, but they scanned nice. Though it's difficult to remove the film from the canisters, the caps don't easily come off, so now I just leave a tongue of film unwound, and I pull it to get the film free. Still, at $4 for 36 exp., it's almost as economical as bulk loading with "cheap" film. A good value from freestyle.
 
OP
OP
dcy

dcy

Member
Joined
May 9, 2025
Messages
156
Location
New Mexico, USA
Format
35mm
They all need more exposure.
And I would say that they all could use more development.
That is based on the negatives themselves, not the positives.

Thanks!

I just took the negatives to my light table and took a picture with my phone. At least now they don't have the +2 EV that I had in my DSLR when I scanned them. Do they still look like they need more exposure?

In the image below each photo appears twice. The first shot was at EI 100 and the second was at EI 80. These were developed in D23, not that that's likely to matter.

negatives.jpg


PS: The second one is out of focus because the negative is bent. I should buy a piece of glass or acrylic to flatten negatives when I put them on the light pad.
 
OP
OP
dcy

dcy

Member
Joined
May 9, 2025
Messages
156
Location
New Mexico, USA
Format
35mm
Do the phone pics look like the actual negatives?

I would say so. But seeing as this is clearly important, I went back and setup my scanning jig again and scanned a few frames again, this time without the +2 EV --- this time the exposure compensation was set to 0.0.

I think these are the most faithful representation of what I see here when I hold the negatives to the light ---- Sorry the images are all crooked; I didn't realize I hadn't aligned the camera correctly.

Small-P6150001.JPG

Small-P6150002.JPG

Small-P6150003.JPG

Small-P6150005.JPG
 
OP
OP
dcy

dcy

Member
Joined
May 9, 2025
Messages
156
Location
New Mexico, USA
Format
35mm
Though it's difficult to remove the film from the canisters, the caps don't easily come off

Oh. Good to know it's not just me. Last time I developed film was a year ago and while I was trying to get the canister to open I kept thinking to myself "I don't remember it being this hard..."
 
OP
OP
dcy

dcy

Member
Joined
May 9, 2025
Messages
156
Location
New Mexico, USA
Format
35mm
Probably unnecessary, but for the sake of completeness, I used my phone to take a picture of 3 of the negative pieces on top of the light pad.

2025-06-15_20-14-48.jpg
 

Craig

Subscriber
Joined
Apr 8, 2004
Messages
2,284
Location
Calgary
Format
Multi Format
Oh. Good to know it's not just me. Last time I developed film was a year ago and while I was trying to get the canister to open I kept thinking to myself "I don't remember it being this hard..."
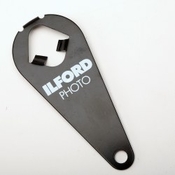
It is much easier with the right tool:
 

Attachments

  • thumb-ilford-35mm-film-cassette-open.jpg
    thumb-ilford-35mm-film-cassette-open.jpg
    9 KB · Views: 1

Craig

Subscriber
Joined
Apr 8, 2004
Messages
2,284
Location
Calgary
Format
Multi Format
I would say underexposed, especially the one the D76 arrow points to in your last frame. Notice how the tree is almost completely blank film? That's underexposure.

The same image in the 2 bath looks overdeveloped (and underexposed), as you can notice how much higher the contrast is between the areas of lots of exposure and the tree. The sky is much denser than the D76 film, it is developed to a higher contrast index.
 
OP
OP
dcy

dcy

Member
Joined
May 9, 2025
Messages
156
Location
New Mexico, USA
Format
35mm
It is much easier with the right tool:

I have one of those. I was using the right tool. I swear the cap just didn't want to come off. No matter how many times I tried, it kept slipping. --- Maybe I just need to practice more --- In the end I ended up just ripping the canister to shreds to get the film out.
 
Last edited:
OP
OP
dcy

dcy

Member
Joined
May 9, 2025
Messages
156
Location
New Mexico, USA
Format
35mm
I would say underexposed, especially the one the D76 arrow points to in your last frame. Notice how the tree is almost completely blank film? That's underexposure.

The same image in the 2 bath looks overdeveloped (and underexposed), as you can notice how much higher the contrast is between the areas of lots of exposure and the tree. The sky is much denser than the D76 film, it is developed to a higher contrast index.

Thank you. This is really helpful.

A while ago Matt gave me a link to a website that shows the difference between overexposed vs overdeveloped, and underexposed vs underdeveloped. Like an idiot, I forgot to bookmark that message and now I can't find that page.

Let's me see if I can paraphrase what you wrote:

(1) Tree completely blank --> Film did not register anything --> Underexposed.

(2) Sky pitch black --> In principle it could be either overexposed or overdeveloped, but we know from the tree that the film is underexposed, so the film must be overdeveloped. --- Also, overdeveloped film looks high contrast.

Did I get that right?

So if the film had been exposed properly but underdeveloped, we would have seen both the tree and the sky being mostly blank (i.e. low contrast). Right?
 

Craig

Subscriber
Joined
Apr 8, 2004
Messages
2,284
Location
Calgary
Format
Multi Format
Point 1, correct.

If the film is correctly exposed, but underdeveloped, it will be low contrast; so less density difference between the areas that received lots of exposure (dark on the negative) and those in shadow ( closer in density to the film base).

Once you get more experience looking at negatives, you can tell what a correct one looks like.

To use a chart from sensitometry, this shows 5 pieces of film exposed identically under a step wedge, the only difference is the developing time. Relative log exposure in the X axis, resulting density is the Y axis. The slope of the straightline portion is the contrast. Ideal aim point for pictorial applications is about 0.58.

The first number on each line is the developing time. The sequence should ring a bell: 4, 5.5, 8, 11, 16.
Second number is a calculated effective speed, or EI.
Third number is the contrast index, or slope of the line.

Notice how the contrast increases with increasing developing time? To determine developing time, you would usually expose a step wedge, develop these 5 pieces of film, plot the curve and then you can interpolate a developing time to give you the contrast you need. In this case, the film was HP5 in replenished Xtol, and I'd be aiming for about a 9 min developing time.

For manufacturer film/developer combos, they have already done this for you; that is where the times on the datasheets come from.
I included this to illustrate the effect that developing time has on contrast, while everything else is the same.
 

Attachments

  • Craig Hp5+.jpeg
    Craig Hp5+.jpeg
    174 KB · Views: 4

MattKing

Moderator
Moderator
Joined
Apr 24, 2005
Messages
52,454
Location
Delta, BC Canada
Format
Medium Format
A while ago Matt gave me a link to a website that shows the difference between overexposed vs overdeveloped, and underexposed vs underdeveloped. Like an idiot, I forgot to bookmark that message and now I can't find that page.

This: https://www.ephotozine.com/article/...xposed film will,producing a washed out print.

So if the film had been exposed properly but underdeveloped, we would have seen both the tree and the sky being mostly blank (i.e. low contrast). Right?

Contrast isn't determined by how much of the film is nearly blank film and how much of the film is really dense film.
Contrast is determined by how tones that are similar can be easily differentiated.

In each case that follows, "shadows" means darker areas of the scene with important details, and "highlights" means bright areas of the scene with important details. With many/most scenes, there are areas that are too dark to be taken into account and there are areas that are too bright to be taken into account in the assessment.

If you give film the right amount of exposure, then there will be density and detail in the shadows, and detail and not too much density in the highlights. Generally speaking, the "best" exposure is at or near the minimum exposure that gives you the detail and density in the shadows.

Assuming proper exposure:
If you develop the film too little, the shadows will only be slightly less dense in the negatives than the midtones will be, and the mid-tones will only be slightly less dense then the highlights will be, and those highlights may be significantly less dense then something near the maximum density of the film.
If you develop the film too much, there will be significant differences in density between the shadows and the midtones, the midtones will be of a density that is too close to the maximum density of the film, and all the highlights will be so close to the maximum density of the film that the details won't be easy to separate.
If you develop the film the right amount, the shadows will only be a good amount less dense in the negatives than the midtones will be, and the midtones will be of moderate density - more than the shadows but less then the highlights - and the highlights will have a range of densities that start near the midtone density and progress consistently up to a maximum density close to but not quite at the maximum possible density of the film - all resulting in nicely defined gradation of tones - aka "tonality".

With this in mind, you can probably see that the best subjects for doing tests have areas of important detail in the near shadows, in the midtones, and in the brighter areas. For the purposes of testing, you can discount the deep, featureless shadows and the bright, almost specular highlights where details don't matter.

When it comes to the aesthetic qualities of your photographs, then you can go on to observe and appreciate the the deep, featureless shadows and the bright, almost specular highlights where details don't matter. You are, however, likely to gain more by playing closer attention to the midtones, because IMHO most photographs either fail or succeed there.
 
Joined
Jan 31, 2020
Messages
1,279
Location
Germany
Format
Multi Format
Are you looking at those scans a much higher resolution than what you posted here? Because no visible difference, except maybe some in terms of speed, was to be expected at this resolution. Differences between developers are subtle. This is rather pointless, except of course for the tips on exposure you're getting.
 
OP
OP
dcy

dcy

Member
Joined
May 9, 2025
Messages
156
Location
New Mexico, USA
Format
35mm
Are you looking at those scans a much higher resolution than what you posted here? Because no visible difference, except maybe some in terms of speed, was to be expected at this resolution. Differences between developers are subtle. This is rather pointless, except of course for the tips on exposure you're getting.

Yeah. I first tried to upload my original scans but they were above the maximum file size.

Looking more carefully, I see that the max file size is 2mb and the files are just 3mb. I could have shrunk them just a little bit and posted something a lot closer to the original.
 
OP
OP
dcy

dcy

Member
Joined
May 9, 2025
Messages
156
Location
New Mexico, USA
Format
35mm
I had one of those and still nearly impossible to get the caps off. I'm serious, not hyperbole.

Yeah. I never had this issue with other brands. Just this one.

I found this YT video that shows an easy way to rip open the canister with your fingers. If you get your fingers into the little space where the film enters the can, you can just rip it open; it's soft plastic. I tried it on a couple of cans I had from before and it works. So that's going to be my backup method.
 
Photrio.com contains affiliate links to products. We may receive a commission for purchases made through these links.
To read our full affiliate disclosure statement please click Here.

PHOTRIO PARTNERS EQUALLY FUNDING OUR COMMUNITY:


Ilford ADOX Freestyle Photographic Stearman Press Weldon Color Lab Blue Moon Camera & Machine
Top Bottom